CFMoto Moto JetMax CF250T-6A. Service Manual - part 3


  Index      Manuals     CFMoto Moto JetMax CF250T-6A. Service Manual


Search            copyright infringement  


Content      ..     1      2      3     


CFMoto Moto JetMax CF250T-6A. Service Manual - part 3


-28-

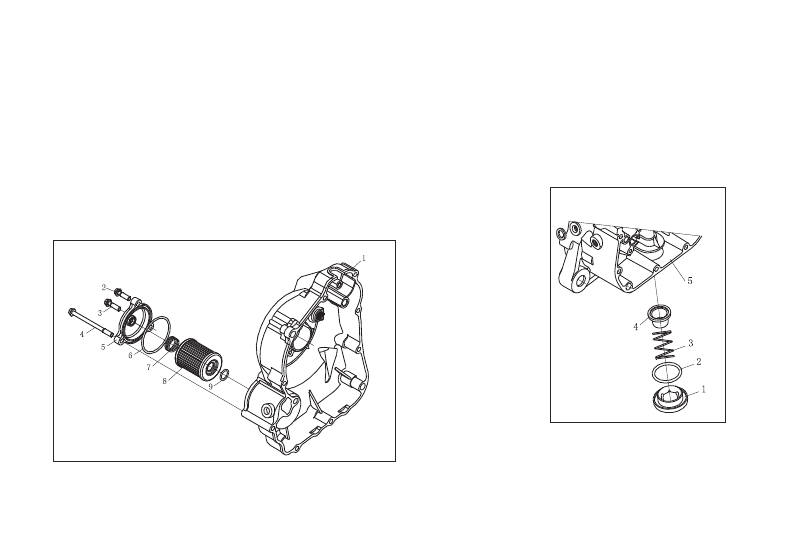
See pic4: At the position of pic 2, loosen the bolt 2, 3, 4, remove filter screen cover 5,


O


ring6

filter


element


compression


spring7

paprt cartridge 8, O ring 9

;

Cleaning the above parts, first install O ring 9 to right side cover 1 location pillar, after


install


paprt


cartridge8


to


right


side


cover1


location


pillar

fit O ring 6 to filter element cover 5, fit filter

 compression spring 7. Install filter element cover 5 in


the


reverse


sequence


of


uninstall

Tighten


bolt2,3,4

.


Picture3 

Picture4 

-------------------------------------------------------------------------------------------------------------------------------------------------------------

-29-

REPLACING CRANKCASE OIL

Crankcase oil drain


position


see


pic5

;

Hold the vehicle side stand, lean left

take


down


p14


dipstick

loosen


pic5


drain bolt and washer

;

Exhaust engine crankcase oil, install drain bolt and washer

;

After exhaust engine crankcase oil, hold vehicle middle stand, make engine in initial state, fill oil

 through dipstick untill the oil level between upper and lower scale limits.

Assemble the dipstick.


picture5

Bolt, oil drain

-------------------------------------------------------------------------------------------------------------------------------------------------------------

-30-

Replace gearbox oil

Recommended gearbox oil type: SAE15W-40/SG
1.Rear transmission gearbox oil position as Chart .
2.When replace the gearbox oil, first to Park scooter with main
 stand while the engine is still warm, remove the 

(

L

)

engine


cover

,


then


remove


the oil filter bolt& gasket and filling bolt & gasket.

3. Clean drain bolt

install


and


tighten


it

.

4. Fill gear oil through the filling hole till it overflows.
5. Install the filling bolt, and tighten it.
6.Engine rear gearbox running period at 2000 replace


the


oil

then


to


replace


every


10,000km

.

NOTICE:

 Park the scooter with main stand and drain the oil while the engine is still warm to ensure

 fast and clean drainage.

-------------------------------------------------------------------------------------------------------------------------------------------------------------

-31-

SPARK PLUG CR9EP

REPLACE SPARK PLUG


1.Remove ENGINE SKID PLATE

(

center

), 

ENGINE SKID PLATE(front), engine SKID plate(rear) and

 foot pedals.

2.


Remove


cap


and


remove


spark


plug


with


wrench

.

3.Check the electrode and the central ceramic point for carbon deposit,
or wearing. If necessary, replace the spark plug. Clean off the
deposit with spark plug cleaning detergent or brush.
4.


Measure


the


spark


plug


gap


with


a


feeler


gauge

Bend


the


side

electrode to adjust the gap to 0.8mm~1.0mm

The


gap


should


not

be too small.
Battery


type


12

V

10

Ah 

Open the seat, remove electric unit waterproof cover, and battery
can be seen. Loosen the screws to take out the battery.

Batter y cover

-------------------------------------------------------------------------------------------------------------------------------------------------------------

-32-

REPLACE FUSE

Rated current capacity of fuse: 30A

The main fuse is located


in


the


glove


box

.

Fuse box is located in the glove box,


Rated current capacity of fuse: 15A,10A

&

7.5A

.

If the fuse is burnt frequently, it indicates short circuit or overload
in the electrical system

you should consult the local dealer.

NOTICE: 

Turn the main switch to “       ” when checking or replacing fuse to avoid short circuit.

Replace the fuse: Remove the used fuse and install a new one.

Only use the fuse of specified current capacity. Using
 incorrect fuse may result in damage to the electrical system,
 or cause fire. Incorrect fuse may also cause illumination
 failure or engine failure during night driving.

Fuse box

Broken line means this part is inside
 cannot be seen

-------------------------------------------------------------------------------------------------------------------------------------------------------------

-33-

TOOLS

The tools are in the compartment below the seat. 
These tools are enough for minor repairing, adjusting or part replacing.
The tool kit includes:
●8

×

10mm


open


end


wrench


●12

×

14mm


open


end


wrench

●13

×

15mm


open


end


wrench


●S=5 internal hex wrench

●Double-end screwdriver


●Double-end screwdriver handle

●16

×

18mm


socket


wrench

-------------------------------------------------------------------------------------------------------------------------------------------------------------

-34-

Vehicle identification number

When scooter is registerd, or apply for driving licence, VIN

 No. and engine serial No.should be submitted. if you need
 to ask for replacement of one component to dealer, above
 VIN No. and engine No. should also be submitted. so it’s
 necessary to have this No.

Location of VIN No. is as shown picture 1 which is inside 
glove box. remove VIN No. and it can be seen. picture 2 
shows location of VIN plate and picture 3 shows location of 
engine No. which is front bottom of engine (LH).

VIN No.

Engine seial No.

-------------------------------------------------------------------------------------------------------------------------------------------------------------

-35-

Parking Instructions

Storage

When motorcycle or scooter needs to be stored for a long time, for example, in winter, several steps

 need to be  taken into consideration to prevent parts becoming defective or damaged. Besides,
 cleaning is also  needed.

1.Replace engine oil and oil filter

;

▲ 

Warning

Under


some


circumstances

fuel


is


flammable


and


explosive

Never


put


vehicle


near


smoke


or


sparkle


in


case


of


fuel


leakage

.

2.Drain all fuel in the fuel tank and remove oil pump starting relay (oil pump will be damaged)

;

3.Remove spark plug and inject about 15ml~20ml of engine oil, then start the engine several times.
 Make sure engine oil is tunneled into all parts, then install the spark plug

;

Note: 

During engine starting, put spark plug into cable cap and grounded to protect ignition system 

being damaged.
4.Remove the battery, place it in places away from freezing or sun-reaching. Charge the battery

 once a month

;

5.Clean and dry the motorcycle. Coat the painting surface with wax and anti-corrosion

;  

6.Apply appropriate tire


pressure

Make front wheel a


little


higher


using


wooden


balancer


when


parking


vehicle

Make


sure


front


and


real


wheel


do


not


touch


the


ground

;

7.Cover the vehicle

 (

do


not


use


plastic


cover


or


any


other


glue


materials

) . 

Put


the


vehicle


into


cool


and


dry


places

.

-------------------------------------------------------------------------------------------------------------------------------------------------------------

-36-

Step to ride the vehicle from the storage room.

1.Clean the vehicle

In


case


of


exceeding


4


months


of


storage

engine


must


be


replaced

;

2.Check the power of the battery. If necessary, charge and then install the battery

;

3.Refuel and install the oil pump starting relay (remark: before installing the starting relay and 
starting the engine, make sure there is adequate fuel or oil pump will be damaged)

4.Check thoroughly of the vehicle

ride


in


low


gear


in


non

-

busy


traffic


situations


to


ensure


safety

.

-------------------------------------------------------------------------------------------------------------------------------------------------------------

-37-

TECHNICAL PAMAMETER

DIMENSIONS

Length

Height

Width

Wheel base

Ground clearance

Weight

Net Weight

CAPACITY

Engine oil

Fuel tank

Max. Load

ENGINE

1590mm

125mm

200kg

2259mm

1366mm

798mm

Crankcase1.5L

Gearbox0.3

L

12.5L

150kg

Type

Single cylinder, liquid cooled,
4 stroke, horizontal

Bore

 ×

Stroke

Com pr essi on rat io

Displacement

SPARK PLUG

Type

Gap

TIRE

Front

Rear

MAIN PERFORMANCE DATA

Max. Power

Max. Torque

Max Speed

125km/h

23N.m/6500r/min

17KW/8000r/min

CR9EP

-------------------------------------------------------------------------------------------------------------------------------------------------------------

-38-

Fuel consumption

Idle speed

TRANSMISSION

Primary ration

Final reduction ratio

ELECTRICAL SYSTEM

Battery

MAN ETOR STARTOR 

LIGHT

Headlight(H/L beam)

Warning light

Pilot light (position)

Taillight

AC Magneto

Fuse

Turning signal(F)

Turning signal®

Instrument

Turning signal indicator

High-low beam indicator

Side stand indicator

Water temperature
 indicator

30A

/

15A

/

10A

/

5A

LED

×2

170

0±100

r

/

min

2.59~0.811

-------------------------------------------------------------------------------------------------------------------------------------------------------------


Content      ..     1      2      3