KTM LC4 400-660LC42003 engine. Manual - part 24


  Index      Manuals     KTM LC4 400-660LC42003 engine. Repair Manual


Search            


Content   ..  22  23  24  25   ..


KTM LC4 400-660LC42003 engine. Manual - part 24


8-48D

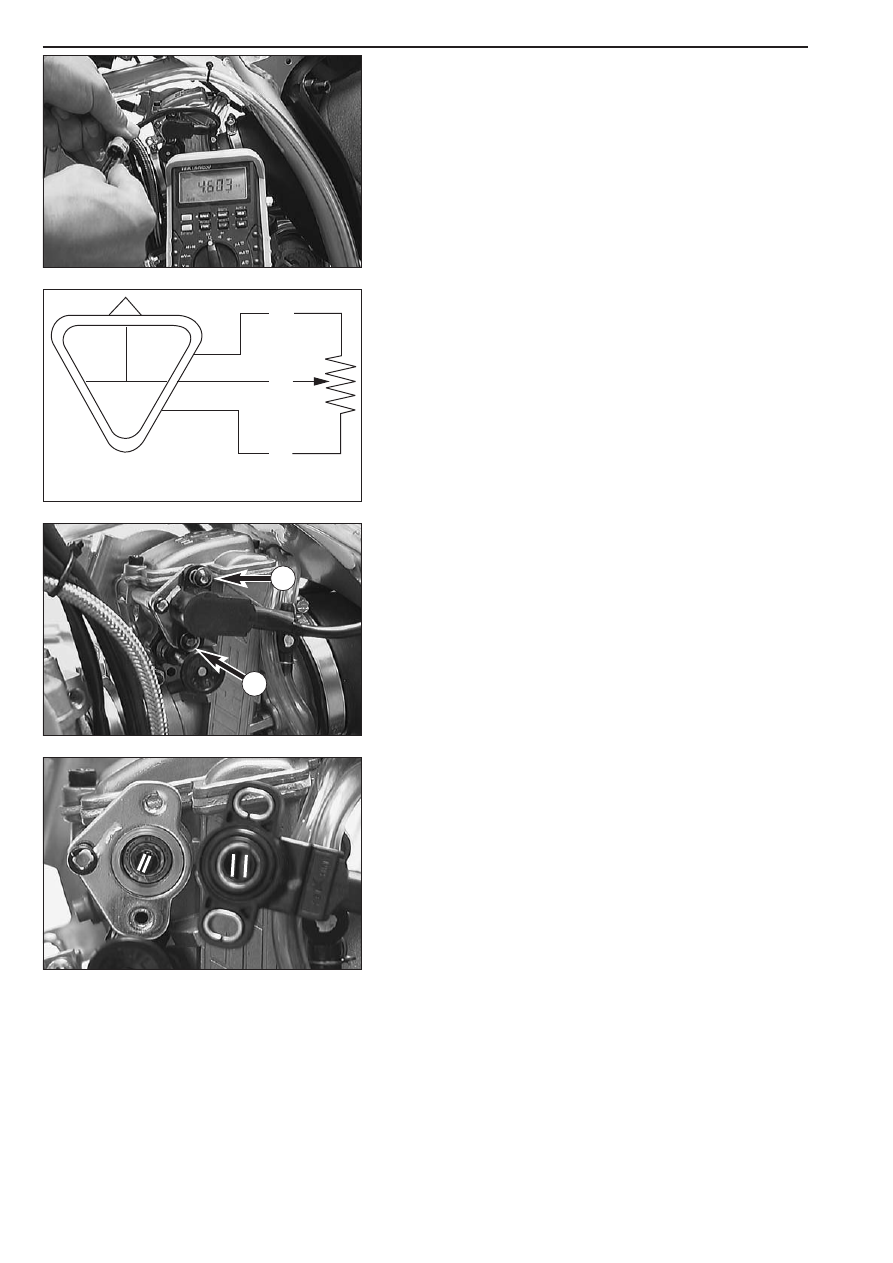
Checking the throttle valve sensor

NOTE: The following measurement must be taken at a component 
temperature of approx. 20°C.

– Open the plug-and-socket connection of the throttle valve sensor.
– Connect a multimeter (measuring range Ω x 1k) to the blue (+) and

the black (-) cable of the throttle valve sensor.

Resistance of throttle valve sensor: 4 - 6 k

– Now, connect the multimeter to the yellow (+) and the black (-)

cable of the throttle valve sensor.

– As you open the throttle grip slowly, the resistance must change

evenly.

Resistance of throttle valve sensor: 0-5 kΩ ±1 k

(while opening the throttle grip)

Dismounting and installing the throttle valve sensor

– Disconnect the plug-and-socket connection of the throttle valve

sensor and remove the bolts 

1

.

– Take the throttle valve sensor off the carburetor.

– When mounting the throttle valve sensor, make sure that the flat

spot at the throttle valve pin engages the groove on the throttle
valve sensor.

– Mount the 2 bolts, however, do not yet tighten them fully and adjust

the position of the throttle valve sensor. Secure the 2 bolts with
Loctite 243.

bl

bl

ge

ge

s

s

bl = blue
ge = yellow
s = black

1

1

8-49D

Repair manual  KTM LC4 

Art.-Nr

.  3.206.006 -E

CARBURETOR – Adjust idling (Keihin FCR-MX 41)

Idling adjustment of the carburetor strongly affects the engine’s starting
behavior. That is, an engine whose idling speed is adjusted correctly will
be easier to start than one whose idling speed has not been adjusted
correctly.
The idle speed is controlled by means of the adjusting wheel 

1

and the

mixture control screw 

2

. The adjusting wheel is used to adjust the basic

setting of the slide. The mixture control screw is used to control the idle
mixture which arrives at the engine by way of the idle system.
Clockwise turning reduces the fuel quantity (lean mixture),
counterclockwise turning increases the fuel quantity (rich mixture).
TO ADJUST IDLING CORRECTLY, PROCEED AS FOLLOWS:
1 Turn in mixture control screw 

2

up to the stop, and turn it back out

to the basic position (see technical date-engine)

2 Warm up the engine
3 Use the adjusting wheel 

1

to set the normal idle speed (1400 -

1500 rpm).

4 Turn mixture control screw 

2

slowly clockwise until idling speed

starts to decrease. Memorize this position, and turn mixture control
screw slowly counterclockwise until the idling speed decreases again.
Adjust the point of the highest idling speed between these two
positions. If, in the course of this procedure, the speed undergoes a
relatively high increase, reduce the idle speed to a normal level and
repeat the procedure specified in 4. Serious competitive racers will
choose a setting approx. 1/4 turn (clockwise) leaner than this ideal
value because their engine will heat up more when used in
competitions.
NOTE: If you fail to obtain a satisfying result by following the
procedure described above, an incorrectly dimensioned idling nozzle
may be the cause. If:
a) the mixture control screw has been screwed in up to the stop
without causing any change in rotational speed, a smaller idling jet
has to be installed;
b) the engine dies when the mixture control screw is still open by 
2 turns, a larger idling jet needs to be selected.
Naturally, in cases of jet changes, you have to start your adjusting
work from the beginning.

5 Then, use the adjusting wheel to set the desired idle speed.
6 In cases of greater changes in the outside temperature and extremely 

different altitudes, the idling speed should be readjusted.

Basic information on carburetor wear
As a result of engine vibrations, the throttle valve, jet needle, and
needle jet are subjected to increased wear. This wear may cause the
carburetor to malfunction (e.g., overly rich mixture). Therefore, these
parts should be replaced after 200 hours.

Adjusting the mixture control screw

Especially on the EXC models, accessing the mixture control screw is
difficult. For this reasons, we have created an appropriate special tool.

Introduce the special tool on the mixture control screw 

2

at the

carburetor bottom. Press the tool slightly upward and turn the adjusting
wheel 

until the tool engages the slot of the mixture control screw.

Now, you can go about adjusting the screw. Marks were provided on
the adjusting wheel, making it easier to keep track of the turns.

Checking the float level (float height)

For this purpose, dismount the carburetor and remove the float
chamber. Hold the carburetor in a slanted position such that the float
will abut the float needle valve but not compress it.
In this position, the edge of the float should be parallel with the
float chamber sealing surface (see illustration).
If the float height does not correspond to the desired value, check the
float needle valve and, if necessary, replace it.

If the float needle valve is o.k., you can adjust the float height by
bending the float lever 

4

.

Mount the float chamber, install the carburetor, and adjust the idle
speed.

2

4

1

3

Repair manual  KTM LC4 

Art.-Nr

.  3.206.006 -E

TROUBLE SHOOTING

TROUBLE SHOOTING (SX, SXC, SC, SMC)  . . . . . . . . . . . . . . . . . . . .9-2

TROUBLE SHOOTING (LC4 COMPETITION)  . . . . . . . . . . . . . . . . . . .9-4

TROUBLE SHOOTING (LC4) . . . . . . . . . . . . . . . . . . . . . . . . . . . . . . .9-7

INDEX

9-1D

9

Repair manual  KTM LC4 

Art.-Nr

.  3.206.006 -E

9-2

TROUBLE

Engine will not start

Engine will not idle

Engine does not rev high

CAUSE

Operating error

Fuel supply interrupted

Flooded engine

Sooty or wet spark plug 

Electrode gap too large

Spark plug connector or spark plug
faulty

If connector oxidates from
generator to ignition coil

Short circuit cable scored in wiring
harness, ignition lock, emergency OFF
switch or short circuit button faulty

The plug connection of the CDI-
unit, the pulse generator or the
ignition coil has oxydized

Water in short emergency OFF switch

Water in carburettor or jets blocked

Carburettor does not fit in properly
at intake flange

Idling jet blocked

Adjusting screws on carburettor
uncorrect adjusted

Ignition system faulty

Carburettor fuel level too high
because float needle valve is dirty
or worn out

Loose carburettor jets

Electronical ignition timing faulty

REMEDY

Switch on ignition, switch on emergency OFF switch, open
fuel tap, tank fuel, do not use choke i.e. the hotstart device.
Pay attention to starting off information (see driving
instructions).

Close fuel tap, loosen fuel hose at carburettor, lead into a
basin and open fuel tap,
– if fuel leaks out, clean carburettor
– if no fuel leaks out, check tank ventilation, i.e. clean fuel

tap

See driving instructions

Clean or replace spark plug

Adjust spark plug electrode gap to 0,6 mm

Dismount spark plug, connect ignition cable, hold to ground
(blank place on engine) and actuate kickstarter, a strong
spark must be produced at the spark plug
– If no spark is produced, loosen spark plug cap from ignition

cable, hold about 5 mm from ground and actuate
kickstarter

– If a spark now occurs, replace spark plug cap
– If no spark is produced, control ignition system

Remove fuel tank, clean connector and treat with contact
spray

Remove fuel tank, draw off blue/black cable from orange
cable of ignition coil and check spark.
– If a spark is produced, seek fault in short circuit current

Remove the seat, the right side cover and the fuel tank.
Clean the plug connection and treat it with contact spray

Remove 2-pole connector located underneath the headlight
mask, treat emergency OFF switch with contact spray

Dismount and clean carburettor

Check if carburettor is fitted in correctly

Dismount carburettor and clean jets

Adjust carburettor

Check ignition system

Dismount carburettor and check if worn out 

Tighten jets

Check ignition system

TROUBLE SHOOTING – SX, SXC, SC, SMC

9-3D

TROUBLE

Engine will not reach full
power

Engine stops or splutters
in carburettor

Engine gets to hot, 

High oil consumption

All switched on lamps
blown out

CAUSE

Fuel supply partically interrupted or
carburettor dirty

Float is not tight, or no axial play

Air filter very dirty

Exhaust leaking or blocked

Valve gap to small

Loss of compression because hand
decompressor has no play

Electronical ignition timing faulty 

Insuffient fuel

Engine takes air out of control

Insufficient cooling liquid

Not enough air stream

Radiators very dirty

Foam formation in cooling system

Bent cooling hose

Thermostat defective

Buckling gearing ventilation hose

Engine oil level too high

Motor oil too thin (viscosity)

Capacitor or voltage regulator
faulty

REMEDY

Clean and check fuel system as well as carburettor

Replace or abrade the float

Clean or replace air filter

Check if exhaust is damaged, replace glas fibre yarn in
exhaust silencer 

Adjust valve gap 

Check setting of the hand decompression cable

Check ignition system

Clean and check fuel system and carburettor

Check intake flange and carburettor if firmly setted

Refill cooling liquid (see maintenace work), check cooling
system for leaks

Drive on briskly

Clean radiators with water jet

Replace cooling liquid, use anti freeze liquid with brand
name

Shorten or replace cooling hose

Dismount and check thermostat (opening temperature 70°
C, 158° F) or replace it

Dislocate i.e. replace non-buckling vetilation hose

Check engine oil level when the engine is warm; correct if necessary

Use thicker engine oil; see chapter „Engine oil“

Remove right side cover and control connections. Check
capacitor and voltage regulator

Repair manual  KTM LC4 

Art.-Nr

.  3.206.006 -E

9-4D

TROUBLE

Engine will not start

Engine will not idle

CAUSE

Operating error

The motorcycle has been out of
operation for a longer period of
time. Therefore the float chamber
is filled with old fuel.

Fuel supply interrupted

Flooded engine

Sooty or wet spark plug 

Electrode gap too large

Spark plug connector or spark plug
faulty

If connector oxidates from
generator to ignition coil

Short circuit cable scored in wiring
harness, ignition lock, emergency
OFF switch faulty

Water in short emergency OFF
switch

Water in carburetor or jets blocked

Carburetor does not fit in properly
at intake flange

Idling jet blocked

Adjusting screws on carburetor
uncorrect adjusted

Spark plug faulty

Ignition system faulty

REMEDY

Switch on ignition, switch on emergency OFF switch, open
fuel tap, tank fuel, do not use choke i.e. the hotstart device.
Pay attention to starting off information (see driving
instructions).

The easily inflammable components of the new fuels
evaporate during longer periods of standstill. When the
motorcycle has been out of operation for more than a week,
it is therefore recommended to drain the old fuel from the
float chamber. The engine will immediately start off when the
float chamber is filled with new fuel.

Close fuel tap, loosen fuel hose at carburetor, lead into a
basin and open fuel tap,
– if fuel leaks out, clean carburetor
– if no fuel leaks out, check tank ventilation, i.e. clean fuel

tap

Fully open the throttle when starting or replace the spark
plug, respectively.

Clean / dry or replace spark plug.

Adjust spark plug electrode gap to 0,7 mm

Dismount spark plug, connect ignition cable, hold to ground
(blank place on engine) and actuate kickstarter, a strong
spark must be produced at the spark plug
– If no spark is created exchange the spark plug.
– If the new spark plug doesn’t produce a spark either,

disconnect the spark plug connector from the ignition
cable, hold it approx. 5 mm from ground and start.

– If a spark now occurs, replace spark plug cap
– If no spark is produced, control ignition system

Remove fuel tank, clean connector and treat with contact
spray

Remove fuel tank, draw off blue/black cable from orange
cable of ignition coil and check spark.
– If a spark is produced, seek fault in short circuit current

Remove 2-pole connector located underneath the headlight
mask, treat emergency OFF switch with contact spray

Dismount and clean carburetor

Check if carburetor is fitted in correctly

Dismount carburetor and clean jets

Adjust carburetor

Exchange the spark plug

Check ignition system

TROUBLE SHOOTING – LC4 COMPETITION

9-5D

TROUBLE

Engine does not rev high

Engine will not reach full
power

Engine gets to hot, 
cooling liquid tmperature
warning lamp lights up

High oil consumption

All lamps that were on
have burned out.

Headlight and parking
light fail.

Flasher lights, brake light,
fan and horn fail.

CAUSE

Carburetor fuel level too high
because 

Float needle is dirty or worn out

Float leaks

The cold starting system is
permanently activated due to a
lack of play in the choke cable.

Carburetor jets have loosened.

Defective electronic ignition timing
device.

Fuel supply partically interrupted or
carburetor dirty

Float is not tight

Air filter very dirty

Valve gap to small

Loss of compression because hand
decompressor has no play

Electronical ignition timing faulty 

Insufficient cooling liquid

Radiators very dirty

Foam formation in cooling system

Bent cooling hose

Thermostat defective

Buckling gearing ventilation hose

Engine oil level too high

Motor oil too thin (viscosity)

Defective voltage regulator.

Blown fuse.

Blown fuse

REMEDY

Dismount carburetor and check if worn out 

Replace float needle

Replace float

Adjust choke cable.

Retighten jets.

Check ignition system

Clean and check fuel system as well as carburetor

Replace the float

Clean or replace air filter

Adjust valve gap 

Check setting of the hand decompression cable

Check ignition system 

Refill cooling liquid (see maintenace work), check cooling
system for leaks

Clean radiators with water jet

Replace cooling liquid, use anti freeze liquid with brand name

Shorten or replace cooling hose

Dismount and check thermostat (opening temperature 70°C,
158°F) or replace it

Dislocate i.e. replace non-buckling ventilation hose

Check engine oil level when the engine is warm; correct if
necessary

Use thicker engine oil; see chapter „Engine oil“

Remove seat, check connections, Check the voltage
regulator

Replace fuse (below the headlight mask).

Replace fuse (below the headlight mask).

Repair manual  KTM LC4 

Art.-Nr

.  3.206.006 -E

9-6D

TROUBLE

The neutral indicator lamp
doesn’t light up when the
motorcycle is put into
neutral.

Discharged battery.

CAUSE

Defective indicator lamp.

Defective idle switch.

Loose connections, defective cable.

The ignition (power consumer) has
been left on.

The generator doesn’t recharge the
battery.

REMEDY

Replace indicator lamp.

Connect the cable to ground. The neutral switch must be
replaced if the indicator lamp lights up.

Check connections and cable.

Recharge the battery according to the relevant instructions.

Remove the seat and check the voltage regulator
connections. Check the voltage regulator and the generator.


Content   ..  22  23  24  25   ..