BMW Motorcycle (R1100RT, R1100RS, R850/1100GS, R850/1100R). Manual - part 38
 

  Index      Manuals     BMW AG Motorcycle (R1100RT, R1100RS, R850/1100GS, R850/1100R). Repair Manual


Search            


Content   ..  36  37  38  39   ..


BMW Motorcycle (R1100RT, R1100RS, R850/1100GS, R850/1100R). Manual - part 38


34.7

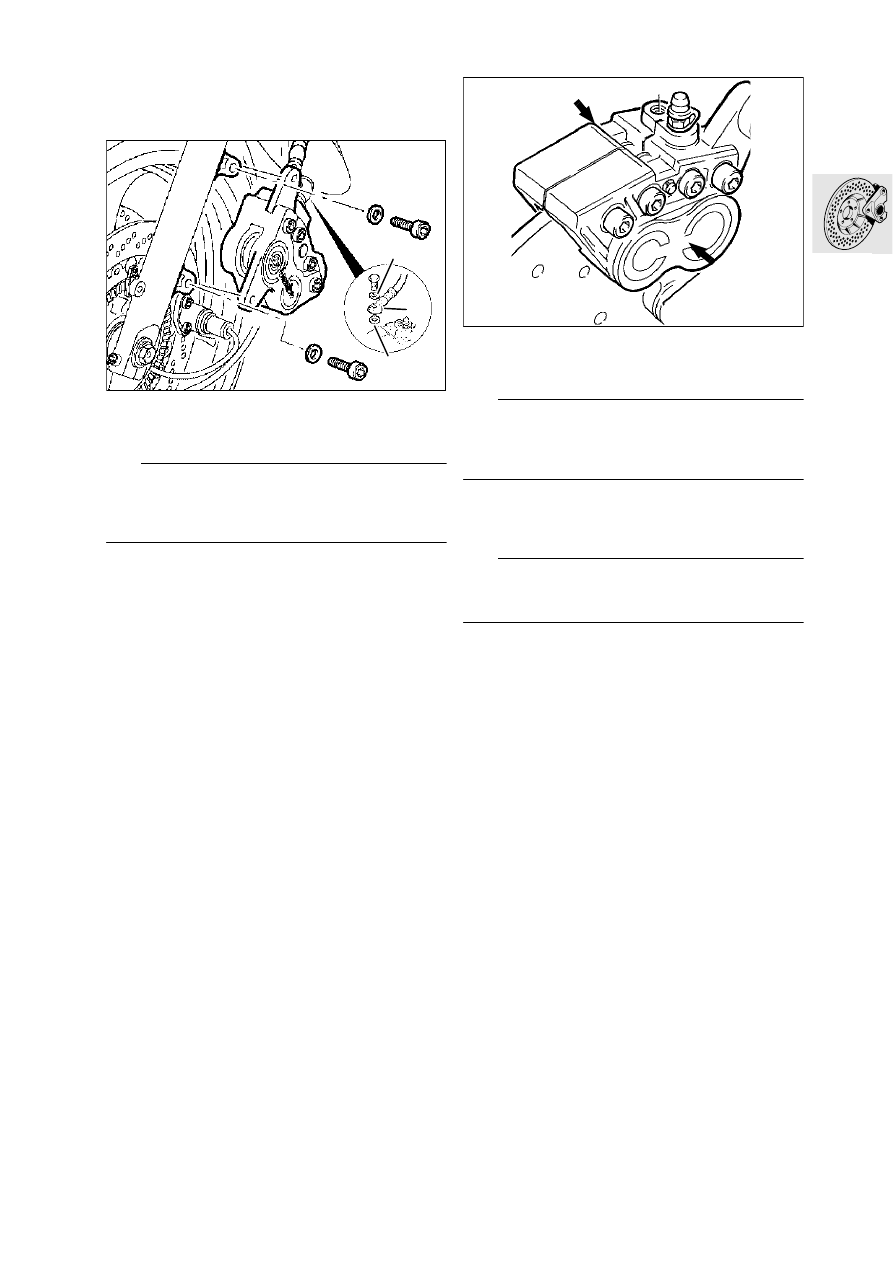
Removing and installing front brake 
caliper

•

Drain fluid from brake system.

•

Detach brake line (1).

e

 Caution:

Do not allow brake fluid to come into contact with 
painted parts of the motorcycle, because brake fluid 
destroys paint.

•

Unscrew the brake caliper.

•

Force back the brake pads/pistons (arrows).

•

Carefully remove the brake calipe.

e

 Caution:

[RS/R/RT] Do not scratch the wheel rim; if neces-
sary, mask off the brake caliper with tape.
Do not damage brake pads.

•

Install in the reverse order of work.

•

Force back the brake pads/pistons.

•

Fill/bleed the brake system. 

e

 Caution:

Use new sealing rings (2).
Do not damage brake pads.

X

 Tightening torque:

Brake caliper to slider tube .......................... 40 Nm
Brake hose to brake caliper ......................... 15 Nm
Bleed screw at brake caliper  ......................... 7 Nm

1

2

2

RS340020

RS340050

34.8

Dismantling and assembling front 
brake caliper

e

 Caution:

The brake caliper halves must not be un-screwed!

Dismantling front brake caliper

•

Remove the brake caliper.

•

Remove keeper from retaining pin (1).

•

Drive out the retaining pin (1) from the wheel side.

•

Pull the brake pads out downwards.

•

Seal the bleed screw.

X

 Tightening torque:

Bleed screw at brake caliper .......................... 7 Nm

•

Hold a cloth over the brake caliper.

•

Carefully press out brake pistons (2), using a 
compressed air gun at the brake line connection.

e


Caution:

Do not allow your fingers to become trapped be-
tween the pistons; risk of injury.

•

Remove the two sealing rings (3,4) from the left/
right brake cylinder bores.

•

Examine the brake caliper pistons for damage.

Assembling front brake caliper

•

Coat new sealing rings (3,4) with brake fluid and 
install. 

•

Coat brake caliper pistons (2) with brake fluid 
and insert.

e

 Caution:

Do not tilt the brake pistons when installing.

•

If necessary, press the pistons fully back with re-
setting tool (7), BMW No. 34 1 500.

•

Install the brake pads.

34 1 500

1

4

3

2

7

RS340070

34.9

Removing and installing rear brake 
caliper

•

Drain fluid from brake system

e

 Caution:

Do not allow brake fluid to come into contact with 
painted parts of the motorcycle, because brake fluid 
destroys paint.

•

Detach the brake line from the brake caliper.

•

[RS/ABS] Detach the sensor line plug (1).

•

Unscrew the brake caliper (2).

•

Install in the reverse order of work.

•

Force back the brake pads/pistons.

•

Fill/bleed the brake system.

•

[R/RT] To bleed, detach the brake caliper and 
position it with the bleed nipple at the highest 
point.

e

 Caution:

Renew sealing rings for brake line. Do not 
damage brake pads.
[ABS] Check sensor gap and adjust if necessary 
with spacing plate.

Sensor gap:.. 0,45...0,55 mm ( 0.0177...0.02165in)

X

 Tightening torque:

Brake caliper to rear wheel drive .................. 40 Nm
Brake line to brake caliper............................ 15 Nm
Bleed screw at brake caliper
[RS] .............................................................. 7 Nm
[GS/R/RT] ..................................................... 4 Nm

RS340120

2

1

RS

34.10

[RS] Dismantling and assembling 
rear brake caliper

Dismantling rear brake caliper

e

 Caution:

The two halves of the brake caliper 
must not be unscrewed!

•

Remove protective cap (1).

•

Drive out retaining pins (2) from the wheel side.

•

Take out clamping pin/curved spring (3/4).

•

Take out brake pads (5).

•

Take out dust protection sleeve (6) at left/right.

•

Seal the bleed screw.

X

 Tightening torque:

Bleed screw at brake caliper .......................... 7 Nm

•

Hold a cloth over the brake caliper.

•

Carefully press our brake piston (7) with a com-
pressed air gun at the connecting bore, working 
at low air pressure.

e

 Caution:

Do not allow your fingers to be trapped by the pis-
ton; risk of injury!

•

Remove sealing ring (8) from the left/right wheel 
brake cylinders.

•

Inspect the brake caliper piston for hairline 
cracks/score-marks/other damage.

RS340133

6

8

7

1

4

3

2

5

34.11

Assembling rear brake caliper

•

Coat new sealing rings (8) with brake fluid and in-
sert them into the left/right brake cylinders.

•

Coat both brake caliper pistons (7) with brake flu-
id and install them.

e

 Caution:

Do not tilt the brake pistons when assembling.

•

Insert the dust protection sleeve (6) at left and 
right

•

Before installing the new brake pads, press the 
pistons back into the brake calipers with the re-
setting device, BMW No. 34 1 500.

34 1 500

RS340150

34.12

[GS/R/RT] Dismantling and re-
assembling rear brake caliper

Dismantling rear brake caliper

•

Remove keeper (1).

•

Drive out retaining pin (2). 

•

Take out brake pads.

•

Seal the bleed screw.

X

 Tightening torque:

Bleed screw at brake caliper .......................... 4 Nm

•

Hold a cloth over the brake caliper piston.

•

Carefully press out brake piston (3) with a com-
pressed air gun applied to the connecting bore; 
work at low air pressure

e

 Caution:

Keep fingers away from gap between pistons and 
side contact face of brake pads; risk of injury.

•

Remove sealing rings (4) from left/right cylinder.

•

Inspect the brake caliper piston for hairline 
cracks/score-marks/other damage.

Assembling rear brake caliper

•

Coat the new sealing rings with brake fluid and 
insert them into the left/right brake caliper cylin-
ders.

•

Coat both brake caliper pistons with brake fluid 
and install them.

e

 Caution:

Do not tilt the brake pistons when installing.

•

Coat the adapter plate locating pins with 
Shell Retinax A and install the adapter plate.

•

Insert locating plate (5) into brake caliper. 

L

 Note:

The installed position must be correct (arrow point-
ing in forward-travel direction).

•

Insert brake pads and secure with retainers.

1

2

3

4

5

GS340140

34.13

Removing and installing front brake 
disc

•

Remove front wheel.

•

Remove/install brake disc.

•

Degrease brake discs before installing.

L

 Note:

Installed direction (arrow) of brake discs must be 
correct.

X

 Tightening torque:

Brake disc to front wheel
[RS/RT]........................................................ 21 Nm
[GS] (clean thread + Loctite 243).................. 24 Nm
[R] Cast alloy front wheel ............................. 21 Nm
(R) Spoked front wheel
(clean thread + Loctite 243).......................... 24 Nm

e

 Caution:

Check/adjust sensor gap; if exchanged, apply a new 
sensor gap measuring mark.

Sensor gap:.. 0.45...0.55 mm (0.0177...0.02165 in)

RS340080

RS

34.14

[RS] Removing and installing rear 
brake disc (attached to rear wheel 
drive)

•

Remove the brake caliper.

•

Remove rear wheel.

•

Heat brake disc retaining screws (1) to 120 °C/
remove.

L

 Note:

Mark the installed position of the brake disc, so that 
vertical runout of the sensor wheel does not change.

•

Install in the reverse order of work.

•

Degrease the brake disc before installing.

e

 Caution:

[ABS] Check sensor gap and adjust with spacing 
plates if necessary.
[ABS] If the brake disc and therefore the sensor 
wheel are renewed, the disc’s vertical runout must 
be determined/marked.

Sensor gap:.. 0.45...0.55 mm (0.0177...0.02165 in)

X

 Tightening torque:

Brake disc to rear wheel drive 
(clean thread + Loctite 273).......................... 21 Nm

[GS/R] Removing and installing rear 
brake disc (attached to rear wheel 
hub)

•

Remove the brake caliper.

•

Remove rear wheel.

•

Remove brake disc.

•

Install in the reverse order of work.

•

Degrease the brake disc before installing.

e

 Caution:

[ABS] Check sensor gap and adjust with spacing 
plates if necessary.

Sensor gap:.. 0.45...0.55 mm (0.0177...0.02165 in)

X

 Tightening torque:

Brake disc to rear wheel drive 
(clean thread + Loctite 243).......................... 21 Nm

j

120

v

273

1

RS340160

v

243

GS340161


Content   ..  36  37  38  39   ..