BMW AG Motorcycle (K1100LT, K1100RS). Manual - part 24
 

  Index      Manuals     BMW AG Motorcycle (K1100LT, K1100RS). Repair Manual


Search            


Content   ..  22  23  24  25   ..


BMW AG Motorcycle (K1100LT, K1100RS). Manual - part 24


23.21

Measuring distances between trans-
mission shafts

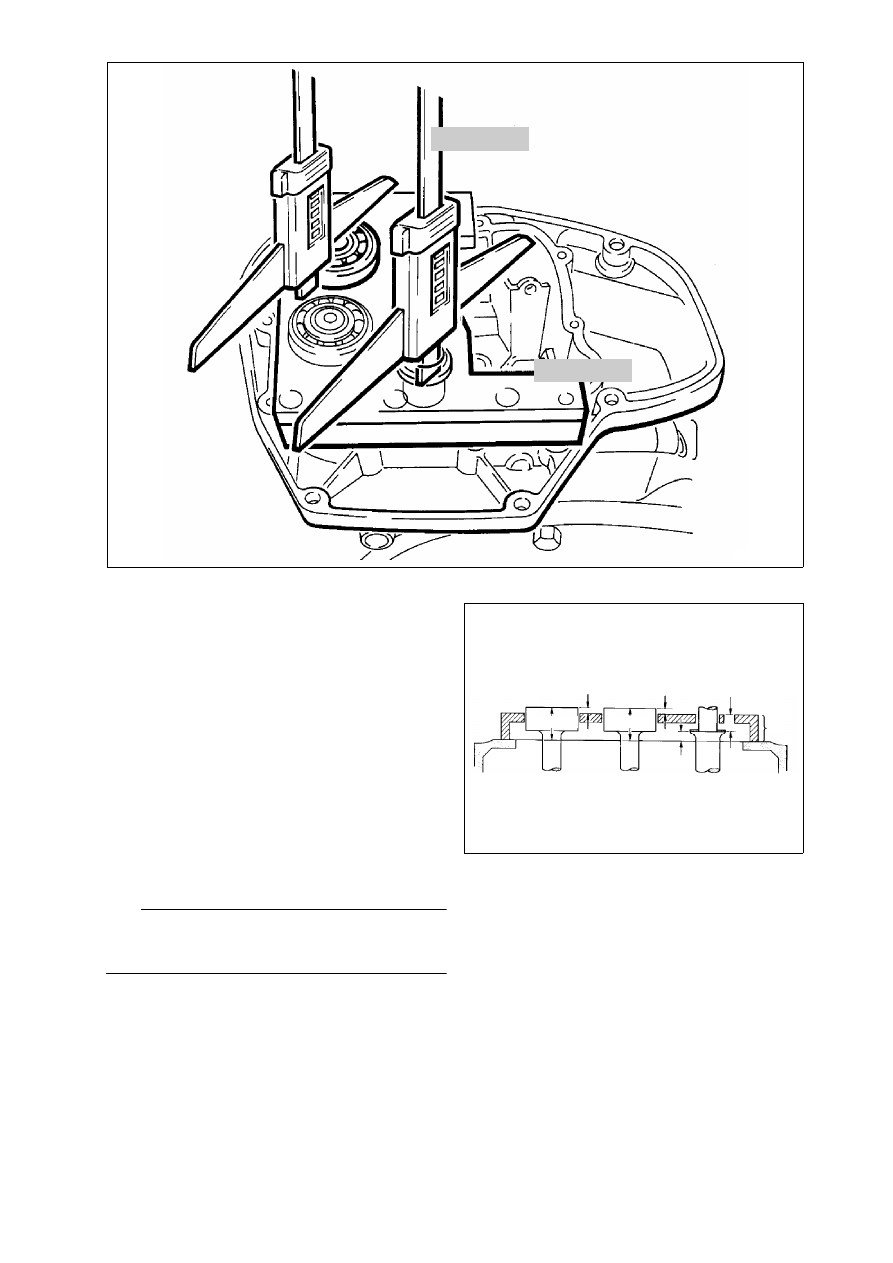
Measuring bearing distance of shafts

•

Place transmission measuring plate, 
BMW No. 23 3 660 (arrow), on the transmission 
housing.

•

Measuring procedure for intermediate shaft and 
output shaft:
Using depth gauge,

 BMW No. 00 2 550

, meas-

ure distance between ball bearing outer race and 
measuring plate. Before measuring, knock the 
corresponding shaft to the base of its seat.

•

For the input shaft, measure through the window 
in the measuring plate the distance from the 
bearing collar to the measuring plate.

•

Enter all measurements in a table, see example.

L

 Note:

The dimension for the input shaft must be entered 
with a negative sign in the table!

Mab = 

Dimension output shaft to measuring plate

Mzw =

Dimension intermediate shaft to measuring 

plate

Man = 

Dimension measuring plate to collar on input
shaft

H       = 

Height of measuring plate

Total measurement:
Gab = Mab   + H
Gzw = Mzw  + H
Gan = H –  Man 

23 3 660

LT230310

00 2 550

LT230320

Mab

Mzw

Man

Gab

Gzw

Gan

H

23.22

Measuring transmission cover

•

Measure from the parting surface of the trans-
mission cover to the base of the bearing seat.

•

Only applies to intermediate shaft and output 
shaft

•

The dimension for the input shaft is measured 
with the taper roller bearing installed.

•

Measure from bearing inner face to parting sur-
face of transmission cover.

•

Enter all measurements in a table, see example.

Dab =

Cover dimension output shaft

Dzw =

Cover dimension intermediate shaft

Dan =

Cover dimension input shaft

Permissible axial clearance:

Intermediate shaft and 
output shaft

... 0.05...0.15 mm (0.00197...0.0059 in)

Permissible preload:

Input shaft

... 0.03...0.08 mm (0.00118...0.00315 in)

00 2 550

LT230330

00 2 550

LT230340

LT230350

Dab

Dzw

Dan

23.23

Measuring distances between transmission shafts

Example

:

•

Remove measuring plate from transmission 
housing.

•

Fit calculated spacer shim rings on the input 
shaft.

•

Heat taper roller bearing to 80°C and fit on input 
shaft.

•

Lightly grease spacer shims for intermediate 
shaft and output shaft and fit flush on ball bear-
ing.

Maße in mm (in)

Output shaft

”ab”

Intermediate 
shaft 

Input shaft

”an”

   H

30.00 

(1.1811 in)

30.00 

(1.1811 in)

30.00 

(1.1811 in)

+ M (

measure!

)

5.45 

(0.2146 in)

6.05 

(0.2382 in)

-20.10 

(-0.7913 in)

= G

35.45 

(1.3957 in)

36.05 

(1.4193 in)

9.90

(0.3897 in)

   D (

measure!

)

36.40 

(1.4331 in)

36.90 

(1.4528 in)

11.30 

(0.4449 in)

- G

-35.45 

(-1.3957 in)

-36.05 

(-1.4193 in)

- 9.90 

(-0.3897 in)

= clearance without spacer shim rings

0.95 

(0.0374 in)

0.85 

(0.0335 in)

1.40 

(0.0551 in)

– specified axial clearance

- 0.05 

(-0.00197 in)

- 0.05 

(-0.00197 in)

+ 0.05 

(+0.00197 in)

= 

thickness of spacer shim ring

0.90 

(0.0354 in)

0.80 

(0.0315 in)

1.45 

(0.0571 in)

23.24

Installing transmission cover

•

Knock out cap (arrow) from the inside using a 
drift.

•

Heat up transmission cover to 100°C.

•

Parting surface at housing and cover must be 
clean and free of grease.

•

Thinly coat one of the two parting surfaces with 
Loctite 574 or with Three-Bond 1209.

•

With the aid of a drift or screwdriver, press back 
locking lever in direction shown by arrow.

•

Carefully fit cover on the housing.

•

Screw in screws holding transmission cover and 
firmly tighten.

X 

Tightening torque:

Retaining screws for cover

............................. 9 Nm

•

Thinly coat end cap (arrow) with 
Three-Bond 1209 and knock in with drift by 
8 mm (0.31496 in).

•

Fit idle lock (ball and spring) in idle position.

•

Screw in screw for idle lock coated with 
Loctite 243.

X 

Tightening torque:

Screw for idle lock

........................................ 13 Nm

LT230420

LT230370

LT230380

23.25

Installing transmission (gearbox)

•

Clutch thrust bearing must be removed.

•

Check centre position of driving disk.

•

Coat spline of input shaft, for example with
Optimoly MP 3.

•

Screw guide pins, BMW No. 23 1 820, in the 
holes with centring sleeve in the intermediate 
flange.

•

Screw in long pin on right-hand side.

•

Fit slip sleeve, BMW No. 23 1 800, on control 
rod.

•

Fit control rod from front through the input shaft.

•

Place transmission on guide pins (oiled) and 
carefully slide into position.

X 

Tightening torque:

Transmission to intermediate flange

............. 16 Nm

•

Install clutch thrust bearing.

23 1 820

LT230470

23 1 820

LT230530

23 1 800

23.26

Installing bearing mount with main 
stand

L

 Note:

Clean threaded holes in transmission and retaining 
bolts (recut thread).

•

Place switch (1) for electric side support on bear-
ing mount, secure lead with cable clip (2).

•

Note spacer sleeves (3).

•

Coat bolts with Loctite 243, screw in and firmly 
tighten.

X 

Tightening torque:

Bearing mount to transmission

..................... 41 Nm

•

Note line arrangement for electrical side stand.

LT230440

LT230490

1

2

3

LT230520

23.27

Installing starter

•

Connect positive and negative leads.

X 

Tightening torque:

Positive lead

.................................................. 5 Nm

Starter to transmission

................................... 9 Nm

•

[ABS I] 

Install support bracket for pressure mod-

ulators.

L

 Note:

Note arrangement of wiring loom.

LT230410

LT230510

23.28

Re-assembling motorcycle

•

Install battery.

•

Intall Motronic control unit.

•

[ABS II] Install ABS unit.

•

Install battery.

•

Intall Motronic control unit.

•

[ABS I] Install control unit.

•

Install swinging arm.

•

Install footrest plates.

•

[ABS I] Install pressure modulators.

•

Install rear wheel drive.

•

Install suspension strut.

•

Install rear wheel.

•

Install brake caliper

L

 Note:

Check ABS sensor gap.

•

Install exhaust system.

•

Install rear mudguard.

•

Install side section of fairing.

X 

Tightening torques:

Fixed swinging arm bearing at geabox ........... 8 Nm
Fixed swinging arm bearing journal, 
free bearing ................................................. 7.5 Nm
Locknut, free bearing ................................... 41 Nm
Bearing pin of fixed bearing ....................... 150 Nm
(clean thread + Loctite 2701)
Bearing pin of loose bearing .......................... 7 Nm
(clean thread + Loctite 2701 applied to entire 
length of thread on loose bearing pin)
Locknut ...................................................... 105 Nm
Suspension strut to frame/rear wheel drive .. 51 Nm
Rear wheel studs ....................................... 105 Nm
Exhaust pipes to cylinder head .................... 21 Nm
Exhaust system to holder/footrest plate ......... 9 Nm
Front silencer (muffler) to gearbox ................ 12 Nm
Footrest plate to gearbox ............................. 15 Nm


Content   ..  22  23  24  25   ..