BMW AG Motorcycle (F 650 GS). Manual - part 20
 

  Index      Manuals     BMW AG Motorcycle (F 650 GS). Repair Manual


Search            


Content   ..  18  19  20  21   ..


BMW AG Motorcycle (F 650 GS). Manual - part 20


17.8

11 51 025 

Installing coolant pump

L

 Note:

Check shaft for score-marks at sealing ring tracks. 
Always replace shaft and sealing rings as a set.

•

Install gearwheel, shaft, pin and washer in engine 
cover.

L

 Note:

Check sealing ring for water pump cover and renew 
if necessary.

•

Lower the engine.

a

....................................................See Group 11

•

Remove oil return line.

•

Attach the left engine housing cover.

•

Connect the oil return line to the engine.

•

Install the engine.

a

....................................................See Group 11

•

Pack the space between the sealing rings with 
Shell Retinax EP2.

•

Drive inner sealing ring onto its seat with drift, 
BMW No. 11 6 540.

•

Drive in outer sealing ring flush with the friction 
face, using the appropriate adapter.

•

Install impeller wheel with locking collet.

•

Renew sealing ring on drain plug.

•

Tighten the hose clips with hose clip pliers, 
BMW No. 17 5 500.

•

Connect the clutch cable to the releaser shaft.

•

Attach the gear shift lever.

•

Install the seat.

–

Add  coolant.

a

......................................................... See below

X 

Tightening torques:

Engine block cover, left ................................ 10 Nm
Water pump cover........................................ 10 Nm
Water pump drain screw .............................  10 Nm
Oil line to cylinder head .................................. 8 Nm
Oil line to engine block ................................. 35 Nm

17 00 035 

Adding coolant

•

Place motorcycle on its centre stand.

•

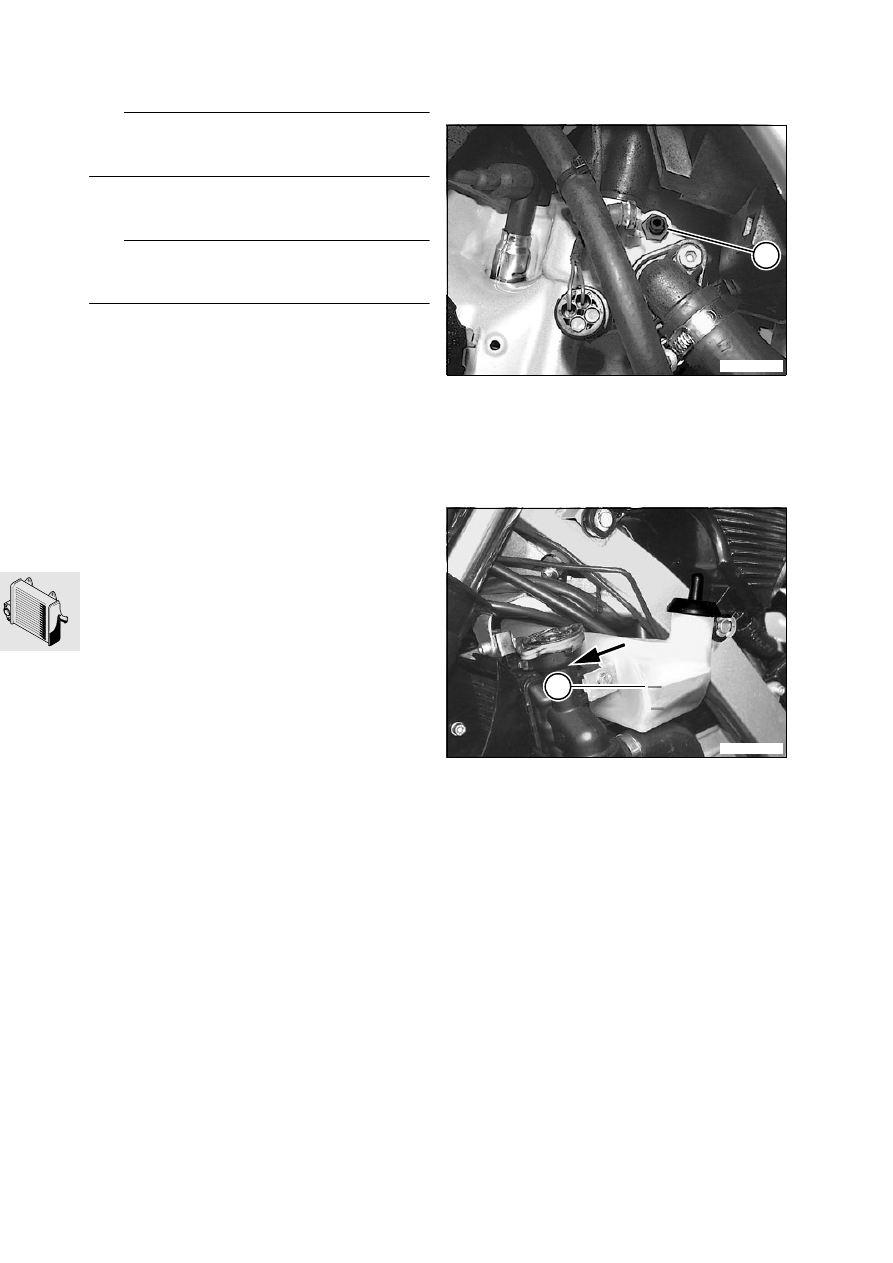
Slacken bleed screw (1) in cylinder head.

•

Connect a hose to the bleed screw.

•

Fill the radiator until coolant escapes at the bleed 
screw; repeatedly squeeze the coolant hoses to 
expel the air.

•

Tighten bleed screw (1).

•

Top up coolant until the level reaches the top of 
the filler neck (arrow).

•

Top up the coolant in the expansion tank until the 
level reaches the MAX mark (A).

Filling capacity
Cooling 
system .......... 1.2 l (2.11 Imp. pints/1.27 US quarts)
In expansion 
tank............ + 0.1 l (1.18 Imp. pints/0.11 US quarts)

E170090

1

E000020

A

17.9

Antifreeze
Use only nitrite-free long-term antifreeze and corro-
sion inhibitor.

Concentration
Antifreeze .........................................................50%
Water ...............................................................50%

•

Run the engine for a short time, then switch it off.

•

Check coolant level and top up if necessary.

•

Installation is the reverse of the removal proce-
dure: pay particular attention to the following.

L

 Note:

Do not reinstall the cover at this stage, if other main-
tenance work has to be performed.

X 

Tightening torques:

Drain plug..................................................... 10 Nm
Expansion tank to radiator.............................. 9 Nm
Bleed screw ................................................. 12 Nm

Removing and installing 
coolant-temperature sensor

–

Drain coolant.

a

....................................................See Group 00

•

Place motorcycle on its centre stand.

•

Remove plug from coolant temperature 
sensor (1).

•

Remove coolant-temperature sensor (2).

•

Installation is the reverse of the removal proce-
dure.

X 

Tightening torque:

Temperature sensor ..................................... 15 Nm

E170050

1

2

17.10

17 00 010 

Checking cooling system 

for leaks

–

Remove left cover.

a

....................................................See Group 46

–

Open the filler cap on the radiator.

•

Connect pump, BMW No. 17 0 500, with adapt-
er and neck, BMW No. 17 5 520, to filler neck.

•

Pressure-test the system; the pressure must re-
main unchanged for at least 5 minutes.

Setting:
Test pressure ............................. 1.5 bar (21.34 psi)

•

Installation is the reverse of the removal proce-
dure.

Removing and installing coolant 
hoses

•

Place motorcycle on its centre stand.

–

Remove left cover.

–

Drain  coolant.

a

.................................................... See Group 00

•

Remove the right-hand coolant hose.

•

Remove the left-hand coolant hose between ra-
diator and frame.

17 12 036 

Replacing coolant hose 

(radiator/water pump)

•

Use pliers, BMW No. 17 5 500, to open the 
clamp securing the coolant hose to the water 
pump.

•

Disconnect the coolant hose from the radiator.

17 12 068 

Replacing coolant hose 

(filler bowl/expansion tank)

•

Disconnect the expansion tank from the radiator 
and pull it to one side.

•

Disconnect the coolant hose from the radiator 
and the expansion tank.

X 

Tightening torque:

Coolant hoses to radiator/engine/frame ......... 2 Nm

17 00 035 

Replacing coolant

See Group 00

17 40 000 

Removing and installing fan

–

Remove right cover.

•

Unclip the MoDiTeC plug from its holder.

•

Disconnect plug for fan.

•

Disengage the clips at top and bottom and re-
move the fan.

•

Installation is the reverse of the removal proce-
dure: pay particular attention to the following.

•

Slide the rubber grommet of the fan onto the pin 
of the expansion tank and then engage the tabs 
of the fan on the radiator.

E170080

17 0 500

17 5 520

17.11

17 11 007 

Removing and installing 

radiator

–

Place motorcycle on its centre stand.

–

Remove left, right and centre covers.

–

Drain  coolant.

a

....................................................See Group 00

•

Disconnect the expansion tank from the radiator, 
pull it to one side and let it dangle from the hose.

–

Remove the fan.

•

Disconnect the coolant hose (arrow) at the frame 
on the left and drain the radiator.

•

Use pliers, BMW No. 17 5 500, to open the 
clamp securing the coolant hose to the water 
pump housing (1).

•

Remove the radiator fasteners.

L

 Note:

Take care not to damage the radiator on the cylinder 
head cover.

•

Raise the radiator and release the pin at the bot-
tom from the lug.

•

Pull the radiator complete with expansion tank to 
the left and remove.

•

Installation is the reverse of the removal proce-
dure.

X 

Tightening torque:

Radiator to main frame ................................... 9 Nm
Coolant hoses to radiator/engine/frame ......... 2 Nm

17 11 045 

Removing and installing 

thermostat

–

Remove left cover.

–

Drain coolant.

a

....................................................See Group 00

•

Do not close the radiator cap.

•

Remove spring clip (2).

•

Use a screwdriver to pry cover (3) out of the 
groove in the housing (arrow).

•

Remove thermostat insert (5) with thermostat (4) 
from the housing.

L

 Note:

Check O-ring for cracks and replace if necessary.

•

Installation is the reverse of the removal proce-
dure.

E170030

1

E170040

2

3

E170100

4

5

17.12

18.1

Contents

Page

18

Technical Data

............................................................................................................................... 3

Removing and installing exhaust system 

........................................................................5

Removing and installing right-hand silencer

 .......................................................................5

Removing and installing left-hand silencer

 ..........................................................................5

Removing and installing exhaust manifold and oxygen sensor

 .................................6

Removing exhaust manifold and oxygen sensor ..................................................................................6
Installing exhaust manifold and oxygen sensor ....................................................................................6

Replacing guard for silencer 

..................................................................................................7

18 Exhaust system

18.2

18.3

18

Technical Data

F 650 GS

Exhaust system

Emission control

3-way catalytic converter

Silencer (muffler)

Reflection/absorption-type silencer


Content   ..  18  19  20  21   ..