Motorcycle BMW R1150RT. Manual - part 58
 

  Index      motorcycles     Motorcycle BMW R1150RT - service repair manual 2001 year


Search            


Content   ..  56  57  58  59   ..


Motorcycle BMW R1150RT. Manual - part 58


32.15

32 73 056 

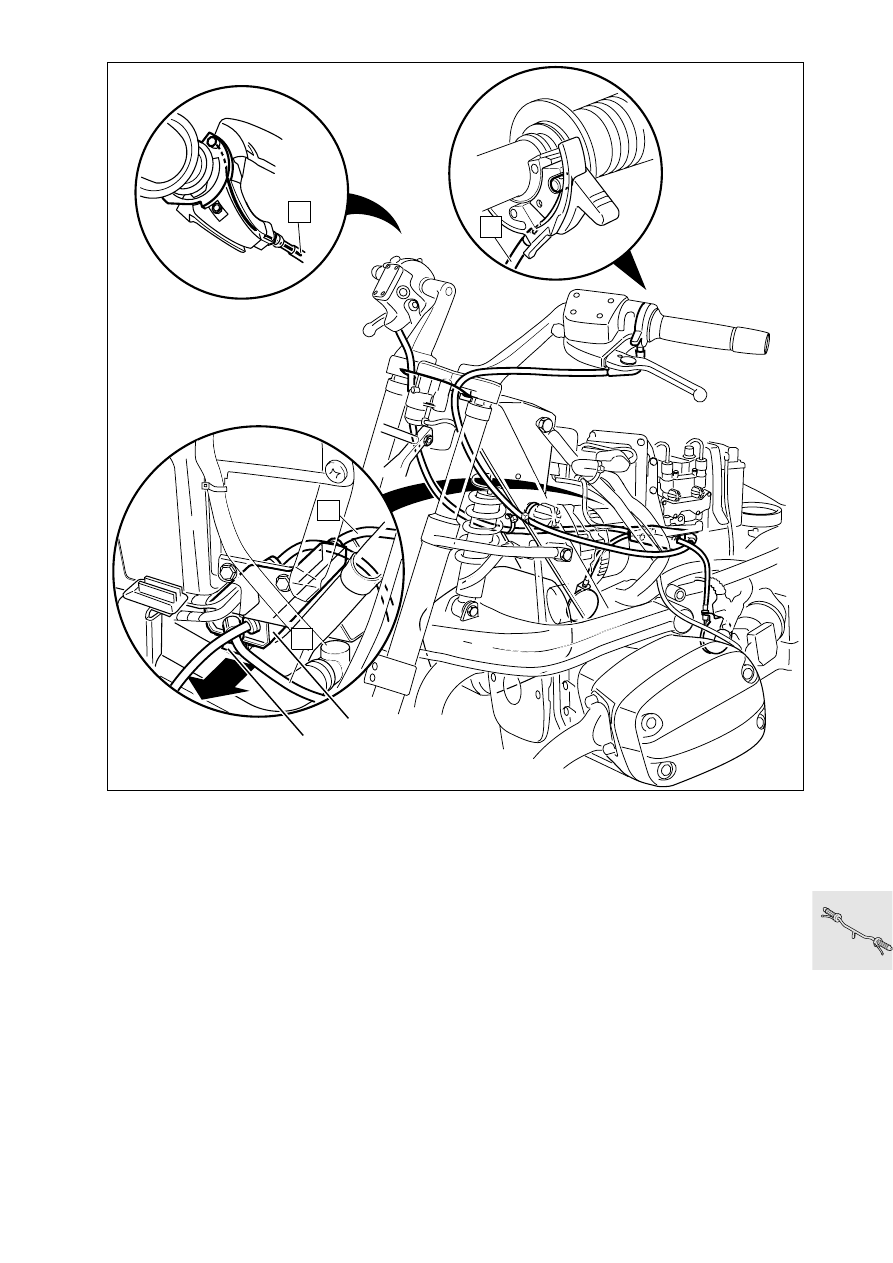
Removing and installing 

Bowden-cable divider, Bowden 
cable for throttle actuation and 
starting-speed increase

•

Remove side panels.

•

Remove fuel tank.

•

Remove actuating cable for starting-speed in-
crease.

•

Disengage cable (A) from grip unit.

•

Remove Bowden-cable shroud from fitting for 
throttle actuation.

•

Release cable (B) and disengage it from grip unit.

•

Disengage throttle cables from right and left 
throttle flap stubs.

•

Remove cable ties securing Bowden cables.

•

Release the plug for the fuel pump from the 
frame.

•

Press down tab (1) and pull cable divider (2) out 
of its retainer in direction indicated by arrow.

•

Installation is the reverse of the removal proce-
dure.

•

Adjust Bowden cables (

a

00.59).

B

A

B

A

R22320050

1

2

32.16

32 73 

Disassembling Bowden-cable 

divider

•

Remove fasteners of Bowden cables at entry to 
Bowden-cable divider.

•

Remove Bowden cable for starting-speed in-
crease (1).

•

Remove retainer (2) and remove roller of Bow-
den-cable divider.

•

Remove Bowden cables.

•

Prior to installation, clean housing of Bowden ca-
ble divider, pulley, and wedge for starting-speed 
increase, and do not grease.

•

Installation is the reverse of the removal proce-
dure.

L

 Note:

The Bowden cable to the right throttle valve (3) is 
shorter than the cable to the left throttle valve (4).

e

 Attention:

Make sure that Bowden cables are free of kinks.
Do not kink the strands of the Bowden cables when 
installing.

•

Adjust Bowden cables (

a

00.59).

R

L

R

L

R

L

R28320050

2

4

3

1

33.1

Contents

Page

33

33 Rear wheel drive

Technical Data

............................................................................................................................... 3

Removing, disassembling, reassembling and installing rear wheel drive 

....5

Removing rear wheel drive 

.........................................................................................................5

Removing and installing taper roller bearing in rear wheel drive 

...............................6

Removing input bevel pinion 

......................................................................................................7

Disassembling input bevel pinion 

............................................................................................8

Removing needle roller bearing for input bevel pinion ..........................................................................9
Installing needle roller bearing for input bevel pinion  ...........................................................................9

Assembling input bevel pinion 

..................................................................................................9

Installing input bevel pinion 

.................................................................................................. 10

Removing and disassembling crown wheel 

...................................................................... 12

Assembling and installing crown wheel 

.............................................................................. 13

Shimming input bevel pinion and crown wheel 

............................................................... 14

Checking tooth contact pattern 

............................................................................................. 15

Checking and adjusting backlash 

......................................................................................... 16

Shimming housing cover 

........................................................................................................... 17

Installing housing cover 

............................................................................................................. 17

Installing splined element 

.......................................................................................................... 17

Installing rear-wheel drive unit 

................................................................................................. 18

Removing and installing spring strut 

............................................................................... 19

Removing and installing rear swinging arm 

................................................................20

Removing rear swinging arm. 

..................................................................................................20

Removing and installing taper roller bearing 

....................................................................21

Removing and installing flexible gaiter 

................................................................................21

Removing drive shaft 

...................................................................................................................21

Checking universal joint for wear  .......................................................................................................21

Installing drive shaft 

.....................................................................................................................21

33.2

Contents

Page

Installing rear swinging arm 

.................................................................................................22


Content   ..  56  57  58  59   ..