Volkswagen Golf / Golf GTI / Jetta. Manual - part 709


  Index      Volkswagen     Volkswagen Golf / Golf GTI / Jetta - service repair manual 1999-2005 year


Search            copyright infringement  


Content   ..  707  708  709  710   ..


Volkswagen Golf / Golf GTI / Jetta. Manual - part 709


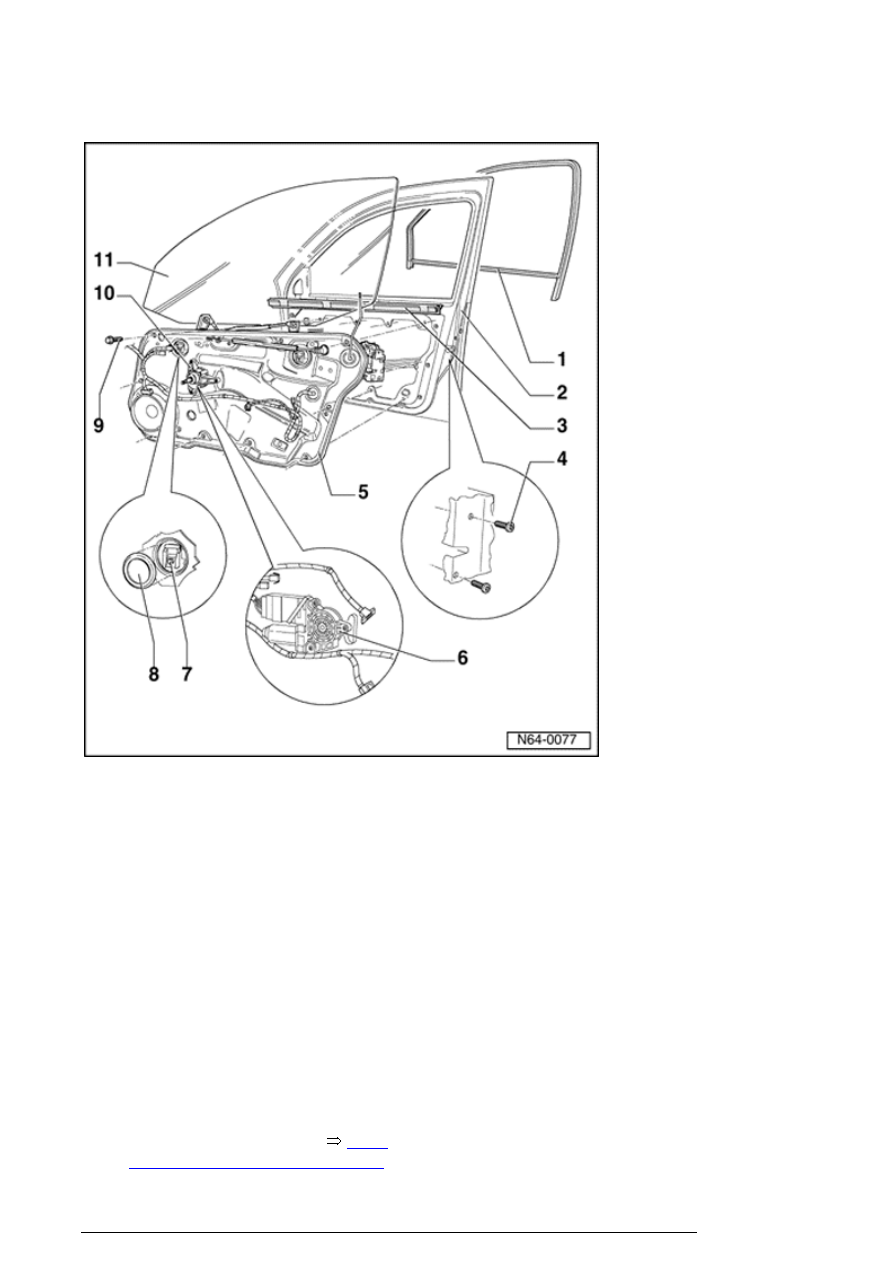
Front door window, assembly overview 

1. Window guide 

¡

Inserted on flange  


2. Door  

3. Inner window recess seal 

¡

Inserted on flange  


4. Bolt 

¡

20 Nm  


5. Carrier assembly 

¡

Removing and installing 


64-2, 

Carrier assembly, removing and 

Door windows

13/2/2005

installing


¡

Window regulator is a component of 
carrier assembly  


6. Motor for window regulator 

¡

Bolted on to carrier assembly from 
front  

¡

Tightening torque for bolts of 
window regulator motor: 3.5 Nm  


7. Bolt 

¡

Plastic clamping brackets 9 Nm  

¡

Aluminum clamping brackets 11 Nm 


8. Cover cap  

9. Bolt 

¡

8 Nm  


10. Crank mechanism for mechanical 

window regulator 

¡

Bolted on to carrier assembly from 
front  


11. Door window 

¡

Removing 


64-2, Front door 

window, removing


¡

Adjusting 


64-2, Door window, 

adjusting


Front door window, removing 

- Removing front door trim 


Repair Manual, Body Interior, Repair Group 70, Door 

trim


Door windows

13/2/2005


- Pry off caps - 1 - 

- Lower door window until securing bolts at clamping 
brackets are accessible. 

Note: 

If work step is not possible due to a malfunction via 
electrical window regulator, window regulator motor can be 
removed to be able to slide window down.   
 

- Loosen bolts - 2 - and press clamping brackets apart. 

- Raise rear door window and remove out of door toward 
front in direction of - arrow - 

Door window, adjusting


- Clamping brackets for door window must be in assembly 

Door windows

13/2/2005


holes. 

- Slide door window - 3 - without additional force into 
clamping brackets and align at rear window guide  - arrow - 

- While doing this, make sure that window sits parallel to 
window guide. 

- Tighten clamping brackets with bolts - 4 - 


Tightening torque: (Plastic clamping brackets - 9 Nm, 
Aluminum clamping brackets - 11 Nm)

Then, perform a function load test.   
 

Disregard items - 1 - and - 2 - in illustration. 

Carrier assembly, removing and installing


Window regulator, door lock and loudspeaker are secured 
to carrier assembly.


Window regulator is part of carrier assembly delivery 
casing.


Carrier assembly can only be removed when door window 
has been removed at clamping brackets of window 
regulator. For this purpose, door window must be driven 
down to height of installation holes in carrier assembly and 
clamping brackets loosened.


If it is not possible to drive down door window by electrical 
window regulator, first exact cause of malfunction must be 

Door windows

13/2/2005


Content   ..  707  708  709  710   ..