SAAB 9000. Manual - part 32
6•2 Clutch
Warning: Hydraulic fluid is
poisonous; thoroughly wash off
spills from bare skin without
delay. Seek immediate medical
advice if any fluid is swallowed or gets into
the eyes. Certain types of hydraulic fluid
are inflammable, and may ignite when
brought into contact with hot components.
When servicing any hydraulic system, it is
safest to assume that the fluid IS
inflammable, and to take precautions
against the risk of fire as though it is petrol
that is being handled. It is hygroscopic (it
can absorb moisture from the air); excess
moisture content lowers the fluid boiling
point to an unacceptable level, resulting in
a loss of hydraulic pressure. Old fluid may
have suffered contamination, and should
not be re-used. When topping-up or
renewing the fluid, always use the
recommended grade, and ensure that it
comes from a freshly-opened sealed
container.
Hydraulic fluid is an effective
paint stripper, and will also
attack many plastics. If
spillage occurs onto painted
bodywork or finings, it should be
washed off immediately, using copious
quantities of fresh water.
Right-hand-drive models
Removal
1 Referring to Chapter 11 for guidance,
remove the sound insulating trim panel from
underneath the facia, on the driver's side.
2 At the connection point between the master
cylinder link rod and the clutch pedal, use a
pair of long-nosed pliers to remove the clip
from the spigot, then pull off the link rod (see
illustration).
3 As a precaution, place a dust sheet under
the clutch pedal in the footwell, to catch any
hydraulic fluid spillage.
4 From the engine bay, seal the flexible
supply hose from the fluid reservoir, using a
proprietary brake hose clamp. Release the
hose clip, and pull the supply hose off the
master cylinder port (see illustration). Be
prepared for a small amount of hydraulic fluid
loss; position a container or a wad of rags
underneath the joint to catch any spillage.
Warning: Observe the warning
given at the beginning of this
Section, regarding the hazards of
handling hydraulic fluid.
5 Slacken the rigid delivery pipe union at the
end of the master cylinder, and disconnect the
pipe; again be prepared for some hydraulic
fluid loss.
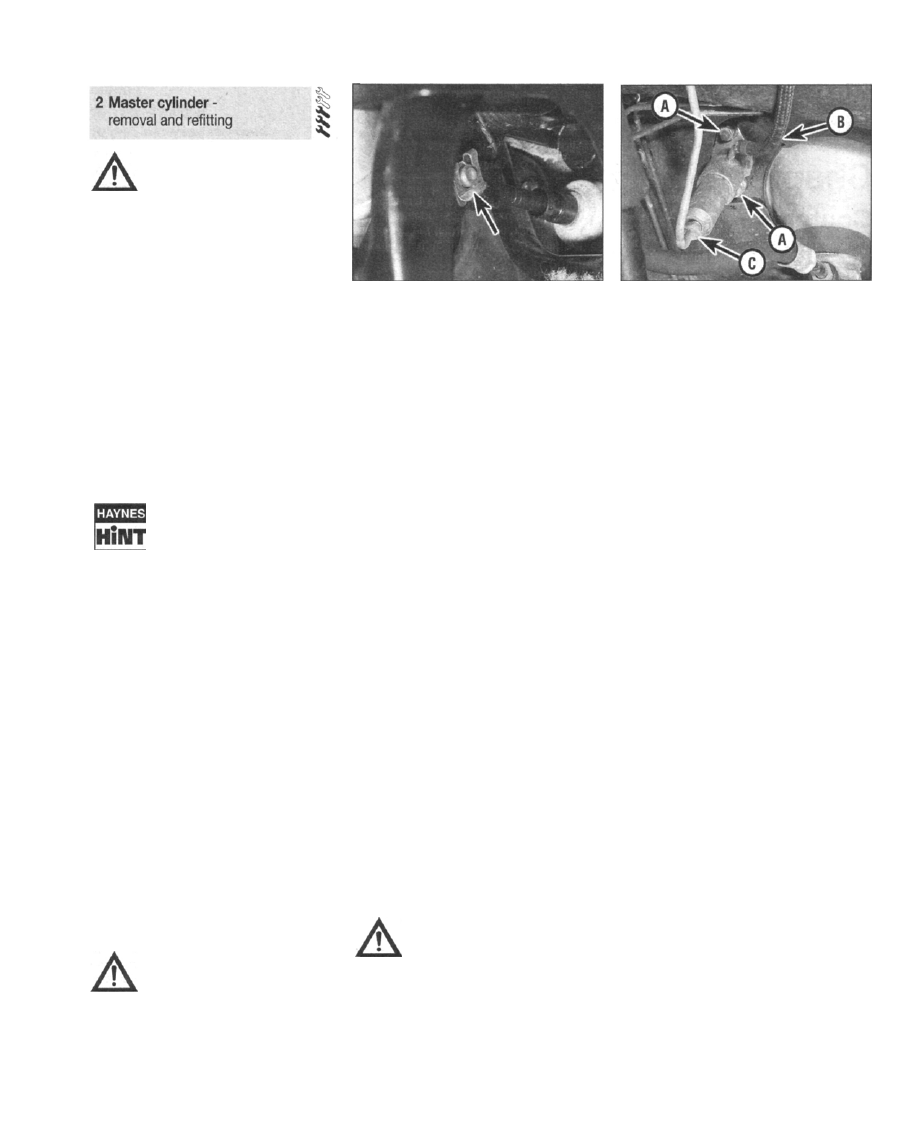
2.2 At the connection point between the
master cylinder link rod and the clutch
pedal, use a pair of long-nosed pliers to
remove the clip from the spigot (arrowed)
6 Remove the two nuts from the retaining
bolts, and lift the master cylinder away from
the bulkhead, guiding the link rod through the
aperture. Recover the gasket and inspect it for
damage; renew it if necessary.
Refitting
7 Refit the master cylinder by following the
removal procedure in reverse. On completion,
refer to Section 6 and bleed the hydraulic
system.
Pre-1994 model year left-hand-
drive models
Removal
8 Referring to Chapter 11 for guidance,
remove the sound insulating trim panel from
underneath the facia, on the driver's side.
9 At the connection point between the master
cylinder link rod and the clutch pedal, use a
pair of long-nosed pliers to remove the clip
from the clevis pin. Withdraw the pin, and pull
off the link rod.
10 As a precaution, place a dust sheet under
the clutch pedal in the footwell, to catch any
hydraulic fluid spillage.
11 From the engine bay, remove the cover
from the compartment behind the false
bulkhead panel. The master cylinder is
mounted vertically, directly above the clutch
pedal, on the upper surface of the bulkhead.
12 Seal the flexible supply hose from the fluid
reservoir, using a proprietary brake hose
clamp. Release the hose clip, and pull the
supply hose off the master cylinder port. Be
prepared for a small amount of hydraulic fluid
loss; position a container or a wad of rags
underneath the joint to catch any spillage.
Warning: Observe the warning
given at the beginning of this
Section, regarding the hazards of
handling hydraulic fluid.
13 Slacken the rigid delivery pipe union at the
end of the master cylinder, and disconnect the
pipe; again be prepared for some hydraulic
fluid loss.
14 Remove the two nuts from the retaining
bolts, and lift the master cylinder up away from
2.4 Clutch master cylinder
A Retaining nuts C Delivery pipe union
B Supply hose
the bulkhead, guiding the link rod through the
aperture. Recover the gasket and inspect it for
damage; renew it if necessary.
Refitting
15 Refit the master cylinder by following the
removal procedure in reverse. On completion,
refer to Section 6 and bleed the hydraulic
system.
Post-1994 model year left-hand-
drive models
General
16 The master cylinder is mounted under the
facia, on the brake/clutch pedal bracket,
rather than in the engine bay. Although the
removal process is no more involved than that
for the pre-1994 model year vehicles, extra
care is needed to avoid spilling hydraulic fluid
inside the car as the supply and delivery hoses
are disconnected.
Removal
17 Referring to Chapter 11 for guidance,
remove the sound insulating trim panel from
underneath the facia, on the driver's side.
18 Remove the clip from the end of the shaft
between the clutch pedal and the master
cylinder link rod. Extract the shaft.
19 Fit a proprietary brake hose clamp to the
supply hose (this is the hose connected to the
uppermost port on the side of the master
cylinder). Expand the clip by hand, and
disconnect the hose from the master cylinder.
Be prepared for the loss of some hydraulic fluid
at this point; position a container underneath
the joint, to catch any spillage and prevent it
from contaminating the footwell carpet.
20 At the lower port on the master cylinder
body, slacken the delivery pipe union and
unplug the pipe; again, be prepared for some
hydraulic fluid leakage - reposition the
container to catch the spillage.
21 Slacken and remove the retaining nuts,
then lift master cylinder off the pedal bracket.
Refitting
22 Refit the master cylinder by following the
removal procedure in reverse. Observe the
specified torque wrench setting when