Nissan Pathfinder. Manual - part 1033


  Index      Nissan     Nissan Pathfinder (2014 year) - Service and Repair Manual


Search            


Content   ..  1031  1032  1033  1034   ..


Nissan Pathfinder. Manual - part 1033


SE-130

< UNIT DISASSEMBLY AND ASSEMBLY >

SECOND ROW SEAT

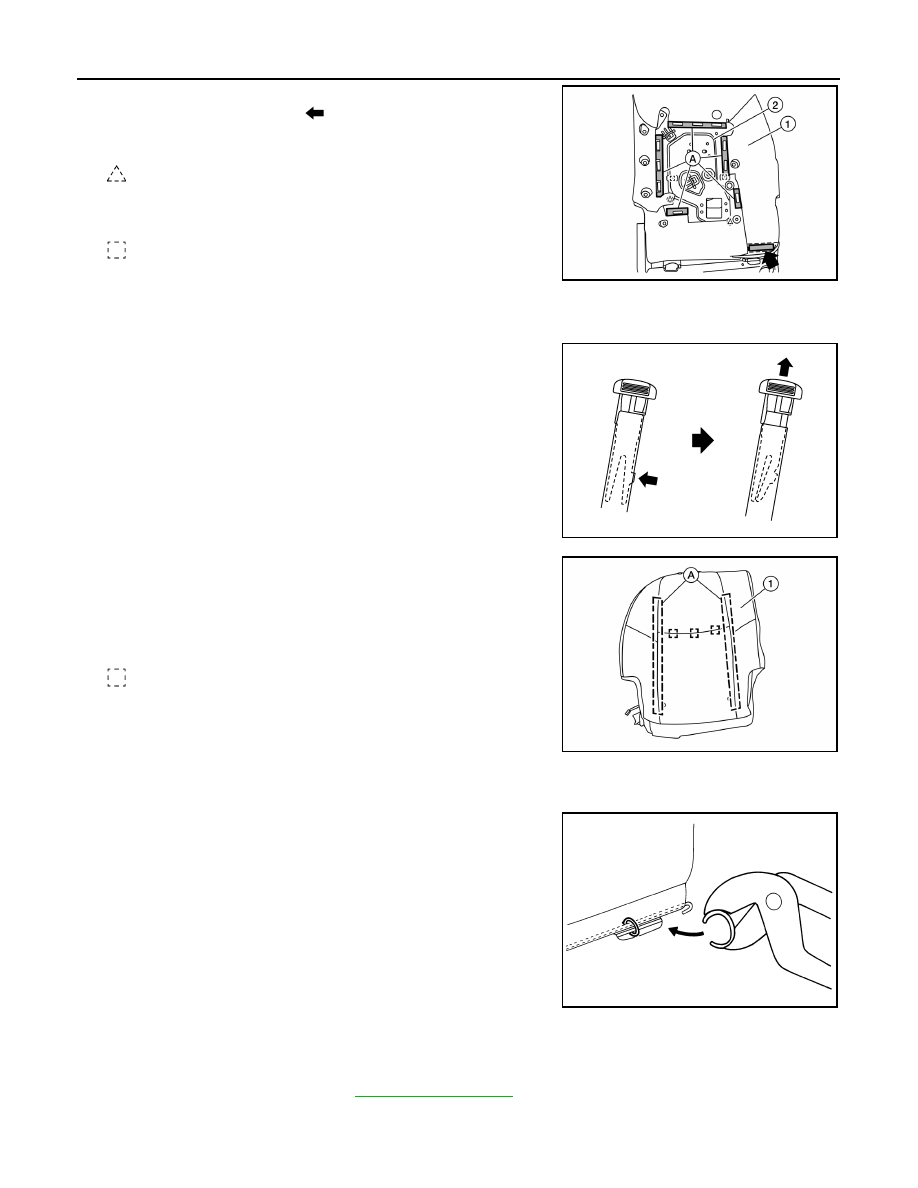
14. Remove the seatback pad and seatback trim (1).
a. Release the J-clip retainer (

) at the rear lower edge of seat-

back.

b. Remove two clips that retain seatback trim in place.

: Clip

c.

Remove two hog rings that retain seatback pad in place.

NOTE:

Remove all pieces of hog rings and discard them.

: Hog ring

d. Release retainer strips (A) from the seat frame assembly (2).
e. Release clips that retain trim behind EZ entry finisher.
f.

Remove the seatback pad and seatback trim as an assembly from the seat frame assembly.

15. Reach up behind the seatback pad, release the headrest holder

locks as shown and remove the headrest holders. 

CAUTION:

Before removing/installing headrest holder, check its orien-

tation (front/rear and right/left).

16. Separate the seatback trim (1) from the seatback pad.
a. Pull seatback trim upward in front to release hook fasteners (A).
b. Remove hog rings and separate the seatback trim from the seat-

back pad.

NOTE:

Remove all pieces of hog rings and discard them.

: Hog ring

c.

Route the seatback heater harness (if equipped) through the

opening in the seatback trim.

ASSEMBLY

Assembly is in the reverse order of disassembly. 

• Install new hog rings on the seatback trim in original positions. 

• Use only one hog ring in each designated location.

• Make sure hog rings are correctly fastened around both the seat-

back trim and seatback pad wires.

• Use NISSAN standard hog rings and tools to assemble.

• Make sure hook fastener is pressed into place after seatback trim

is assembled.

• Smooth out all wrinkles during assembled.

RH SEAT : Seat Cushion

INFOID:0000000009727796

DISASSEMBLY

1. Remove RH seat cushion. Refer to 

SE-97, "Seat Cushion"

.

2. Remove support strut from RH seat cushion.

ALJIA0870ZZ

JMJIA4073ZZ

ALJIA0872ZZ

PIIB3356J

SECOND ROW SEAT

SE-131

< UNIT DISASSEMBLY AND ASSEMBLY >

C

D

E

F

G

H

I

K

L

M

A

B

SE

N

O

P

3. Remove the seat cushion pad and seat cushion trim (1).
a. Unzip the back trim cover and release the J-clip retainer (

).

b. Remove the seat cushion pad and seat cushion trim as an

assembly from the seat cushion frame (2).

4. Separate the seat cushion trim (1) from the seat cushion pad.
a. Remove hog rings and separate the seat cushion trim from the

seat cushion pad.

NOTE:

Remove all pieces of hog rings and discard them.

: Hog ring

: Front

b. Route the seat cushion heater harness (if equipped) through the

opening in the seat cushion trim.

ASSEMBLY

Assembly is in the reverse order of disassembly. 

• Install new hog rings on the seat cushion trim in original positions. 

• Use only one hog ring in each designated location.

• Make sure hog rings are correctly fastened around both the seat

cushion trim and seat cushion pad wires.

• Use NISSAN standard hog rings and tools to assemble.

ALJIA0875ZZ

ALJIA0873ZZ

PIIB3356J

SE-132

< UNIT DISASSEMBLY AND ASSEMBLY >

THIRD ROW SEAT

THIRD ROW SEAT

Exploded View

INFOID:0000000009727797

Seatback

INFOID:0000000009727798

SEATBACK

Disassembly

1. Remove the third row seat. Refer to 

SE-107, "Removal and Installation"

.

2. Release the pawls and remove the tether anchor finisher.
3. Remove the screw and the seatback cargo hook.
4. Press both headrest holder lock buttons in and lift headrest up, and remove.

1.

Seatback release lever and cable 
(LH/RH)

2.

Seatback release lever finisher (LH/
RH)

3.

Headrest (LH) 

4.

Headrest (RH) 

5.

Headrest holders (RH) 

6.

Headrest holders (LH) 

7.

Seatback trim (RH)

8.

Seatback pad (RH)

9.

Seatback trim (LH)

10. Seatback pad (LH)

11. Seat cushion trim

12. Seat cushion pad

13. Seat belt buckle (RH)

14. Seat hinge finisher (center)

15. Seat bolt finisher

16. Seat belt buckle (LH)

17. Seat frame assembly

18. Seat hinge finisher (LH)

19. Seatback board (LH)

20. Seatback pull strap (LH)

21. Seatback cargo hook

22. Tether anchor finisher

23. Seatback pull strap (RH)

24. Seatback board (RH)

25. Seatback hinge finisher (RH)

AWJIA1017ZZ

THIRD ROW SEAT

SE-133

< UNIT DISASSEMBLY AND ASSEMBLY >

C

D

E

F

G

H

I

K

L

M

A

B

SE

N

O

P

5. Remove the seatback board.

NOTE:

Backside of seatback board shown for clarity.

a. Release the hook fastener (A) along the upper edge.
b. Release three clips (B) that retain the seatback board to the seat

frame assembly.

c. Release the remaining clips in the order shown.

6. Remove the seatback trim and seatback pad.
a. Release retainer strip (A) from the seat frame assembly slots (B)

on the top edge of the seat frame assembly.

b. Repeat at the lower and LH/RH edges.

c. Reach up behind the seatback pad, release the headrest holder

locks as shown and remove the headrest holders.

CAUTION:

Before removing/installing headrest holder, check its orien-

tation (front/rear and right/left). 

d. Remove the seatback pad and seatback trim as an assembly from the seat frame assembly.
7. Separate the seatback trim from the seatback pad.
a. Pull seatback trim upward in front to release hook fasteners (A).
b. Remove hog rings and separate the seatback trim from the seat-

back pad.

NOTE:

Remove all pieces of hog rings and discard them.

: Hog ring

8. Remove the screw and the seatback pull strap.

ALJIA0840ZZ

ALJIA0841ZZ

JMJIA4073ZZ

ALJIA0836ZZ


Content   ..  1031  1032  1033  1034   ..