Mazda CX-9 Grand Touring. Manual - part 371


  Index      Mazda     Mazda CX-9 Grand Touring - service repair manual 2008 year


Search            


Content   ..  369  370  371  372   ..


Mazda CX-9 Grand Touring. Manual - part 371


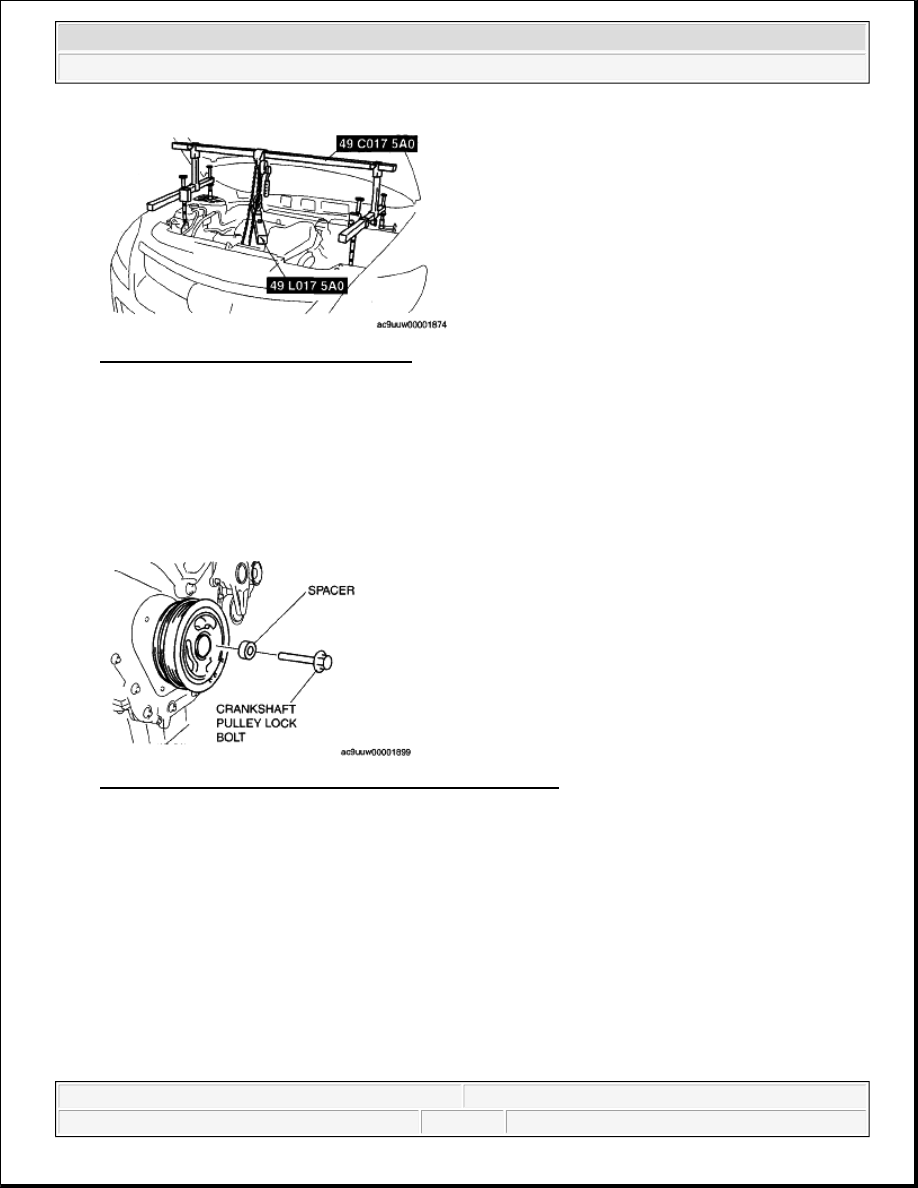
Fig. 112: Identifying No.3 Engine Mount 
Courtesy of MAZDA MOTORS CORP. 

CRANKSHAFT PULLEY REMOVAL NOTE 

1. Slightly loosen the SST (49 C017 5A0) support and tilt the engine to the lower side slightly.  

2. Remove the washer from the crankshaft pulley lock bolt, install a suitable spacer (thickness: approx. 14 

mm {0.55 in} , diameter: approx. 30 mm {1.18 in}) , (similar to front shock absorber lower nut) to the 
crankshaft pulley lock bolt, and install the crankshaft pulley lock bolt to the crankshaft. 

Fig. 113: Identifying Crankshaft Pulley Lock Bolt & Spacer 
Courtesy of MAZDA MOTORS CORP. 

3. Remove the crankshaft pulley using the SST.  

4. Remove the crankshaft pulley lock bolt and spacer. 


2008 Mazda CX-9 Grand Touring 

2008 ENGINE Mechanical (MZI-3.7) - Mazda CX-9


Microsoft 


Sunday, November 15, 2009 10:01:57 AM

Page 71 

© 2005 Mitchell Repair Information Company, LLC. 

Fig. 114: Removing Crankshaft Pulley With SST 
Courtesy of MAZDA MOTORS CORP. 

FRONT OIL SEAL REMOVAL NOTE 

1. Remove the front oil seal using a flathead screwdriver as shown. 

Fig. 115: Identifying Front Oil Seal & RAG 
Courtesy of MAZDA MOTORS CORP. 

FRONT OIL SEAL INSTALLATION NOTE 

1. Push the front oil seal slightly in by hand.  

2. Tap the front oil seal in evenly using the SST and a hammer. 

Substitution SST  

49G028 203 

Outer diameter: 58-70 mm {2.3-2.7 in} 

Inner diameter: 56-58 mm {2.3-2.2 in}

NOTE:

Apply clean engine oil to the front oil seal bore in the engine front cover. 


2008 Mazda CX-9 Grand Touring 

2008 ENGINE Mechanical (MZI-3.7) - Mazda CX-9


Microsoft 


Sunday, November 15, 2009 10:01:57 AM

Page 72 

© 2005 Mitchell Repair Information Company, LLC. 

Tube with board thickness 2 mm {0.079 in} or more

Fig. 116: Identifying Front Oil Seal With SST 
Courtesy of MAZDA MOTORS CORP. 

CRANKSHAFT PULLEY INSTALLATION NOTE 

1. Install the crankshaft pulley, washer, and SST to the crankshaft. 

Fig. 117: Identifying Crankshaft Pulley, Washer & SST 
Courtesy of MAZDA MOTORS CORP. 

2. Tighten the SST nut and install the crankshaft pulley. 

NOTE:

Lubricate the contact surface (exterior area of inner diameter) of the front 
oil seal with clean engine oil.  


2008 Mazda CX-9 Grand Touring 

2008 ENGINE Mechanical (MZI-3.7) - Mazda CX-9


Microsoft 


Sunday, November 15, 2009 10:01:57 AM

Page 73 

© 2005 Mitchell Repair Information Company, LLC. 

Fig. 118: Installing Crankshaft Pulley 
Courtesy of MAZDA MOTORS CORP. 

NO.3 ENGINE MOUNT INSTALLATION NOTE 

1. Using the SST (49 C017 5A0) , tilt up the engine until it is vertical.  

2. Tighten the bolts on the No.1 engine mount bracket in the order of A, B. 

Fig. 119: Identifying No.1 Engine Mount Bracket 
Courtesy of MAZDA MOTORS CORP. 

3. Tighten the No.1 engine mount bolt C at the specified torque. 

No.1 engine mount through-bolt tightening torque 93.1-116.6 N.m {9.50-11.8 kgf.m, 68.7-85.9 ft.lbf}


2008 Mazda CX-9 Grand Touring 

2008 ENGINE Mechanical (MZI-3.7) - Mazda CX-9


Microsoft 


Sunday, November 15, 2009 10:01:57 AM

Page 74 

© 2005 Mitchell Repair Information Company, LLC. 


Content   ..  369  370  371  372   ..