Freelander 1. Manual - part 214


  Index      Land Rover     Freelander 1 - service manual 2002 year


Search            


Content   ..  212  213  214  215   ..


Freelander 1. Manual - part 214


INTERIOR TRIM COMPONENTS

REPAIRS

76-3-7

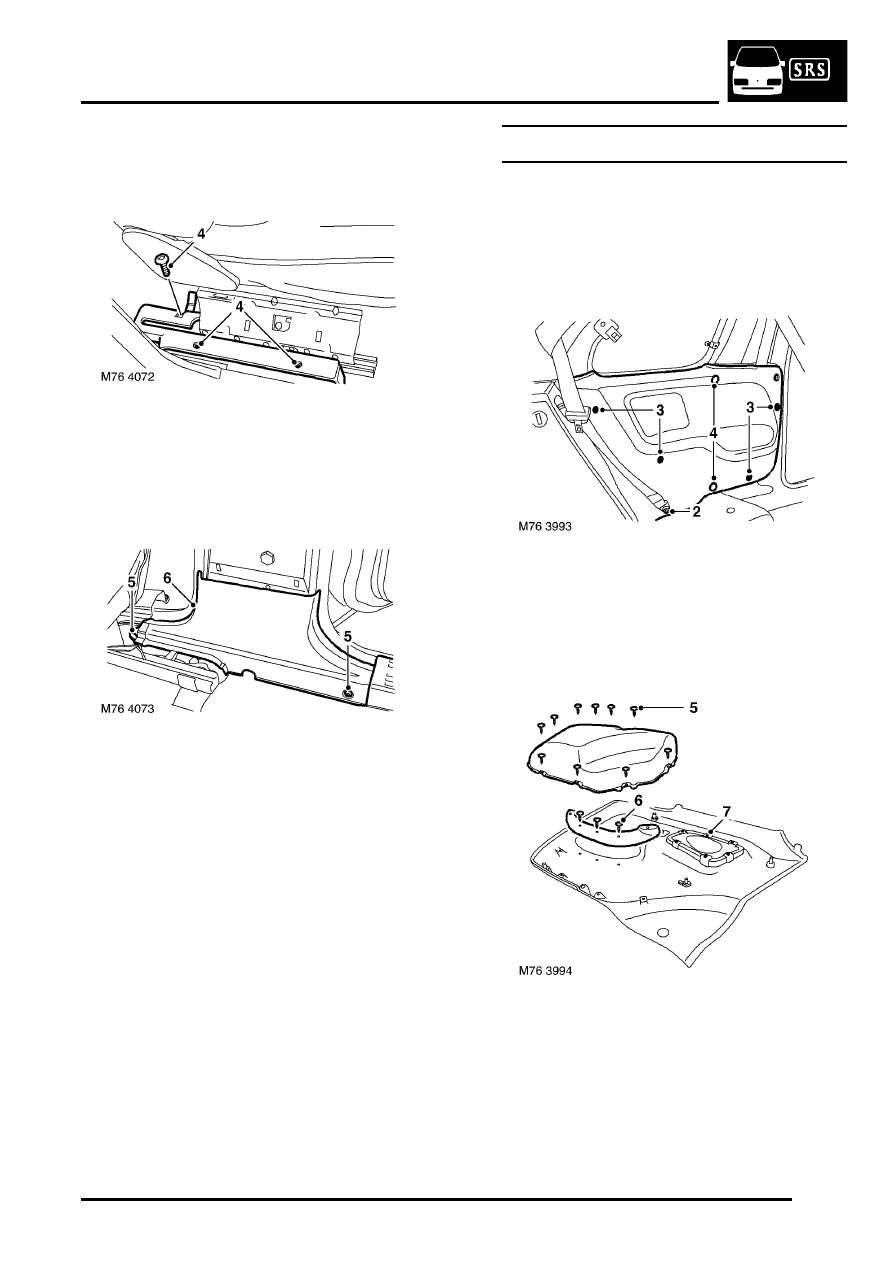
4. Remove 3 Torx screws from top of seat base 

finisher.

5. Remove scrivet and Torx screw from 'B/C' post 

lower finisher.

6. Release and remove 'B/C' post lower finisher 

from seat base finisher.

Refit

1. Locate 'B/C' post lower finisher under seat base 

finisher and rear carpet retainer.

2. Fit scrivet and Torx screw to 'B/C' post lower 

finisher.

3. Fit Torx screws to seat base finisher.
4. Align and secure 'B/C' post upper finisher.
5. Fit front seat cushion side finisher.


 + 

 SEATS, REPAIRS, Finisher - 

cushion side - front seat.

6. Fit carpet retainer and secure with Torx screws 

and scrivet.

Trim casing - body side - rear - LH

$% 76.13.57

Remove

1. Remove rear seat.


 + 

 SEATS, REPAIRS, Rear seat - RH.

2. Remove Torx bolt securing rear seat belt lower 

fixing to body and position seat belt aside.

3. Remove 4 Torx bolts securing trim casing to 

body.

4. Release 2 trim clips and remove trim casing.

5. Noting the position of the 3 long screws, 

remove 10 Torx screws and remove pocket 
from trim casing.

6. Remove 3 screws securing pocket finisher to 

trim casing and remove finisher.

7. Release 6 tags and remove speaker grille.

INTERIOR TRIM COMPONENTS

76-3-8

REPAIRS

Refit

1. Position speaker grille on replacement casing 

and secure tags.

2. Fit pocket finisher and secure with screws.
3. Fit pocket and secure with Torx screws.
4. Fit trim clips to trim casing.
5. Fit trim casing to body and secure with clips and 

Torx screws.

6. Fit seat belt lower fixing and tighten Torx bolt to 

50 Nm (37 lbf.ft).

7. Fit rear seat.


 + 

 SEATS, REPAIRS, Rear seat - RH.

Console - front

$% 76.25.01

Remove

1. Remove rear console.


 + 

 INTERIOR TRIM COMPONENTS, 

REPAIRS, Console - rear.

2. Remove radio.


 + 

 IN CAR ENTERTAINMENT, 

REPAIRS, Radio.

3. Remove gear lever knob.
4. Manual gearbox only: Remove descent 

selector.

5. Remove 3 heater control knobs.
6. Remove 2 screws from heater control panel.
7. Remove heater control panel.

INTERIOR TRIM COMPONENTS

REPAIRS

76-3-9

8. Release tags and remove radio cage.
9. Remove 2 screws from top of console.

10. Remove 4 screws securing heater controls to 

centre console.

11. Remove 3 screws from centre and sides of 

console.

12. Disconnect multiplugs and bulb holder from 

switch pack.

13. Automatic gearbox only: Disconnect 

multiplugs from gear selector.

14. Remove centre console.
15. Remove 4 screws from switch pack assembly 

and remove assembly.

Refit

1. Position switch pack assembly, fit and tighten 

screws.

2. Position console to fascia.
3. Connect multiplugs and bulb holder to switch 

pack.

4. Automatic gearbox only: Connect multiplugs 

to gear selector.

5. Fit centre console.
6. Fit and tighten screws securing centre and 

sides to console.

7. Fit and tighten screws securing switch pack to 

console.

8. Fit and tighten screws to top of console.
9. Position radio cage to console and secure with 

retaining tags.

10. Position heater control panel, fit and tighten 

screws.

11. Fit heater control knobs.
12. Manual gearbox only: Fit descent selector.
13. Fit gear lever knob.
14. Fit radio.


 + 

 IN CAR ENTERTAINMENT, 

REPAIRS, Radio.

15. Fit rear console.


 + 

 INTERIOR TRIM COMPONENTS, 

REPAIRS, Console - rear.

INTERIOR TRIM COMPONENTS

76-3-10 REPAIRS

Console - rear

$% 76.25.04

Remove

1. Release rear ash tray panel from rear console, 

disconnect multiplug from power socket and 
remove panel.

2. Remove oddments tray liner, raise cubby box 

lid and remove cubby box.

3. Remove 2 screws securing rear of console.
4. Remove screw cover and remove 2 screws 

securing front of console.

5. Disconnect multiplugs from window lift switches 

and if fitted, rear window isolator switch.


Content   ..  212  213  214  215   ..