Freelander 1. Manual - part 196


  Index      Land Rover     Freelander 1 - service manual 2002 year


Search            


Content   ..  194  195  196  197   ..


Freelander 1. Manual - part 196


RESTRAINT SYSTEMS

REPAIRS

75-3

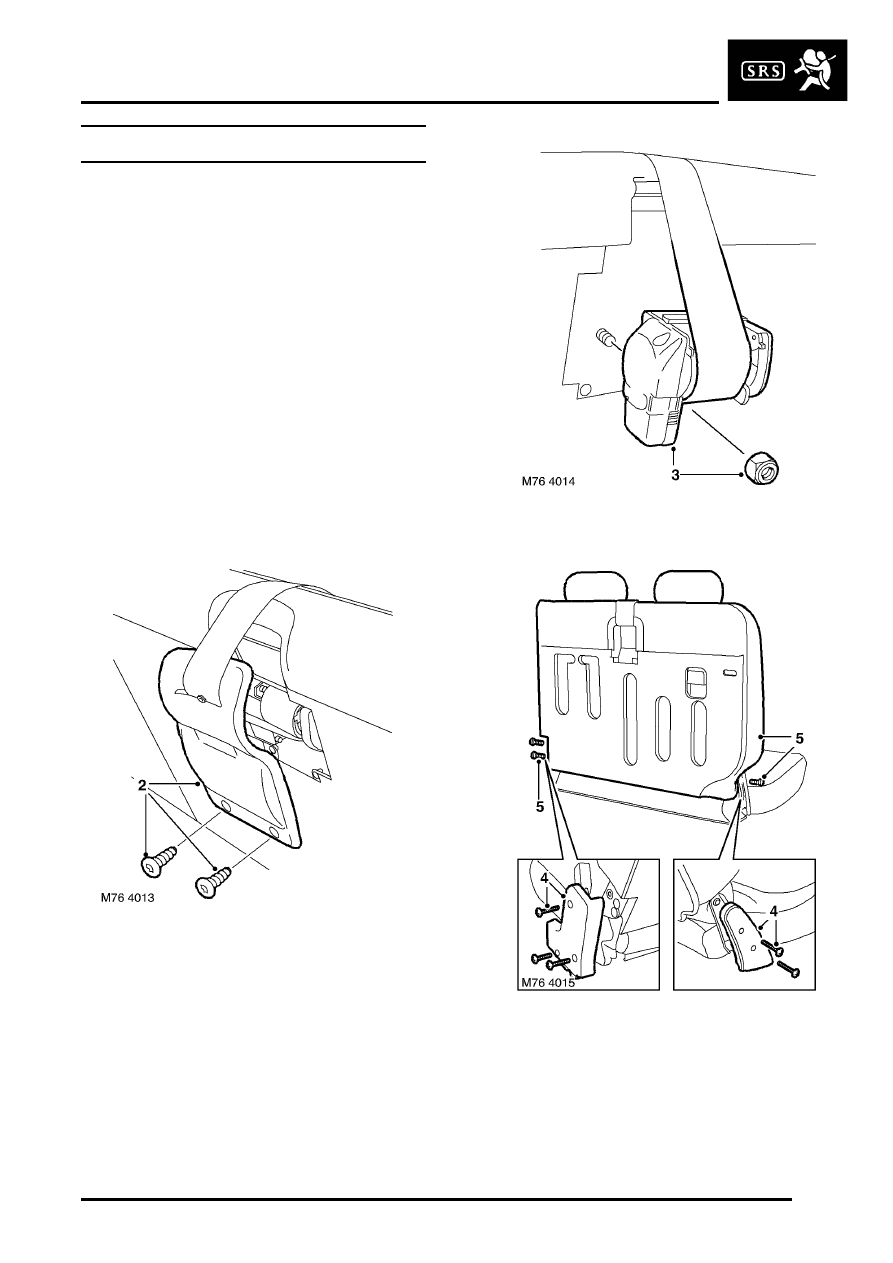
Seat belt - centre - rear

$% 76.73.20

Remove

WARNING: It is imperative that before any 
work is undertaken on the SRS system the 
appropriate information is read thoroughly.

WARNING: When removing, testing or 
installing a seatbelt pre-tensioner, do not 
lean directly over it or block the end of the 
piston tube.

WARNING: Always remove the key from the 
starter switch, disconnect the vehicle 
battery and wait 10 minutes before 
commencing work on the SRS system.

1. Remove RH rear seat.


 + 

 SEATS, REPAIRS, Rear seat - RH.

2. Remove 2 screws and remove seat belt reel 

cover.

3. Remove nut and release seat belt reel.

4. Remove 5 screws and remove both end 

covers.

5. Remove 3 Torx bolts and remove squab from 

cushion.

RESTRAINT SYSTEMS

75-4

REPAIRS

6. Release rear of cushion cover from frame.
7. Release sides and front of cushion cover from 

frame.

8. Release cover and pad from frame.
9. Remove Torx bolt from centre seat belt anchor 

and right seat belt buckle.

10. Remove seat belt and right seat belt buckle.

Refit

NOTE: If the SRS component is to be replaced, 
the bar code of the new unit must be recorded.

1. Position centre seat belt anchor and right seat 

belt buckle to seat and tighten Torx bolt to 32 
Nm (24 lbf.ft).

2. Fit cover and pad to frame.
3. Fit front and sides of cushion cover to frame.
4. Fit rear of cushion cover to frame.
5. Fit cushion to squab and tighten Torx bolts.
6. Fit end covers and tighten screws.
7. Position seat belt reel in seat squab and tighten 

nut to 32 Nm (24 lbf.ft).

8. Fit seat belt reel cover and tighten screws.
9. Fit rear seat.


 + 

 SEATS, REPAIRS, Rear seat - RH.

RESTRAINT SYSTEMS

REPAIRS

75-5

Seat belt - rear - LH

$% 76.73.23

Remove

WARNING: It is imperative that before any 
work is undertaken on the SRS system the 
appropriate information is read thoroughly.

WARNING: When removing, testing or 
installing a seatbelt pre-tensioner, do not 
lean directly over it or block the end of the 
piston tube.

WARNING: Always remove the key from the 
starter switch, disconnect the vehicle 
battery and wait 10 minutes before 
commencing work on the SRS system.

1. Remove rear quarter upper trim casing.


 + 

 INTERIOR TRIM COMPONENTS, 

REPAIRS, Trim casing - rear quarter - upper 
- 5 door.

2. Remove Torx bolt from seat belt upper 

mounting.

3. Remove Torx bolt from seat belt reel and 

remove reel.

Refit

NOTE: If the SRS component is to be replaced, 
the bar code of the new unit must be recorded.

1. Position reel and tighten Torx bolt to 50 Nm (37 

lbf.ft).

2. Extend belt, position top mounting and tighten 

Torx bolt to 32 Nm (24 lbf.ft).

3. Fit rear quarter upper trim casing.


 + 

 INTERIOR TRIM COMPONENTS, 

REPAIRS, Trim casing - rear quarter - upper 
- 5 door.

RESTRAINT SYSTEMS

75-6

REPAIRS

Adjustable mounting - seat belt - 'B' pillar

$% 76.73.26

Remove

1. Release 'B/C' post upper finisher from 6 clips 

and position aside.

2. Remove nut from seat belt upper mounting and 

remove belt bracket.

3. Remove 2 Torx bolts from adjustable mounting 

and remove mounting.

Refit

1. Position mounting and tighten Torx bolts to 26 

Nm (19 lbf.ft).

2. Fit upper belt bracket  and tighten nut to 31 Nm 

(23 lbf.ft).

3. Position 'B/C' post upper finisher and secure 

with clips.


Content   ..  194  195  196  197   ..