Discovery 2. Manual - part 233


  Index      Land Rover     Land Rover Discovery 2 - service manual 1999 year


Search            


Content   ..  231  232  233  234   ..


Discovery 2. Manual - part 233


EXTERIOR FITTINGS

REPAIRS 76-2-13

Bumper assembly - rear - from 03MY

$% 76.22.15

Remove

1. Remove both rear tail lamps.


 + 

 LIGHTING, REPAIRS, Lamp - tail/

flasher - bumper.

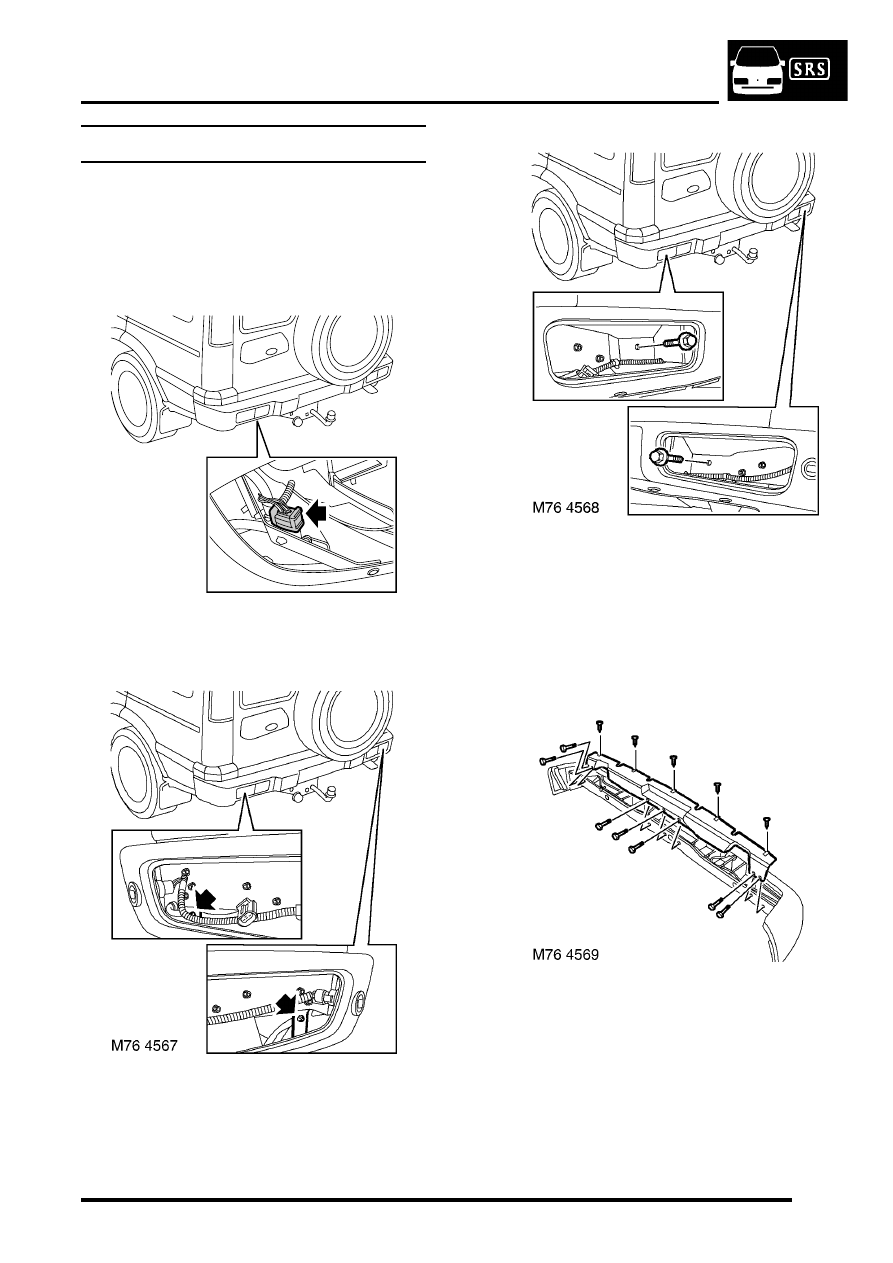
2. Disconnect park distance control harness 

multiplug.

3. Release rear lamp harness clips.

4. Remove 2 bolts securing bumper.
5. With assistance remove bumper.

NOTE: Do not carry out further dismantling if 
component is removed for access only.

6. Remove 7 bolts and 5 screws securing closing 

panel and remove panel.

M76 4566

EXTERIOR FITTINGS

76-2-14 REPAIRS

7. Disconnect 4 park distance control sensor 

harness multiplugs and remove 6 clips 
retaining harness.

8. Release 3 clips retaining harness and remove 

harness.

9. Noting their fitted positions, release and 

remove 4 park distance control sensors and 
sensor housings.

Refit

1. Fit sensor housings to bumper, ensuring lugs 

on housings are aligned with cut-outs in 
bumper.

2. Fit and secure sensors to housings.
3. Fit harness, secure with clips and connect 

multiplugs

4. Fit closing panel and secure with bolts and 

screws.

5. With assistance, fit bumper assembly to body.
6. Fit bolts securing bumper and tighten to 45 Nm 

(33 lbf.ft).

7. Secure rear lamp harness clips and connect 

park distance control sensor harness multiplug.

8. Fit both rear tail lamps.


 + 

 LIGHTING, REPAIRS, Lamp - tail/

flasher - bumper.

Trim finisher - bumper - front - from 03MY

$% 76.22.19

Remove

1. Remove 5 screws securing front bumper 

finisher to bumper and position the finisher 
aside.

2. Release clip securing washer hose to 

headlamp washer jet and disconnect the hose.

3. Remove the bumper finisher.

NOTE: Do not carry out further dismantling if 
component is removed for access only.

4. Remove clip securing headlamp washer jet to 

bumper finisher and remove the washer jet.

Refit

1. Fit and secure headlamp washer jet to bumper 

finisher.

2. Position bumper finisher to bumper, fit washer 

hose to washer jet and secure with clip.

3. Fit bumper finisher to bumper and secure with 

screws.

EXTERIOR FITTINGS

REPAIRS 76-2-15

Bumper assembly - rear - up to 03MY

$% 76.22.52 

Remove

1. Remove both rear tail lamps.


 + 

 LIGHTING, REPAIRS, Lamp - tail/

flasher - bumper.

2. Release 2 clips securing rear lamp  harnesses 

to rear bumper. 

3. Remove 2 bolts securing rear bumper to  

chassis and collect 2 plates. 

4. With assistance, remove bumper assembly. 

NOTE: Do not carry out further dismantling if 
component is removed for access only.

5. Remove centres of 19 trim clips securing  

bumper armature to bumper valance. 

6. Remove outers of trim clips.
7. Remove bumper armature from bumper  

valance. 

8. Release clips and remove rear lamps from 

bumper valance.

Refit

1. Fit rear lamps to bumper valance.
2. Fit armature to bumper valance and  secure 

with trim clip outers.  

3. Fit centres to trim clips.
4. With assistance, fit bumper assembly to body. 
5. Position plates to rear bumper. 
6. Fit and tighten bolts securing  rear bumper to 

chassis to 45 Nm (33 lbf.ft).  

7. Fit 2 clips securing rear lamp harnesses  to rear 

bumper.

8. Connect multiplugs to rear lamps. 

EXTERIOR FITTINGS

76-2-16 REPAIRS

Side finisher - windscreen 

$% 76.43.39 

Remove

1. Push centres from 3 trim clips securing  finisher 

to 'A' post. 

2. Remove trim clip outers from finisher. 
3. Release finisher from 3 spring clips. 
4. Remove finisher. 

Refit

1. Fit finisher to 'A' post and secure with  spring 

clips. 

2. Fit trim clip outers to finisher. 
3. Fit centres to trim clips. 

Grille - front - up to 03MY

$% 76.55.03

Remove

1. Remove repeater lamps.


 + 

 LIGHTING, REPAIRS, Lamp - front 

repeater - up to 03MY.

2. Via access hole in wheel arch liners, remove 

screws securing headlamp finishers.

3. Remove headlamp finishers from grille.

4. Remove 2 screws securing lower corners of 

grille.

5. Remove 3 scrivets and remove grille.

Refit

1. Fit grille and secure with scrivets and screws.
2. Fit headlamp finishers and secure with screws.
3. Fit repeater lamps.


 + 

 LIGHTING, REPAIRS, Lamp - front 

repeater - up to 03MY.


Content   ..  231  232  233  234   ..