Land Rover Discovery. Manual - part 186


  Index      Land Rover     Land Rover Discovery - service 1995-1996 year


Search            


Content   ..  184  185  186  187   ..


Land Rover Discovery. Manual - part 186


HEATING AND VENTILATION

1

REPAIR

HEATER BLOWER SWITCH AND ILLUMINATION
BULB

Service repair no - 80.10.22 - Switch
Service repair no - 86.48.73 - Bulb

Remove

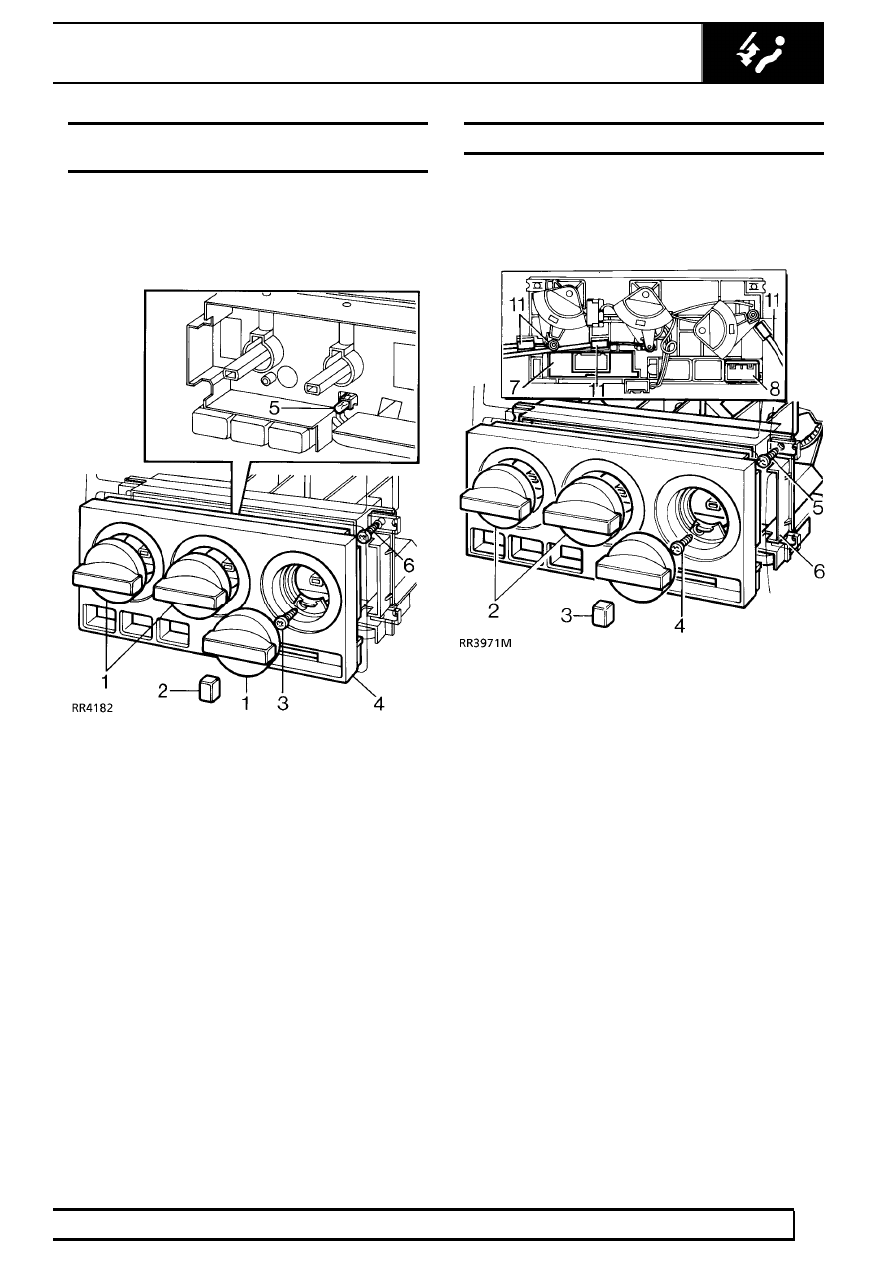
1. Pull 3 knobs from rotary controls.
2. Pull knob from blower switch.
3. Remove 2 screws retaining graphics panel.
4. Remove graphics plate.
5. Remove capless bulb.
6. Remove 4 screws retaining switch.
7. Remove switch panel. Use plastic tube to assist

removal.

Blower switch

8. Pull blower switch from rear of panel.
9. Disconnect multiplug and remove blower switch.

Refit

10. Reverse removal procedure.

HEATER CONTROL UNIT

Service repair no - 80.10.42.

Remove

1. Disconnect battery negative lead.

2. Pull 3 knobs from rotary controls.
3. Pull knob from blower switch.
4. Remove 2 retaining screws and remove

graphics panel.

5. Remove 4 screws retaining switch.
6. Remove switch panel.
7. Release fascia centre louvre vent panel from its

fitted position to gain access to rear of panel.
See CHASSIS AND BODY, Repair, Dash
Panel Central Louvre Panel

80

HEATING AND VENTILATION

2

REPAIR

8. Disconnect 4 multiplugs and position harness

aside.

NOTE:

Do not carry out further

dismantling if component is removed for
access only.

9. Fan speed switch: remove fan speed switch

slide and push out fan speed switch.

10. Pull out light bulb disconnect terminals and

remove fan speed light strip.

11. Unclip 3 heater control cables from control unit.
12. Microswitch: Unclip 3 micro switches.
13. Cut cable tie and release wiring harness from

control unit.

14. Remove heater control unit.

Refit

15. Reverse removal procedure. Check the

satisfactory function of the controls before fitting
louvre vent panel.

CONTROL CABLES

Service repair no - 80.10.06 - Air flow
Service repair no - 80.10.25 - Temperature control
RH
Service repair no - 80.10.26 - Temperature control
LH

Remove

1. Release fascia centre louvre vent panel from its

fitted position to gain access to rear of panel.
See CHASSIS AND BODY, Repair, Dash
Panel Central Louvre Panel

2. Open glove box, manoeuvre side springs

through cut-outs and lower lid.

HEATING AND VENTILATION

3

REPAIR

Air direction

3. Set control fully clockwise
4. Release outer cable from 2 clips on unit.
5. Release cable from stud on flap lever.
6. Remove control cable from control lever.

Temperature

7. Set RH control fully clockwise, LH control fully

anti-clockwise

8. Release outer cable from 2 clips on unit.
9. Release cable from stud on flap lever.

10. Remove control cable from control lever.

Refit

11. Reverse removal procedure. Check the

satisfactory function of the controls before fitting
louvre vent panel.

RESISTOR UNIT

Service repair no - 80.20.17

Remove

1. Open glove box, manoeuvre side springs

through cut-outs and lower lid.

2. Remove 2 screws securing resistor unit to

trunking.

3. Disconnect multiplug and remove resistor unit.

Refit

4. Reverse removal procedure.

80

HEATING AND VENTILATION

4

REPAIR

WATER VALVE

Service repair no - 80.10.16

Remove

1. Disconnect vacuum pipe from water valve.
2. Slacken 4 clips securing hoses to water valve.
3. Use a thin blade to break seal between hoses

and nozzles

4. Disconnect heater inlet hose from valve.

NOTE: A quantity of coolant will be
released.

5. Disconnect heater outlet hose from valve.
6. Lever valve from coolant pipe hoses.

Refit

7. Reverse removal procedure. Lightly lubricate

water valve nozzles with petroleum jelly.

8. Reverse removal procedure. Top-up engine

coolant

VACUUM SWITCH - WATER VALVE

Service repair no - 80.10.36

Remove

1. Release emission pipe from retaining clip.
2. Remove bolt securing switch to bulkhead.
3. Disconnect multiplug from switch.
4. Disconnect 2 vacuum pipes and remove vacuum

switch.

Refit

5. Reverse removal procedure.


Content   ..  184  185  186  187   ..