Jeep Wrangler TJ. Manual - part 452
 

  Index      Jeep     Jeep Wrangler TJ - service repair manual 2005 year


Search            


Content   ..  450  451  452  453   ..


Jeep Wrangler TJ. Manual - part 452


OIL

STANDARD PROCEDURE - ENGINE OIL
SERVICE

ENGINE OIL CHANGE

WARNING: NEW OR USED ENGINE OIL CAN BE
IRRITATING TO THE SKIN. AVOID PROLONGED OR
REPEATED SKIN CONTACT WITH ENGINE OIL.
CONTAMINANTS IN USED ENGINE OIL, CAUSED BY
INTERNAL COMBUSTION, CAN BE HAZARDOUS TO
YOUR HEALTH. THOROUGHLY WASH EXPOSED
SKIN WITH SOAP AND WATER. DO NOT WASH
SKIN WITH GASOLINE, DIESEL FUEL, THINNER, OR
SOLVENTS, HEALTH PROBLEMS CAN RESULT. DO
NOT POLLUTE, DISPOSE OF USED ENGINE OIL
PROPERLY. CONTACT YOUR DEALER OR GOVERN-
MENT AGENCY FOR LOCATION OF COLLECTION
CENTER IN YOUR AREA.

CAUTION: Do not use oil filter with metric threads.
The proper oil filter has SAE type 3/4 X 16 threads.
An oil filter with metric threads can result in oil
leaks and engine failure.

All Jeep engines are equipped with a high quality

full-flow, throw-away type oil filter. DaimlerChrysler
Corporation recommends a Mopar

t or equivalent oil

filter be used.

Change engine oil at mileage and time intervals

described in Maintenance Schedules.

Run engine until achieving normal operating tem-

perature.

(1) Position the vehicle on a level surface and turn

engine off.

(2) Hoist and support vehicle on safety stands.
(3) Remove oil fill cap.
(4) Place a suitable drain pan under crankcase

drain.

(5) Remove drain plug from crankcase and allow

oil to drain into pan. Inspect drain plug threads for
stretching or other damage. Replace drain plug if
damaged.

(6) Install drain plug in crankcase.
(7) Position a drain pan under the oil filter.
(8) Using a suitable oil filter wrench loosen filter.
(9) Rotate the oil filter counterclockwise to remove

it from the cylinder block oil filter boss or filter
adapter housing.

(10) When filter separates from adapter nipple, tip

gasket end upward to minimize oil spill. Remove fil-
ter from vehicle.

(11) Make sure old gasket comes off with oil filter.

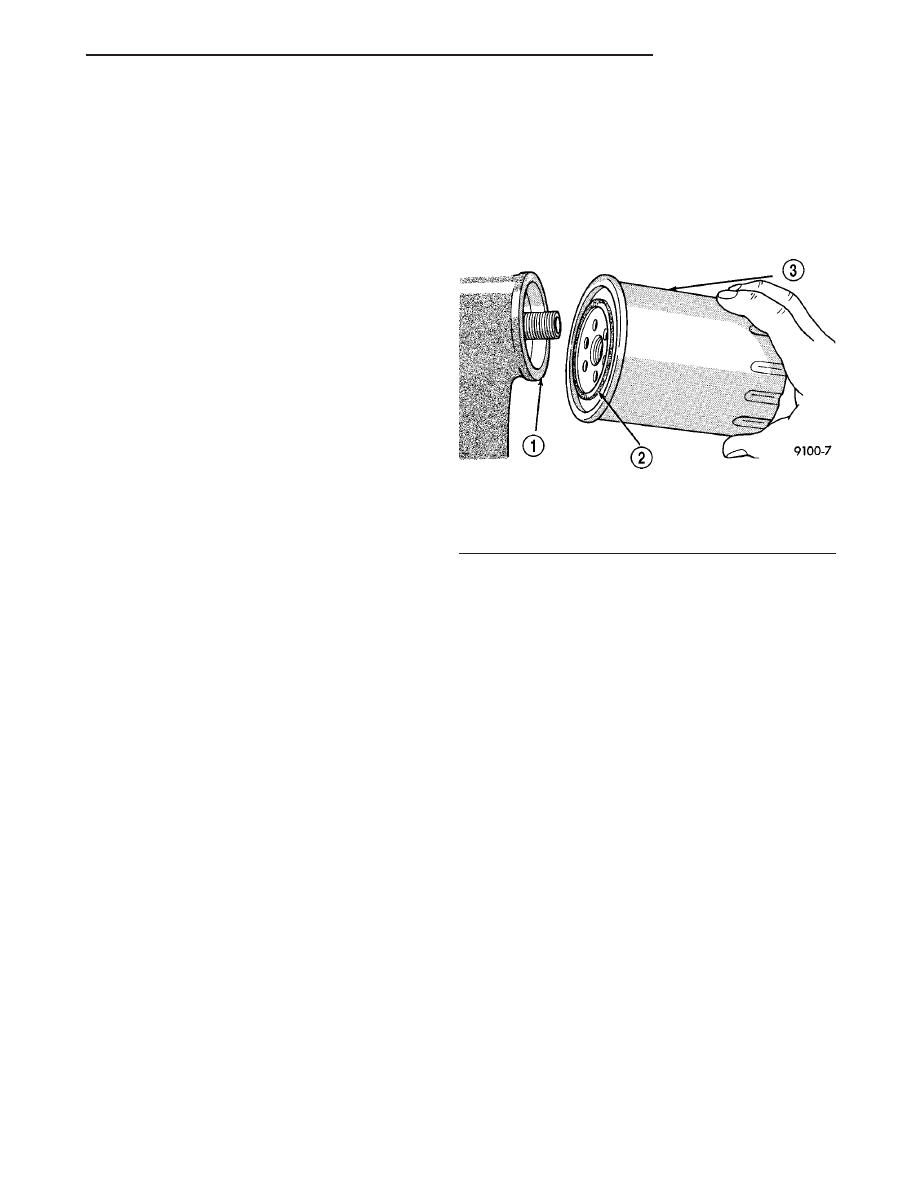
With a wiping cloth, clean the gasket sealing surface
(Fig. 79) of oil and grime.

(12) Lightly lubricate oil filter gasket with engine

oil or chassis grease.

(13) Thread filter onto adapter nipple. When gas-

ket makes contact with sealing surface, (Fig. 79)hand
tighten filter one full turn, do not over tighten.

(14) Lower vehicle and fill crankcase with specified

type and amount of engine oil described in this sec-
tion.

(15) Install oil fill cap.
(16) Start engine and inspect for leaks.
(17) Stop engine and inspect oil level.

CRANKCASE OIL LEVEL INSPECTION

CAUTION: Do not overfill crankcase with engine oil,
oil foaming and oil pressure loss can result.

The engine oil level indicator (Dipstick) is located

at the right rear of the 4.0L engine. Inspect engine
oil level approximately every 800 kilometers (500
miles). Unless the engine has exhibited loss of oil
pressure, run the engine for about five minutes
before checking oil level. Checking engine oil level on
a cold engine is not accurate.

To ensure proper lubrication of an engine, the

engine oil must be maintained at an acceptable level.
The acceptable levels are indicated between the ADD
and SAFE marks on the engine oil dipstick.

(1) Position vehicle on level surface.
(2) With engine OFF, allow approximately ten min-

utes for oil to settle to bottom of crankcase, remove
engine oil dipstick.

(3) Wipe dipstick clean.
(4) Install dipstick and verify it is seated in the

tube.

Fig. 79 Oil Filter Sealing Surface—Typical

1 - SEALING SURFACE
2 - RUBBER GASKET
3 - OIL FILTER

TJ

ENGINE 4.0L

9 - 123

(5) Remove dipstick, with handle held above the

tip, take oil level reading.

(6) Add oil only if level is below the ADD mark on

dipstick.

USED ENGINE OIL DISPOSAL

Care should be exercised when disposing used

engine oil after it has been drained from a vehicle
engine. Refer to the WARNING at beginning of this
procedure.

OIL FILTER

REMOVAL

CAUTION: Do not use oil filter with metric threads.
The proper oil filter has SAE type 3/4 X 16 threads.
An oil filter with metric threads can result in oil
leaks and engine failure.

All Jeep engines are equipped with a high quality

full-flow, throw-away type oil filter. DaimlerChrysler
Corporation recommends a Mopar

t or equivalent oil

filter be used.

(1) Position a drain pan under the oil filter.
(2) Using a suitable oil filter wrench loosen filter.
(3) Rotate the oil filter counterclockwise to remove

it from the cylinder block oil filter boss or filter
adapter housing.

(4) When filter separates from adapter nipple, tip

gasket end upward to minimize oil spill. Remove fil-
ter from vehicle.

(5) Make sure old gasket comes off with oil filter.

With a wiping cloth, clean the gasket sealing surface
of oil and grime.

INSTALLATION

(1) Lightly lubricate oil filter gasket with engine

oil or chassis grease.

(2) Thread filter onto adapter nipple. When gasket

makes contact with sealing surface, (Fig. 80) hand
tighten filter one full turn, do not over tighten.

(3) Add oil, verify crankcase oil level and start

engine. Inspect for oil leaks.

OIL PAN

DESCRIPTION

The oil pan is made of stamped steel. The oil pan

gasket is a one piece steel backbone silicone coated
gasket (Fig. 81).

REMOVAL

(1) Disconnect negative cable from battery.
(2) Raise the vehicle.

(3) Remove the oil pan drain plug and drain the

engine oil.

(4) Disconnect the exhaust pipe at the exhaust

manifold.

(5) Disconnect the exhaust hanger at the catalytic

converter and lower the pipe.

(6) Remove the starter motor. (Refer to 8 - ELEC-

TRICAL/STARTING/STARTER

MOTOR

-

REMOVAL).

(7) Remove the engine flywheel and transmission

torque converter housing access cover.

(8) If equipped with an oil level sensor, disconnect

the sensor.

(9) Position a jack stand directly under the engine

vibration damper.

(10) Place a piece of wood (2 x 2) between the jack

stand and the engine vibration damper.

(11) Remove the engine mount through bolts.
(12) Using the jack stand, raise the engine until

adequate clearance is obtained to remove the oil pan.

Fig. 80 Oil Filter Sealing Surface—Typical

1 - SEALING SURFACE
2 - RUBBER GASKET
3 - OIL FILTER

Fig. 81 Oil Pan

1 - OIL PAN
2 - OIL PAN DRAIN PLUG

9 - 124

ENGINE 4.0L

TJ

OIL (Continued)

(13) Remove transmission oil cooling lines (if

equipped) and oxygen sensor wiring supports that
are attached to the oil pan studs.

(14) Remove the oil pan bolts and studs. Carefully

slide the oil pan and gasket to the rear. If equipped
with an oil level sensor, take care not to damage the
sensor.

INSTALLATION

(1) Clean the block and pan gasket surfaces.
(2) Fabricate 4 alignment dowels from 1 1/2 x 1/4

inch bolts. Cut the head off the bolts and cut a slot
into the top of the dowel. This will allow easier
installation and removal with a screwdriver (Fig. 82).

(3) Install two dowels in the timing case cover.

Install the other two dowels in the cylinder block
(Fig. 83).

(4) Apply Mopar

t Silicone Rubber Adhesive Seal-

ant on cylinder block to rear main bearing cap cor-
ners and cylinder block to front cover joints (four
places) (Fig. 84).

(5) Slide the one-piece gasket over the dowels and

onto the block and timing case cover.

(6) Position the oil pan over the dowels and onto

the gasket. If equipped with an oil level sensor, take
care not to damage the sensor.

(7) Install the 1/4 inch oil pan bolts. Tighten these

bolts to 9.5 N·m (84 in. lbs.) torque. Install the 5/16
inch oil pan bolts (Fig. 85). Tighten these bolts to 15
N·m (132 in. lbs.) torque.

(8) Remove the dowels. Install the remaining 1/4

inch oil pan bolts. Tighten these bolts to 9.5 N·m (84
in. lbs.) torque.

(9) Lower the engine until it is properly located on

the engine mounts.

(10) Install the through bolts and tighten the nuts.
(11) Lower the jack stand and remove the piece of

wood.

(12) Install the engine flywheel and transmission

torque converter housing access cover.

Fig. 82 Fabrication of Alignment Dowels

1 - 1/4

88

× 1 1/2

88

BOLT

2 - DOWEL
3 - SLOT

Fig. 83 Position of Dowels in Cylinder Block

1 - DOWEL HOLES
2 - CYLINDER BLOCK
3 - 5/16

88

HOLES

4 - 5/16

88

HOLES

Fig. 84 Oil Pan Sealer Location

1 - SEALER LOCATIONS

Fig. 85 Position of 5/16 inch Oil Pan Bolts

1 - OIL PAN
2 - OIL PAN DRAIN PLUG

TJ

ENGINE 4.0L

9 - 125

OIL PAN (Continued)

(13) Install the engine starter motor. (Refer to 8 -

ELECTRICAL/STARTING/STARTER

MOTOR

-

INSTALLATION).

(14) Connect the exhaust pipe to the hanger and to

the engine exhaust manifold.

(15) Install

transmission

oil

cooling

lines

(if

equipped) and oxygen sensor wiring supports that
attach to the oil pan studs.

(16) Install the oil pan drain plug (Fig. 85).

Tighten the plug to 34 N·m (25 ft. lbs.) torque.

(17) Lower the vehicle.
(18) Connect negative cable to battery.
(19) Fill the oil pan with engine oil to the specified

level.

WARNING: USE EXTREME CAUTION WHEN THE
ENGINE IS OPERATING. DO NOT STAND IN A
DIRECT LINE WITH THE FAN. DO NOT PUT YOUR
HANDS NEAR THE PULLEYS, BELTS OR FAN. DO
NOT WEAR LOOSE CLOTHING.

(20) Start the engine and inspect for leaks.

ENGINE OIL PRESSURE
SENSOR

DESCRIPTION

The 3 wire, solid-state engine oil pressure sensor

(sending unit) is located in an engine oil pressure
gallery.

OPERATION

The oil pressure sensor uses three circuits. They

are:

• A 5 volt power supply from the Powertrain Con-

trol Module (PCM)

• A sensor ground through the PCM’s sensor

return

• A signal to the PCM relating to engine oil pres-

sure

The oil pressure sensor has a 3 wire electrical

function very much like the Manifold Absolute Pres-
sure (MAP) sensor. Meaning different pressures
relate to different output voltages.

A 5 volt supply is sent to the sensor from the PCM

to power up the sensor. The sensor returns a voltage
signal back to the PCM relating to engine oil pres-
sure. This signal is then transferred (bussed) to the
instrument panel on either a CCD or PCI bus circuit
(depending on vehicle line) to operate the oil pressure
gauge and the check gauges lamp. Ground for the
sensor is provided by the PCM through a low-noise
sensor return.

OIL PUMP

REMOVAL

A gear-type oil pump is mounted at the underside

of the cylinder block opposite the No.4 main bearing.

(1) Drain the engine oil.
(2) Remove the oil pan (Refer to 9 - ENGINE/LU-

BRICATION/OIL PAN - REMOVAL).

(3) Remove the pump-to-cylinder block attaching

bolts. Remove the pump assembly with gasket (Fig.
86).

CAUTION: If the oil pump is not to be serviced, DO
NOT disturb position of oil inlet tube and strainer
assembly in pump body. If the tube is moved within
the pump body, a replacement tube and strainer
assembly must be installed to assure an airtight
seal.

INSTALLATION

A gear-type oil pump is mounted at the underside

of the cylinder block opposite the No.4 main bearing.

(1) Install the oil pump on the cylinder block using

a replacement gasket. Tighten the bolts to 23 N·m
(17 ft. lbs.) torque.

(2) Install the oil pan (Refer to 9 - ENGINE/LU-

BRICATION/OIL PAN - INSTALLATION).

Fig. 86 Oil Pump Assembly

1 - OIL FILTER ADAPTOR
2 - BLOCK
3 - GASKET
4 - OIL INLET TUBE
5 - OIL PUMP
6 - STRAINER ASSEMBLY
7 - ATTACHING BOLTS

9 - 126

ENGINE 4.0L

TJ

OIL PAN (Continued)


Content   ..  450  451  452  453   ..