Jeep Liberty KJ. Manual - part 1319


  Index      Jeep     Jeep Liberty KJ - service repair manual 2006 year


Search            


Content   ..  1317  1318  1319  1320   ..


Jeep Liberty KJ. Manual - part 1319


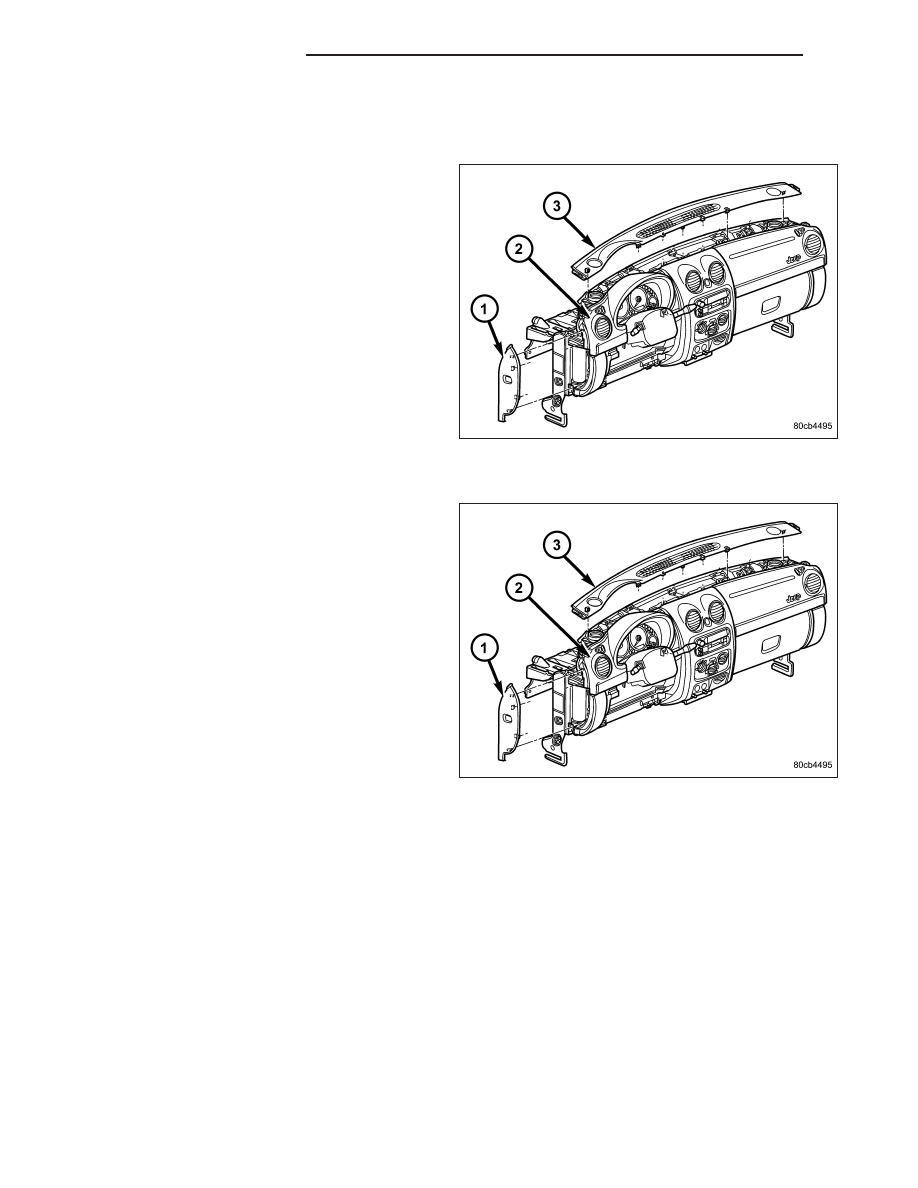
INSTRUMENT PANEL END CAP

REMOVAL

1. Before proceeding with the following repair proce-

dure, review all warnings and cautions. (Refer to
23 - BODY/INSTRUMENT PANEL - WARNING)

2. Open the door.

3. Using the finger indent, grasp and remove the side

cover (1).

INSTALLATION

1. Before proceeding with the following repair proce-

dure, review all warnings and cautions. (Refer to
23 - BODY/INSTRUMENT PANEL - WARNING)

2. Position the side panels (1) and seat the clips fully.

23 - 176

INSTRUMENT PANEL

KJ

INSTRUMENT PANEL DRIVER SIDE BEZELS

REMOVAL

1. Before proceeding with the following repair proce-

dure, review all warnings and cautions. (Refer to
23 - BODY/INSTRUMENT PANEL - WARNING)

2. Using a trim stick C-4755 or equivalent, disengage

the bezels (2) on either side of the steering col-
umn.

INSTALLATION

1. Before proceeding with the following repair proce-

dure, review all warnings and cautions. (Refer to
23 - BODY/INSTRUMENT PANEL - WARNING)

2. Position the appropriate divers side bezels (2) on

either side of the steering column and seat the
attachment clips.

KJ

INSTRUMENT PANEL

23 - 177

INSTRUMENT PANEL CENTER BEZEL

REMOVAL

1. Before proceeding with the following repair proce-

dure, review all warnings and cautions. (Refer to
23 - BODY/INSTRUMENT PANEL - WARNING)

2. Remove the screw from inside the cubby bin next

to the power outlet.

3. Using a trim stick C-4755 or equivalent, remove the

center bezel (3) from the instrument panel assem-
bly.

4. Disconnect the electrical and vacuum connectors.

INSTALLATION

1. Before proceeding with the following repair proce-

dure, review all warnings and cautions. (Refer to
23 - BODY/INSTRUMENT PANEL - WARNING)

2. Connect the electrical and vacuum connectors.

3. Position the center bezel (3) and seat the retaining

clips starting with the lower clips first.

4. Install the screw in the cubby bin next to the power

outlet.

23 - 178

INSTRUMENT PANEL

KJ

INSTRUMENT PANEL PASSENGER SIDE BEZEL

REMOVAL

1. Before proceeding with the following repair procedure, review all warnings and cautions. (Refer to 23 - BODY/

INSTRUMENT PANEL - WARNING)

On vehicles equipped with a grab handle:

1. Using a trim stick C-4755 or equivalent, remove the

grab handle end caps.

2. Disconnect the electrical connector, if equipped.

3. Remove the grab handle screws.

4. Remove the grab handle and bezel assembly.

On vehicles without a grab handle:

1. Using a trim stick C-4755 or equivalent, release the

retaining clips and remove the passenger side
bezel (5).

INSTALLATION

1. Before proceeding with the following repair procedure, review all warnings and cautions. (Refer to 23 - BODY/

INSTRUMENT PANEL - WARNING)

KJ

INSTRUMENT PANEL

23 - 179


Content   ..  1317  1318  1319  1320   ..