Isuzu Amigo / Axiom / Trooper / Rodeo / VehiCross. Manual - part 971


  Index      Isuzu     Isuzu Amigo / Axiom / Trooper / Rodeo / VehiCross - service repair manual 1999-2002 year


Search            


Content   ..  969  970  971  972   ..


Isuzu Amigo / Axiom / Trooper / Rodeo / VehiCross. Manual - part 971


WIPER/WASHER SYSTEM

8B–5

Windshield Wiper Arm/Blade

Removal

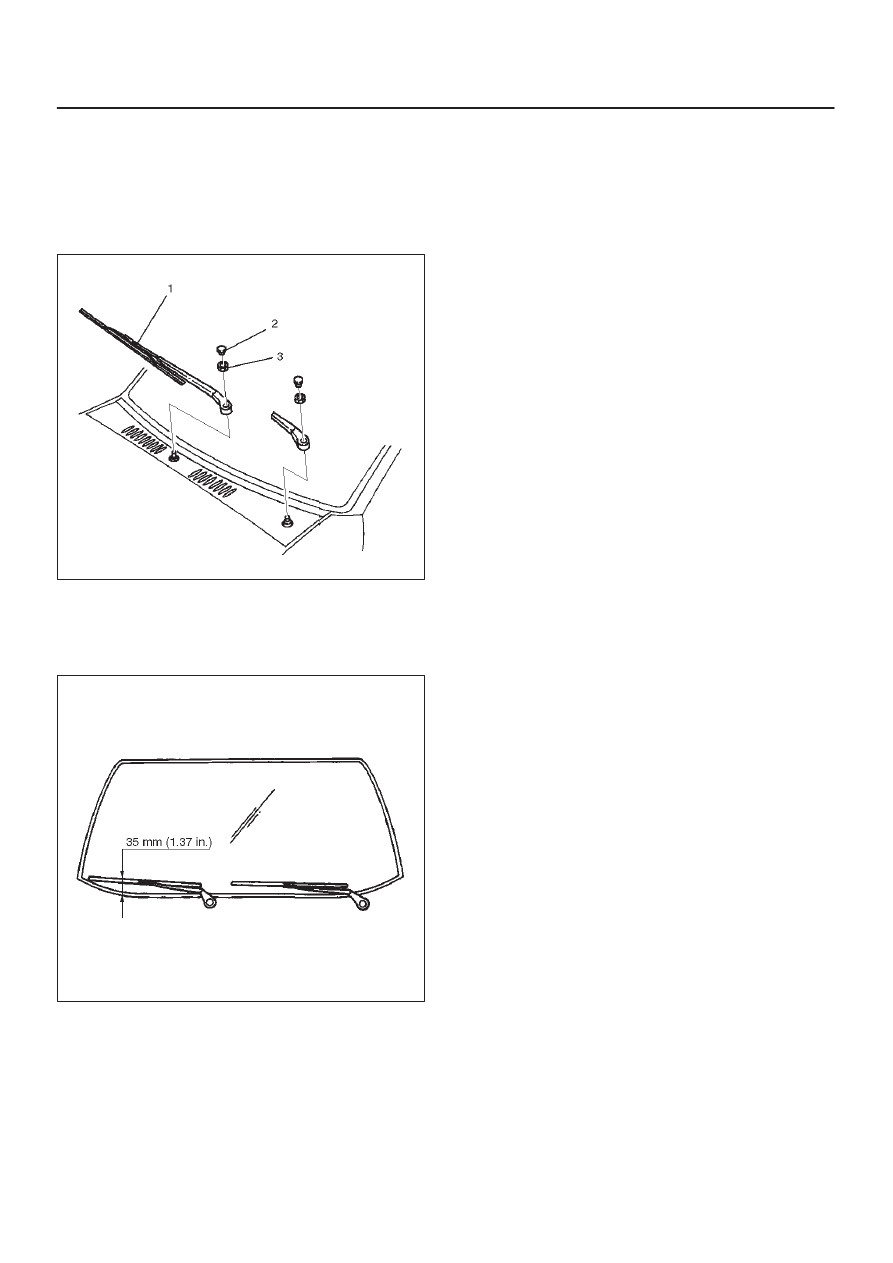
1. Pry the cap(2) off with the tip of a screwdriver.
2. Remove the nut(3).
3. Remove the wiper/blade(1).

880RS005

Installation

To install, follow the removal steps in the reverse order,
noting the following points.

880RS004

1. Wiper arm/blade

D

Before installing the wiper arm/blade to the shaft,
confirm that the motor stops at the auto-stop
position.

D

Set the wiper arm/blade so that the tips of both
blades are positioned about 35 mm (1.37 in) from
the upper edge of the cowl cover as shown in the
figure.

D

Tighten the nuts to the specified torque.

Torque: 31 N·m (23 lb ft)

8B–6

WIPER/WASHER SYSTEM

Windshield Wiper Blade Rubber

Removal

1. Push the wiper blade lock(1) while pulling the wiper

blade in the arrow direction as shown in the figure.

CAUTION: When the wiper blade has been
removed, wrap the tip of the wiper arm with cloth, to
avoid damaging the glass.

880RS011

2. Pull the end of rubber and remove the projection(3)

from the click of the blade stay (2).

880RS010

3. Pull the rubber out in the same direction.

Installation

To install, follow the removal steps in the reverse order,
noting the following points.

1. Install the click of the blade stay in the groove of the

new rubber and slide it in.  Complete wiper blade
installation by pushing the click.

885RS002

2. Finally, check that the click of the stay has caught in

the hole of the rubber.

885RS001

WIPER/WASHER SYSTEM

8B–7

Rear Wiper/Washer System

General Description

The circuit consists of the starter switch, rear wiper &
washer switch, rear wiper motor, rear washer motor and
rear intermittent relay.

When the wiper & washer switch is turned on with the
starter switch on, the battery voltage is applied to the
wiper motor to activate the wiper.
The washer motor squirts glass cleaning fluid while the
washer switch is being pushed.  The intermittent relay is
used to control motion of the wiper.

Rear Wiper and Washer Switch

Removal

1. Disconnect the battery ground cable.
2. Remove the front console assembly(1).

Refer to the Instrument Panel Assembly in Body
Structure section.

3. Remove the lower cluster assembly(2).

Refer to the Instrument Panel Assembly in Body
Structure section.

4. Remove the instrument panel driver lower cover(3).

Refer to the Instrument Panel Assembly in Body
Structure section.

740R200050

5. Remove the instrument panel cluster assembly(4).

Refer to the Instrument Panel Assembly in Body
Structure section.

6. Disconnect the connector and push the lock from the

back side of the instrument panel cluster assembly to
remove the rear wiper & washer switch(5).

821RW023

Installation

To install, follow the removal steps in the reverse order,
noting the following point:

1. Push the switch with your fingers until it locks

securely.

8B–8

WIPER/WASHER SYSTEM

Rear Wiper Motor

Removal

1. Disconnect the battery ground cable.
2. Remove the tailgate trim pad.
3. Remove the wiper arm/blade.

Refer to the removal steps of the Rear Wiper
Arm/Blade in this section.

4. Disconnect the connector remove the wiper shaft nut,

remove the fixing screws and then remove the rear
wiper motor(1).

885RS013

Installation

To install, follow the removal steps in the reverse order,
noting the following points.

1. Before installing the wiper arm/blade to the motor

shaft, confirm that the motor stops at the auto-stop
position.

2. Install the wiper arm so that the blade gets parallel to

the lowermost heat wire(2) of the rear defogger
(w/rear defogger), or position the blade 20 mm
(0.79 in) from edge of tailgate glass (W/O rear
defogger).

885RS012

885RS011

3. Tighten the motor shaft nut to the specified torque.

Torque:  6 N·m (52 lb in)

4. Tighten the wiper arm nut to the specified torque.

Torque:  9 N·m (78 lb in)


Content   ..  969  970  971  972   ..