Isuzu Amigo / Axiom / Trooper / Rodeo / VehiCross. Manual - part 956


  Index      Isuzu     Isuzu Amigo / Axiom / Trooper / Rodeo / VehiCross - service repair manual 1999-2002 year


Search            


Content   ..  954  955  956  957   ..


Isuzu Amigo / Axiom / Trooper / Rodeo / VehiCross. Manual - part 956


MANUAL TRANSMISSION

7B–59

6. Check that the top gear shaft and mainshaft

rotate.

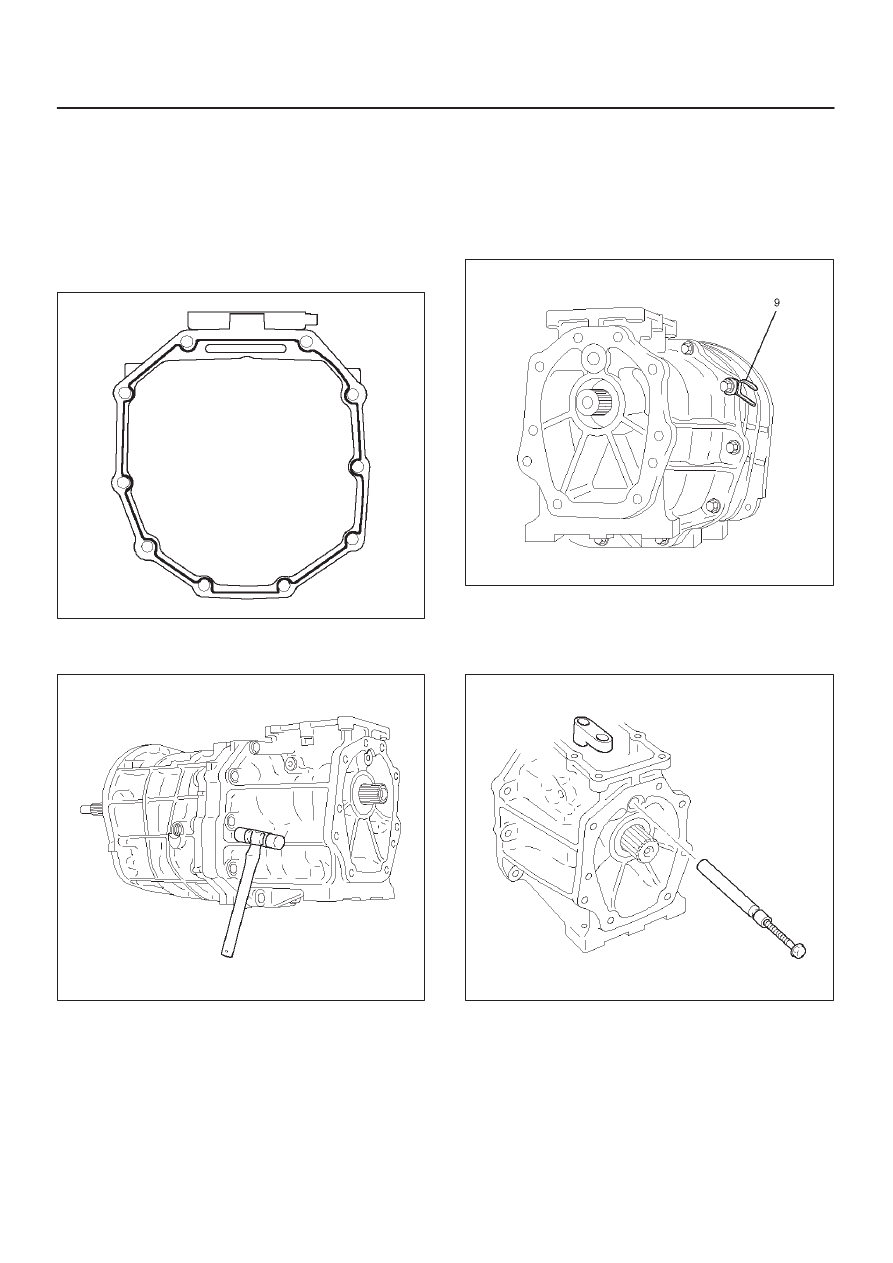
36. Install the transfer adapter.

1. Clean up the fitting surface.

2. Apply recommended liquid gasket (THREE

BOND 1281 or equivalent), as shown.

NOTE:

D

Don’t dry the liquid gasket.

220RW026

3. Using a plastic hammer, tap the transfer adapter

and attach it to the intermediate plate.

220RW034

4. Using 10 bolts, install the transfer adapter.

Torque: 37 N·m (27 lb ft)

NOTE:

D

Tighten the all bolts evenly.

D

Don’t damage the lip of the oil seal.

D

Install the wire clamp (9) to the transfer adapter.

220RW083

37.  Install the gear control box.

1. Align the projection of the shift lever housing to

the shift rod groove, and install the gear control
rod.

230RW003

7B–60 MANUAL TRANSMISSION

2. Using a pin punch and hammer, drive in the

slotted spring pin (2) to the shift lever housing.

NOTE: Be carefull not to drop the slotted spring pin.

230RW002

3. Apply sealant (THREE BOND 1344 or

equivalent) to the plug (1) thread.

4. Using hexagon wrench, install and torque the

plug (1).

Torque: 18 N·m (13 lb ft)

220RW010

5. Clean up the bolts and bolt hole.

6. Using 6 bolts, install the gear control box through

the gasket.

Torque 18 N·m (13 lb ft)

230RW001

38. Install clutch housing.

1. Install the clutch housing to the transmission

case.

Torque: 36 N·m (27 lb ft)

NOTE: Tighten the all bolts evenly.

241RW001

MANUAL TRANSMISSION

7B–61

39. Install the switches.

1. Install the new gasket to the 1st and 2nd switch.

2. Install the 1st and 2nd switch assembly (8).

Torque: 39 N·m (29 lb ft)

3. Install the new gasket to the backup light switch.

4. Install the backup light switch assembly (6).

Torque: 44 N·m (33 lb ft)

220RY001

40. Install the clutch release bearing (3) and clutch shift

fork (5).
1. Apply the clutch release grease.

1. Fitting surface of the cylinder push rod.
2. Fitting surface of the release bearing hub.
3. The hole of the fork split pin (4).

2. Apply the clutch release grease.

1. The spline surface of the top gear shaft.

3. Install the clutch shift fork (5).

4. Install the snap pin.

5. Install the clutch release bearing (3) to the clutch

shift fork (5).

220RW086

41. Install the drain plug and filler plug.

1. Install the drain plug (1) through the new gasket.

Torque: 37 N·m (27 lb ft)

2. Install the filler plug (2) through the new gasket.

Reference: Plug after the gear oil fill in.
Torque: 37 N·m (27 lb ft)

220RW007

7B–62 MANUAL TRANSMISSION

Main Data and Specifications

General Specifications

Transmission type

Fully synchronized forward and reverse gears

Control method

Direct control with the gear shift lever on the floor

Gear ratio

1st

3.954

2nd

2.330

3rd

1.436

4th

1.000

5th

0.788

Rev

3.918

Oil capacity lit (US qt)

2.7 (2.86)

Type of lubricant

Engine oil : Refer to the chart in “SECTION 0”

Torque Specifications

E07RY002


Content   ..  954  955  956  957   ..