Isuzu Amigo / Axiom / Trooper / Rodeo / VehiCross. Manual - part 1031


  Index      Isuzu     Isuzu Amigo / Axiom / Trooper / Rodeo / VehiCross - service repair manual 1999-2002 year


Search            


Content   ..  1029  1030  1031  1032   ..


Isuzu Amigo / Axiom / Trooper / Rodeo / VehiCross. Manual - part 1031


EXTERIOR/INTERIOR TRIM

8J–9

Installation

To install, follow the removal steps in the reverse order,
noting the following point.

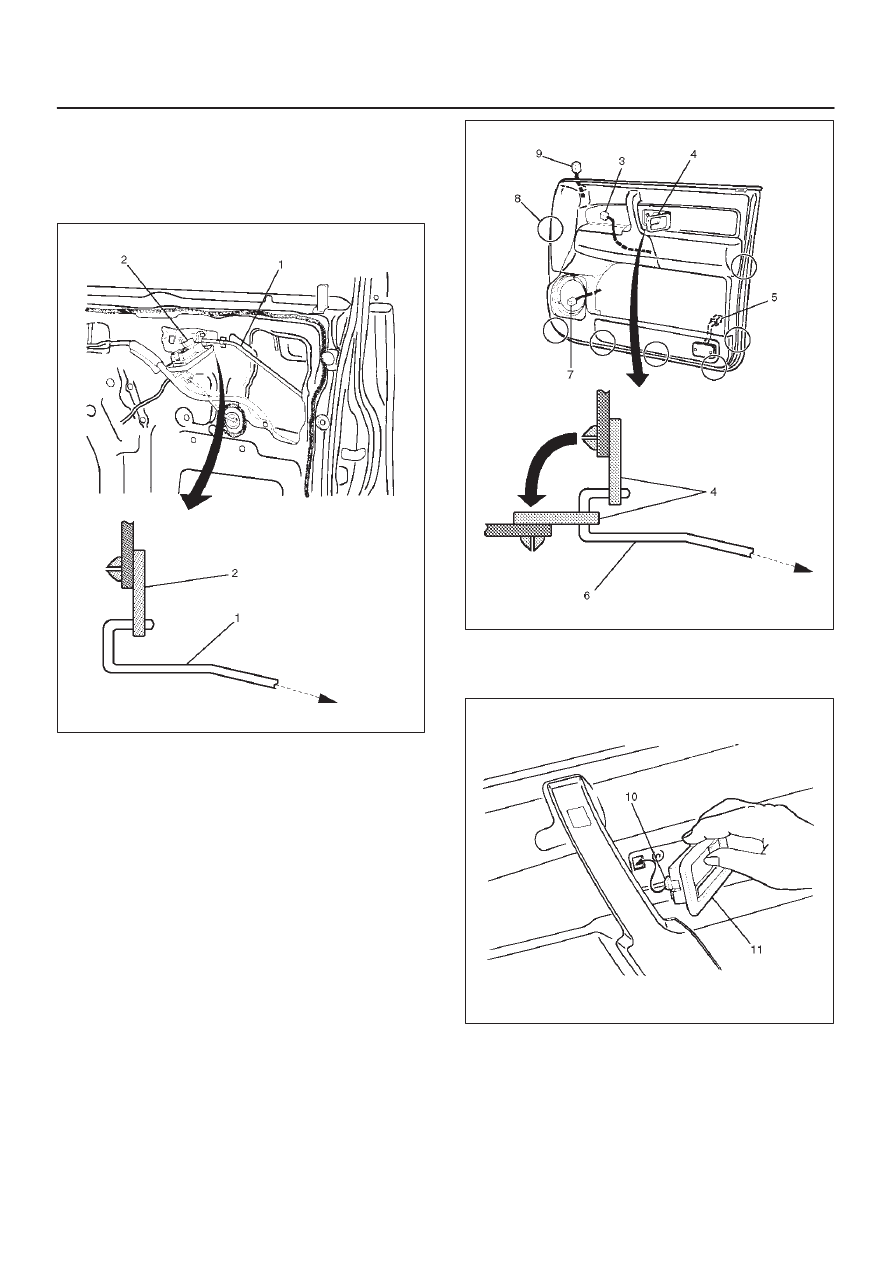
1. When installing the inside handle(2), assemble it

temporarily to the inside handle link(1).

632RS014

2. Pass the inside handle(4) through the mounting hole

of the trim panel and assemble the trim panel.
Engage seven clips(8) into the door panel.  Also,
connect the courtesy light connector(5) and leave the
connectors of the speaker(7), tweeter(9) and power
window(3) drawn out to their prescribed positions, so
that they will not be caught.
Then, put the inside handle(4) to the normal position
of the inside handle link(6).

632RW006

3. Fit the claw(10) of the inside handle(11) securely into

the hole of the door panel and fix the inside handle
with the screw.

632RW007

8J–10

EXTERIOR/INTERIOR TRIM

Rear Door Trim Panel

Rear Door Trim Panel and Associated Parts

655R200011

Legend

(1) Power Window Switch
(2) Door Wood Panel
(3) Door Trim Panel
(4) Washer

(5) Clip
(6) Regulator Handle
(7) Inside Handle Fixing Screw
(8) Inside Handle

Removal

1. Disconnect the battery ground cable.
2. Remove the regulator handle(1).

D

Pull the hook(2) out and remove the regulator
handle.

631RW002

EXTERIOR/INTERIOR TRIM

8J–11

3. Remove the power window switch(3).

D

Pry the power window switch out and disconnect
the switch connector.

825RS084

4. Remove the inside handle fixing screw.

D

Remove the screw that fixes the inside handle(5),
slide the inside handle to the position illustrated,
and leave it there for the moment.

CAUTION: Take care not to impose excessive force
on the inside handle link(4), lest this link be
elongated, which could make it impossible to
operate the door with the inside handle.

632RW002

5. Remove the door trim panel(6).

D

Remove two fixing screws(8) to take off seven
clips(7) from the door panel.

655R200012

D

Unplug the courtesy light connector to lift the trim
panel and unlock the engagement of the waist seal
section. Then, pass the inside lever through the
mounting hole of the trim panel, and detach the trim
panel.

6. Remove the inside handle.
7. Remove the door wood panel.

D

Refer to the Door Wood Panel Assembly in this
section.

Installation

To install, follow the removal steps in the reverse order,
noting the following point.

1. When installing the inside handle(1), assemble

temporarily to the inside handle link(2).

652RS006

8J–12

EXTERIOR/INTERIOR TRIM

2. Pass the inside handle through the mounting hole of

the trim panel.  Assemble the trim panel.  Engage
securely seven clips into the door panel.  Also,
connect the courtesy light connector.  Leave the
connector of the power window drawn out to its
prescribed position, so that it will not caught.

3. Put back the inside handle(3) to the original position

of the link(5).  Fit the claw(4) of the inside handle
securely into the hole of the door panel.  Fix the
handle with the screw.

632RW011


Content   ..  1029  1030  1031  1032   ..