Infiniti QX56 (JA60). Manual - part 302


  Index      Infiniti     Infiniti QX56 (JA60) - service repair manual 2010 year


Search            


Content   ..  300  301  302  303   ..


Infiniti QX56 (JA60). Manual - part 302


FRONT OIL SEAL

DLN-131

< ON-VEHICLE REPAIR >

[ATX14B]

C

E

F

G

H

I

J

K

L

M

A

B

DLN

N

O

P

FRONT OIL SEAL

Removal and Installation

INFOID:0000000005148888

REMOVAL

1. Partially drain the transfer fluid. Refer to 

DLN-129

.

2. Remove the front propeller shaft. Refer to 

DLN-186, "Removal and Installation"

.

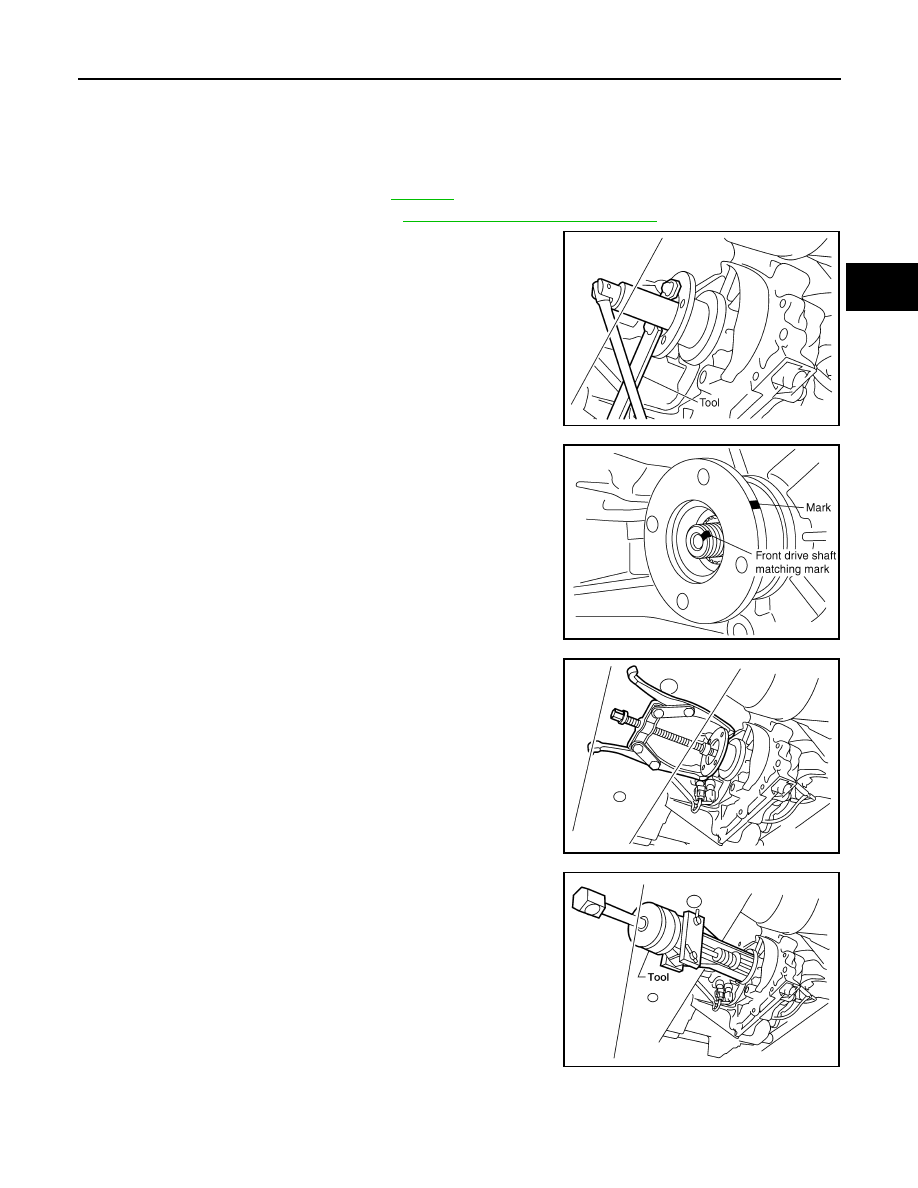
3. Remove the companion flange self-lock nut using suitable tool.

4. Put a matching mark on top of the front drive shaft in line with

the mark on the companion flange.

CAUTION:

Use paint to make the matching mark on the front drive

shaft. Do not damage the front drive shaft.

5. Remove the companion flange using suitable tool.

6. Remove the front oil seal from the front case using Tool.

CAUTION:

Do not damage front case.

INSTALLATION

SDIA2657E

SDIA2658E

WDIA0193E

Tool number

: KV381054S0 (J-34286)

LDIA0144E

DLN-132

< ON-VEHICLE REPAIR >

[ATX14B]

FRONT OIL SEAL

1. Install the new front oil seal until it is flush with the end face of

the front case using Tool.

CAUTION:

• Do not reuse oil seal.

• Apply petroleum jelly to oil seal.

2. Align the matching mark of the front drive shaft with the match-

ing mark of the companion flange, then install the companion

flange.

3. Install the new self-lock nut. Tighten to the specified torque

using suitable tool. Refer to 

DLN-142, "Disassembly and

Assembly"

.

CAUTION:

Do not reuse self-lock nut.

4. Install the front propeller shaft. Refer to 

DLN-186, "Removal and

Installation"

.

5. Refill the transfer with fluid and check for fluid leakage and fluid

level. Refer to 

DLN-129, "Inspection"

.

Tool number : KV38100500 ( — )

SDIA2662E

SDIA2658E

LDIA0147E

REAR OIL SEAL

DLN-133

< ON-VEHICLE REPAIR >

[ATX14B]

C

E

F

G

H

I

J

K

L

M

A

B

DLN

N

O

P

REAR OIL SEAL

Removal and Installation

INFOID:0000000005148889

REMOVAL

1. Partially drain the transfer fluid. Refer to 

DLN-129, "Replacement"

.

2. Remove the rear propeller shaft. Refer to 

DLN-196, "Removal and Installation"

.

3. Remove the dust cover from the rear case.

CAUTION:

Do not damage the rear case.

4. Remove the rear oil seal from the rear case using Tool.

CAUTION:

Do not damage the rear case.

INSTALLATION

1. Install the new rear oil seal until it is flush with the end face of the

rear case using Tool.

CAUTION:

• Do not reuse oil seal.

• Apply petroleum jelly to oil seal.

2. Apply petroleum jelly to the circumference of the new dust cover

(1). Position the new dust cover as shown.

CAUTION:

• Do not reuse dust cover.

• Position the projection in the position shown.

• Rear case assembly (2)

• Protrusions (A)

WDIA0127E

Tool number

: KV381054S0 (J-34286)

LDIA0139E

Tool number

: ST30720000 (J-25405)

LDIA0140E

AWDIA0550GB

DLN-134

< ON-VEHICLE REPAIR >

[ATX14B]

REAR OIL SEAL

3. Install the new dust cover to the rear case using Tool.

CAUTION:

• Do not reuse dust cover.

• Apply petroleum jelly to dust cover.

4. Install the rear propeller shaft. Refer to 

DLN-196, "Removal and

Installation"

.

5. Refill the transfer with fluid and check for fluid leakage and fluid

level. Refer to 

DLN-129, "Replacement"

.

Tool number

: KV40105310 ( — )

PDIA0116E


Content   ..  300  301  302  303   ..