Infiniti QX4 (R50). Manual - part 124
 

  Index      Infiniti     Infiniti QX4 (R50) - service repair manual 2001 year


Search            copyright infringement  


Content   ..  122  123  124  125   ..


Infiniti QX4 (R50). Manual - part 124


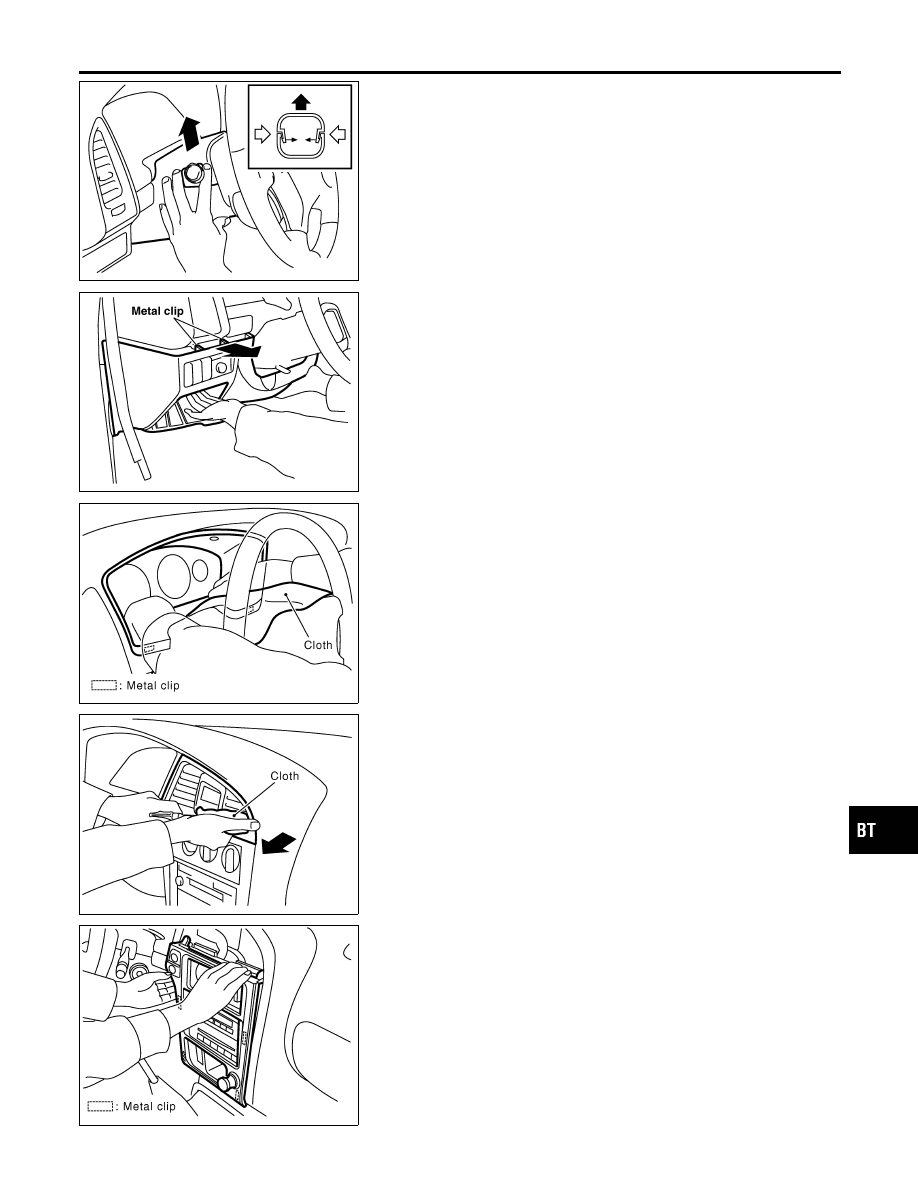
SBT029A

Steering column cover
After removing the screws, release the pawls by pressing on the
upper cover where it meets (the bottom cover) from both sides.

SBT030A

Instrument lower panel on the driver side
Open the pocket after removing the screws. Hold the opening and
the bottom and pull out horizontally.

SBT044A

Cluster lid A
After removing the screws, hold the bottom and pull out.

CAUTION:

Cover the surroundings with a cloth to prevent damage.

SBT031A

Center ventilator
Hook a cloth-covered flat-bladed screwdriver into the right-side
groove section, and pull out.

CAUTION:

To prevent the screwdriver from slipping and causing damage
to the surface, pull out while applying pressure on the screw-
driver towards the right.

SBT045A

Cluster lid C
After removing the screws, place hands on the metal clip section,
and pull forward to remove the metal clips.

GI

MA

EM

LC

EC

FE

AT

TF

PD

AX

SU

BR

ST

RS

HA

SC

EL

IDX

INSTRUMENT PANEL ASSEMBLY

Removal and Installation (Cont’d)

BT-25

SBT040A

Console finisher
1)

Open the lid of the cup holders, insert a cloth-covered flat-
bladed screwdriver into the gap between the console and the
finisher, and remove the clip at the back.

2)

Lift up the metal clip section, and pull forward to remove.

SBT033A

Console box
1)

Pull up the parking brake lever.

2)

Remove the screws, pull the console towards the back of the
car until it is free of the instrument panel, lift up the front and
remove.

I

It will be easier to remove if the parking brake lever is pulled
up for more than 10 notches.

SBT034A

Instrument finisher
Remove the screws and pull up.

SBT046A

Instrument lower panel on the passenger side
After removing the screws, hold both sides and pull out horizontally.

SBT047A

Instrument mask
Insert a cloth-covered flat-bladed screwdriver, and remove by lift-
ing up.

INSTRUMENT PANEL ASSEMBLY

Removal and Installation (Cont’d)

BT-26

SBT035A

Defroster grille
REMOVAL
Insert a cloth-covered flat-bladed screwdriver into the grilles of the
outside, center and central grilles, respectively, lift up the front of
the grilles and remove.
INSTALLATION
After inserting the front section, insert the rear section (pawls) to
attach.

CAUTION:

Confirm that the pawls at the rear are securely attached.

SBT036A

Side ventilator-left
Insert a cloth-covered flat-bladed screwdriver into the lower
section, and pull out forward.

SBT037A

Side ventilator-right
Insert a cloth-covered flat-bladed screwdriver into the corner of the
lower section, and pull out forward. (Securely press the screwdriver
against the ventilator.) Or, after removing the instrument lower
panel, push the ventilator out from the back.
Side defroster grille
After removing the side ventilator, reach in with hands from the
opening, push on the pawls from behind the grille, and remove by
pushing out.

GI

MA

EM

LC

EC

FE

AT

TF

PD

AX

SU

BR

ST

RS

HA

SC

EL

IDX

INSTRUMENT PANEL ASSEMBLY

Removal and Installation (Cont’d)

BT-27

Removal and Installation

NBBT0009

CAUTION:

Wrap the tip of flat-bladed screwdriver with a cloth when removing metal clips from garnishes.
1. Remove front and rear seats. Refer to “FRONT SEAT” and “REAR SEAT” for details, BT-41, BT-44.
2. Remove front and rear seat belts. Refer to RS-4 and RS-5, “Front Seat Belt” and “Rear Seat Belt” for

details.

3. Remove front and rear kicking plates.
4. Remove dash side lower finishers.
5. Remove front and rear body side welts.
6. Remove front pillar garnishes.
7. Remove center assist grips.
8. Remove center pillar lower garnishes.
9. Remove center pillar upper garnishes.
10. Remove rear gate kicking plate.
11. Remove rear net hooks.
12. Remove tonneau cover assembly and rear parcel holder.
13. Remove rear side lower garnishes.
14. Remove rear side upper garnishes.

SBT694

SIDE AND FLOOR TRIM

Removal and Installation

BT-28


Content   ..  122  123  124  125   ..