Honda Element. Manual - part 473


  Index      Honda     Honda Element - service repair manual 2007-2008 year


Search            


Content   ..  471  472  473  474   ..


Honda Element. Manual - part 473


Courtesy of AMERICAN HONDA MOTOR CO., INC.

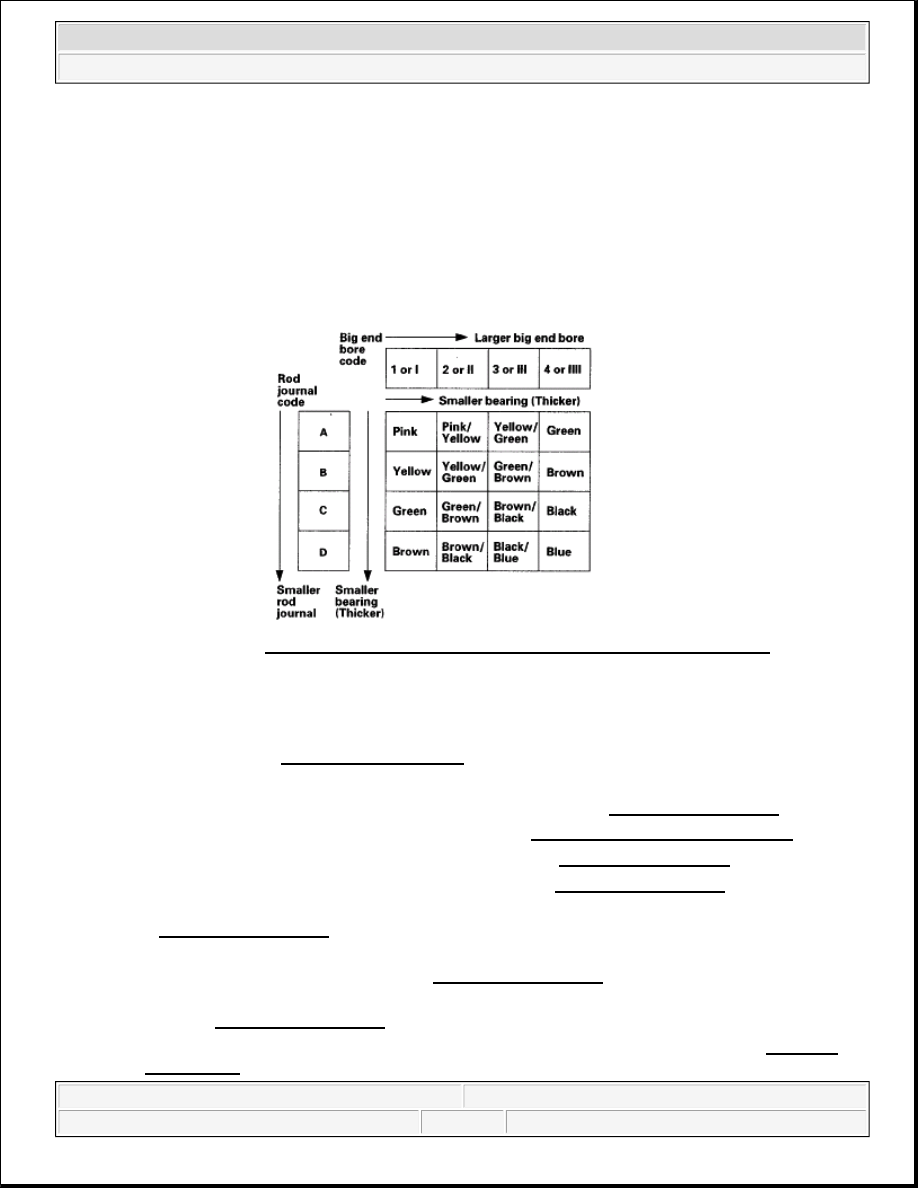
4. Use the big end bore codes and rod journal codes to select appropriate replacement bearings from the 

following table. 

OIL PAN REMOVAL 

1. Drain the engine oil (see OIL PRESSURE TEST ).  

2. If the engine is still in the vehicle, remove the subframe. 

-1 Attach the engine support hanger to the engine (see step 42 inENGINE REMOVAL ).  

-2 Disconnect the suspension knuckle ball joints (see LOWER ARM REPLACEMENT ).  

-3 Remove the rear mount mounting bolts (see step 44 in ENGINE REMOVAL ).  

-4 Remove the front mount mounting bolt (see step 45 inENGINE REMOVAL ).  

-5 A/T model: Remove the automatic transmission fluid (ATF) filter mounting bolt (see step 37 
inENGINE REMOVAL ).  

-6 Make the appropriate reference lines at positions A and B that line up with the center of the 
subframe mounting bolts (see step 46 inENGINE REMOVAL ).  

-7 Attach the subframe adapter to the subframe, then attach the jack to the subframe adapter (see 
step 47 inENGINE REMOVAL ).  

-8 Remove the front subframe mounting bolts, then lower the subframe (see step 49 inENGINE 
REMOVAL
 ).  

NOTE:

The color code is on the edge of the bearing.  

When using bearing halves of different colors, it does not matter 
which color is used in the top or bottom. 

Fig. 14: Big End Bore Codes And Rod Journal Codes Chart 
Courtesy of AMERICAN HONDA MOTOR CO., INC. 


2007 Honda Element EX 

2007-08 ENGINE Engine Block - Element


3. M/T model: Remove the clutch cover. 

Fig. 15: Identifying Front Subframe Mounting Bolts 
Courtesy of AMERICAN HONDA MOTOR CO., INC. 

4. Remove the bolts/nuts securing the oil pan.  

5. Drive an oil pan seal cutter between the oil pan and engine block. 

Fig. 16: Driving Oil Pan Seal Cutter Between Oil Pan And Engine Block 
Courtesy of AMERICAN HONDA MOTOR CO., INC. 

6. Cut the oil pan seal by striking the side of the cutter to slide the cutter along the oil pan. 


2007 Honda Element EX 

2007-08 ENGINE Engine Block - Element


Fig. 17: Cutting Oil Pan Seal By Striking Side Of Cutter 
Courtesy of AMERICAN HONDA MOTOR CO., INC. 

7. Remove the oil pan.  

CRANKSHAFT AND PISTON REMOVAL 

1. Remove the engine/transmission (see ENGINE REMOVAL ).  

2. Remove the transmission: 

Manual transmission (see TRANSMISSION REMOVAL )  

Automatic transmission (see TRANSMISSION REMOVAL )  

3. M/T model: Remove the pressure plate (see CLUTCH REPLACEMENT ), clutch disc (see CLUTCH 

REPLACEMENT ), and flywheel (see FLYWHEEL INSPECTION ).  

4. A/T model: Remove the drive plate (see DRIVE PLATE REMOVAL AND INSTALLATION ).  

5. Remove the oil pan (see OIL PAN REMOVAL ).  

6. Remove the oil pump (see OIL PUMP REMOVAL ).  

7. Remove the cylinder head (see CYLINDER HEAD REMOVAL ).  

8. Remove the baffle plates. 


2007 Honda Element EX 

2007-08 ENGINE Engine Block - Element


Fig. 18: Identifying Baffle Plates Bolts 
Courtesy of AMERICAN HONDA MOTOR CO., INC. 

9. If you can feel a ridge of metal or hard carbon around the top of each cylinder, remove it with a ridge 

reamer (A). Follow the reamer manufacturer's instructions. If the ridge is not removed, it may damage the 
pistons as they are pushed out. 

Fig. 19: Removing Ridge Reamer 
Courtesy of AMERICAN HONDA MOTOR CO., INC. 

10. Remove the 8 mm bolts from the lower block in the criss-cross pattern shown. 


2007 Honda Element EX 

2007-08 ENGINE Engine Block - Element


Content   ..  471  472  473  474   ..