Honda Element. Manual - part 294


  Index      Honda     Honda Element - service repair manual 2007-2008 year


Search            


Content   ..  292  293  294  295   ..


Honda Element. Manual - part 294


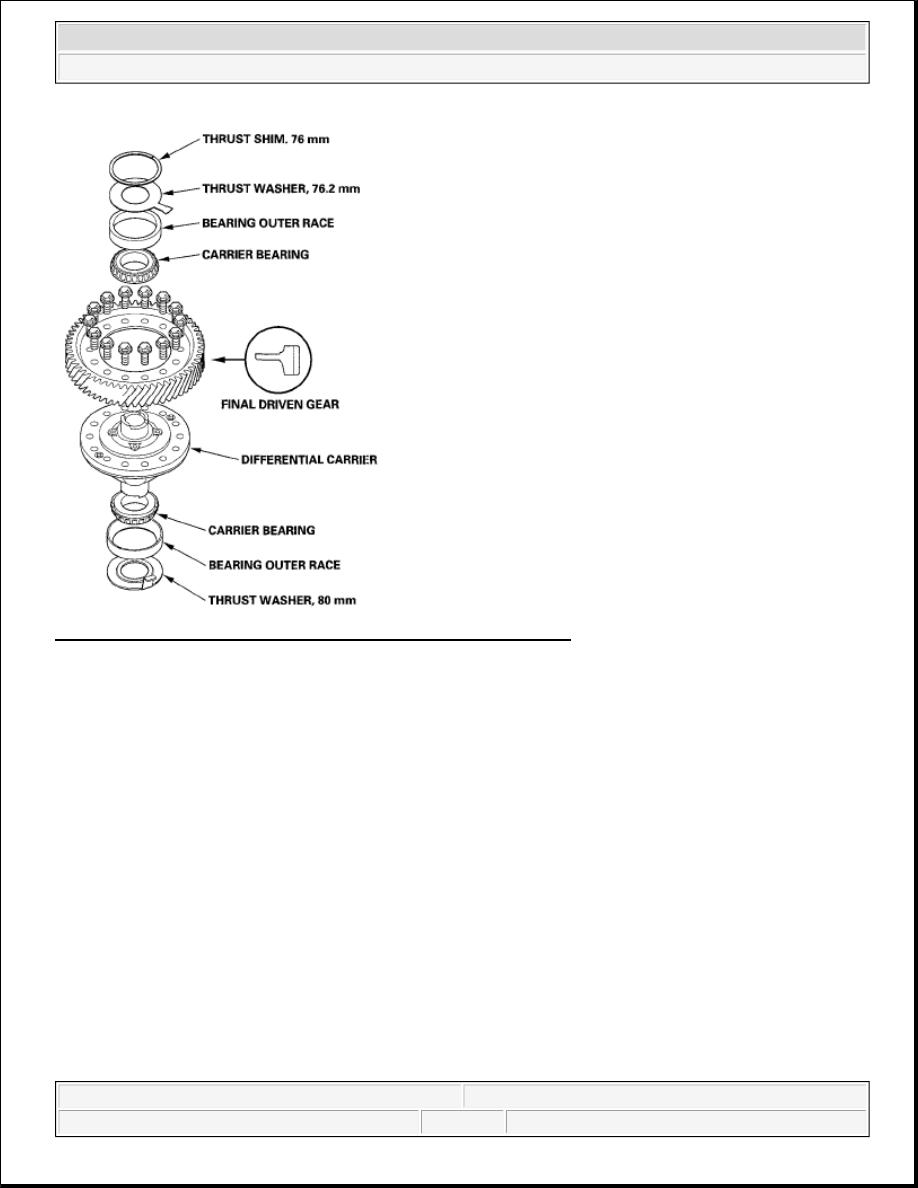
Fig. 556: Identifying A/T Differential Components Location (2WD) 
Courtesy of AMERICAN HONDA MOTOR CO., INC. 

BACKLASH INSPECTION 

1. Install the drive shaft and intermediate shaft into the differential assembly.  

2. Secure the driveshaft (A) in a bench vise (B) with soft jaws (C). To prevent damage to the driveshaft, 

always use soft jaws or equivalent material between the driveshaft and the vise. 

NOTE:

The illustration shows the 4WD transmission; the 2WD transmission is similar.


2007 Honda Element EX 

2007-2008 TRANSMISSION Automatic Transmission - Element


Fig. 557: Measuring Backlash Of Final Driven Gear 
Courtesy of AMERICAN HONDA MOTOR CO., INC. 

3. Place the intermediate shaft (D) on a V-block (E), then fix the intermediate shaft using a grip (F) or 

equivalent.  

4. Measure the backlash of the final driven gear (G) with a dial indicator (H). 

Standard: 1.1-1.6 mm (0.04-0.06 in.)  

5. If the backlash is out of standard, replace the differential carrier; 4WD (see DIFFERENTIAL 

CARRIER, FINAL DRIVEN GEAR, AND TRANSFER DRIVE GEAR REPLACEMENT ), 2WD 
(see DIFFERENTIAL CARRIER, FINAL DRIVEN GEAR, AND TRANSFER DRIVE GEAR 
REPLACEMENT
 ).  

CARRIER BEARING REPLACEMENT 

Special Tools Required  

Attachment, 40 x 50 mm 07LAD-PW50601 

1. 4WD: Remove the final driven gear and transfer drive gear (see DIFFERENTIAL CARRIER, FINAL 

NOTE:

The bearing and bearing outer race should be replaced as a set.  

Inspect and adjust the carrier bearing preload whenever a bearing is 
replaced.  

Check the bearing for wear and rough rotation. If the bearing is OK, 
removal is not necessary.  

The illustration shows the 4WD transmission; the 2WD transmission is 
similar.  


2007 Honda Element EX 

2007-2008 TRANSMISSION Automatic Transmission - Element


DRIVEN GEAR, AND TRANSFER DRIVE GEAR REPLACEMENT ). 

2WD: Remove the final driven gear (see DIFFERENTIAL CARRIER, FINAL DRIVEN GEAR, 
AND TRANSFER DRIVE GEAR REPLACEMENT
 ). 

2. Remove the carrier bearing (A) with a commercially available puller (B), bearing separator (C), and 

stepper adapter (D). 

Fig. 558: Removing Carrier Bearing 
Courtesy of AMERICAN HONDA MOTOR CO., INC. 

3. Install the new bearings with the 40 x 50 mm attachment and a press. Press the bearing on securely so 

there is no clearance between the bearing and the differential carrier. 

Fig. 559: Pressing Bearings 
Courtesy of AMERICAN HONDA MOTOR CO., INC. 

DIFFERENTIAL CARRIER, FINAL DRIVEN GEAR, AND TRANSFER DRIVE 
GEAR REPLACEMENT 

4WD 

1. Remove the final driven gear (A) and transfer drive gear (B) from the differential carrier (C). 


2007 Honda Element EX 

2007-2008 TRANSMISSION Automatic Transmission - Element


Fig. 560: Identifying Final Driven Gear And Transfer Drive Gear From Differential Carrier (4WD) 
With Torque Specification
 
Courtesy of AMERICAN HONDA MOTOR CO., INC. 

2. Install the final driven gear and transfer drive gear on the differential carrier in the direction shown.  

3. Tighten the bolts to the specified torque in a crisscross pattern in two or more steps.  

DIFFERENTIAL CARRIER AND FINAL DRIVEN GEAR REPLACEMENT 

2WD 

1. Remove the final driven gear (A) from the differential carrier (B). 

NOTE:

The final driven gear bolts have left-hand threads.

NOTE:

The final driven gear bolts have left-hand threads.


2007 Honda Element EX 

2007-2008 TRANSMISSION Automatic Transmission - Element


Content   ..  292  293  294  295   ..