Honda Civic. Manual - part 723


  Index      Honda     Honda Civic - service repair manual 2006-2009 year


Search            


Content   ..  721  722  723  724   ..


Honda Civic. Manual - part 723


terminal cover base (B), and disconnect the window antenna connector (C). 

Fig. 27: Removing Terminal Cover From Window Antenna Terminal 
Cover Base
 

3. Disconnect the rear window defogger connectors (D).  
4. If the old rear window will be reinstalled, make alignment marks across the 

glass and body with a grease pencil.  

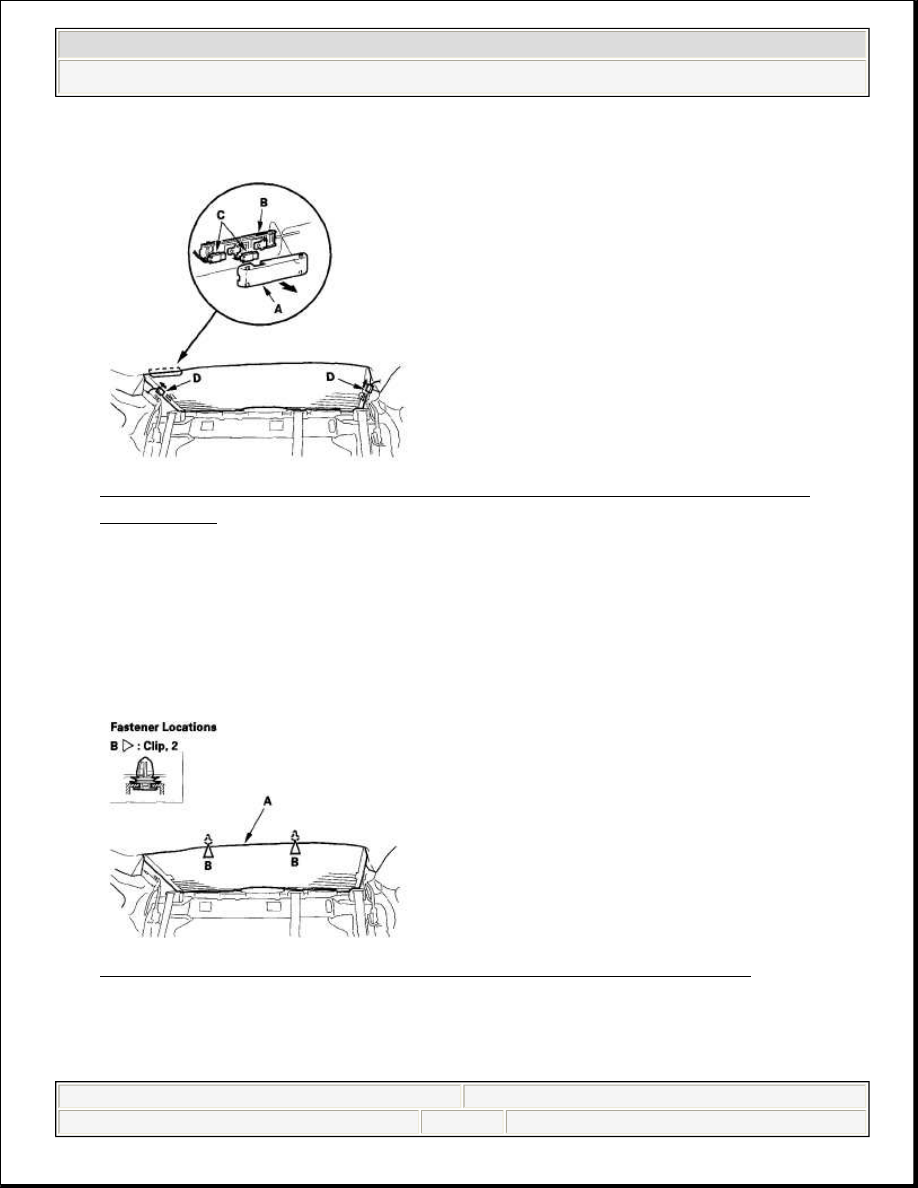
5. Pull down the rear portion of the headliner (A) by detaching the clips (B). Take 

care not to bend the headliner excessively, or you may crease or break it. 

Fig. 28: Detaching Clips To Remove Rear Portion Of Headliner 

6. Apply protective tape along the inside and outside edges of the body. Using an 

awl, make a hole through the adhesive from inside the vehicle at the corner 
portion of the rear window. Push a piece of piano wire through the hole, and 


2008 Honda Civic EX 

2006-08 ACCESSORIES & EQUIPMENT Glass - Civic (All Except Hybrid)


wrap each end around a piece of wood.  

7. Remove the lower rubber dam (A) from the lower edge of the rear window (B). 

If necessary, cut the molding with a utility knife. 

Fig. 29: Removing Lower Rubber Dam From Lower Edge Of Rear 
Window
 

8. With a helper on the outside, pull the piano wire (A) back and forth in a sawing 

motion. Hold the piano wire as close to the rear window (B) as possible to 
prevent damage to the body, and carefully cut through the adhesive (C) around 
the entire rear window. 

Fig. 30: Pulling Piano Wire Back And Forth In Sawing Motion 

Cutting positions  


2008 Honda Civic EX 

2006-08 ACCESSORIES & EQUIPMENT Glass - Civic (All Except Hybrid)


Fig. 31: Identifying Cutting Positions 

9. Carefully remove the rear window.  

10. With a putty knife, scrape the old adhesive smooth to a thickness of about 2 

mm (0.08 in.) on the bonding surface around the entire rear window opening 
flange: 


Do not scrape down to the painted surface of the body; damaged paint will 
interfere with proper bonding.  


Remove the fasteners from the body.  

11. Clean the body bonding surface with a sponge dampened in alcohol. After 

cleaning, keep oil, grease, and water from getting on the surface.  

12. If the old rear window will be reinstalled, use a putty knife to scrape off the old 

adhesive, the moldings and the fasteners from the rear window. Clean the 
inside face and the edge of the rear window with alcohol where new adhesive 
will be applied. Make sure the bonding surface is kept free of water, oil, and 
grease.  

13. Attach the window antenna terminal cover base (A) with adhesive tape to the 

inside face of the rear window (B) as shown. Apply primer to the inside face of 
the rear window as shown. Be careful not to touch the rear window where 
adhesive will be applied. 


2008 Honda Civic EX 

2006-08 ACCESSORIES & EQUIPMENT Glass - Civic (All Except Hybrid)


Fig. 32: Identifying Antenna Terminal Cover Base With Adhesive Tape To 
Inside Face Of Rear Window (With Specifications)
 

14. Apply primer to the edge of the rear window (A) where the lower rubber dam 

adhesive tape will be attached as shown. Attach the lower rubber dam (B) with 
adhesive tape (C) to the lower edge of the rear window: 


After installing the rubber dam, cut the ends (D) of the rubber dam as 
shown.  


Be careful not to touch the windshield where adhesive will be applied.  

Rubber dams adhesive tape:  

Thickness 0.2 mm (0.008 in.)  
Width 4 mm (0.16 in.)  


2008 Honda Civic EX 

2006-08 ACCESSORIES & EQUIPMENT Glass - Civic (All Except Hybrid)


Content   ..  721  722  723  724   ..