Great Wall Hover. Manual - part 69


  Index      Great Wall     Great Wall Hover - service repair manual


Search            copyright infringement  


Content   ..  67  68  69  70   ..


Great Wall Hover. Manual - part 69


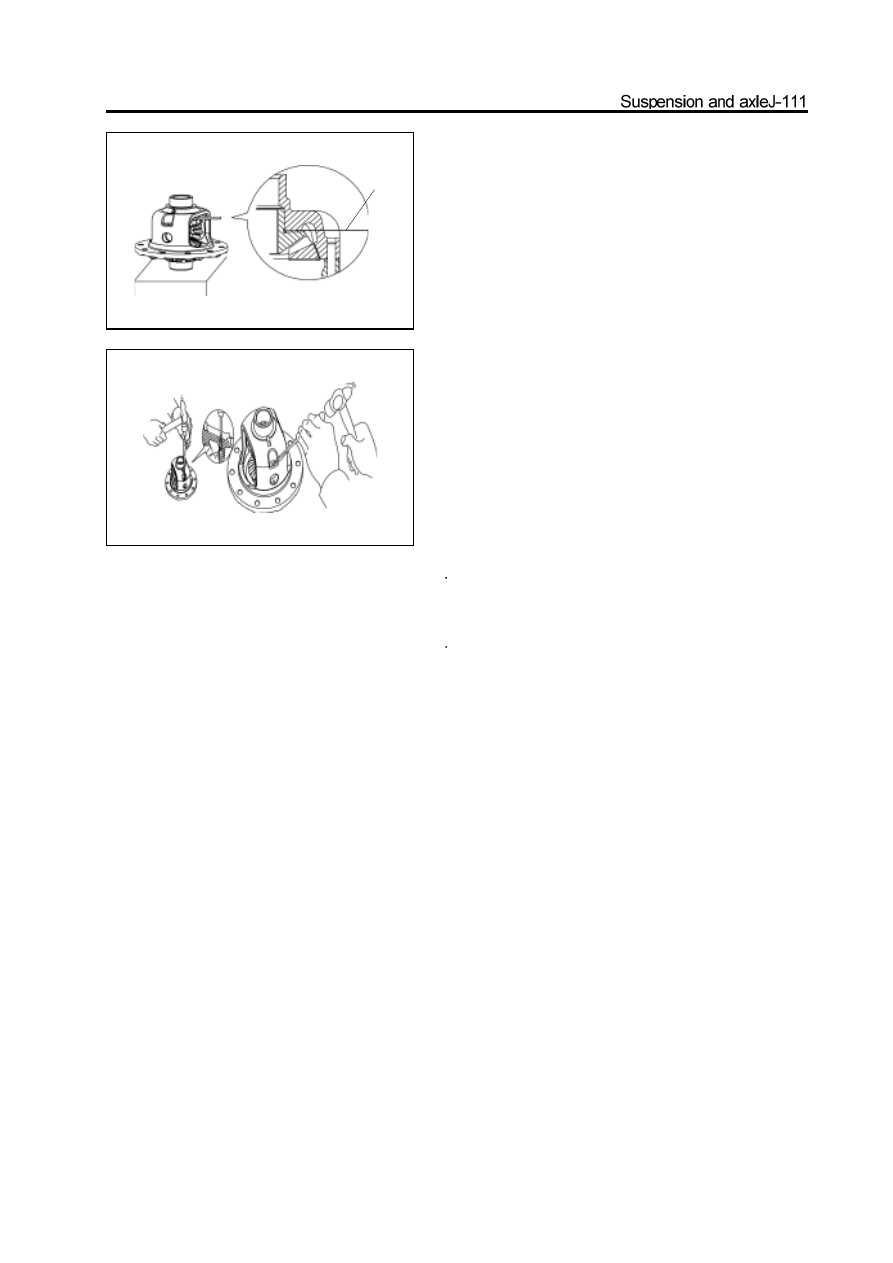
c.Use the feeler to measure the clearance between the thrust plate

  and differential housing; it can be replaced by the thrust plate with

  different thickness if the clearance is beyond the specified range.

Standard clearance:   0.45-0.75mm

     d.Install the straight pin

Use the hammer and punch to knock in the pin through the hole

on the differential housing and planetary gear shaft. Rivet the pin

with the differential housing.

Installation of differential

1 Install the differential assembly in the reducer hous

    ing

(Refer to “Assembly of Reducer”)

2 Install the differential

(Refer to “Installation of Reducer and Differential Assembly”)

f

eeler

Rear suspension

m:       specified torque

bush clip

bush

rear stabilizer bar

rear connecting rod of stabilizer bar assembly

plain washer

short longitudinal
pull-rod fixed bolt

rubber pad

short longitudinal
pull-rod fixed bolt

long longitudinal
pull-rod assembly

long longitudinal
pull-rod fixed bolt

long longitudinal
pull-rodassembly

short longitudinal
pull-rod assembly

rear axle

assembly

coil spring

upper support pad

of coil spring

short longitudinal pull-rod assembly

long longitudinal

pull-rod assembly

rear vibration damper

cross pull-rod assembly

cross pull-rod

connecting bolt

Removal of vibration damper

1. Use the lifter to raise the car firstly, then support

 the rear axle by bracket.

2. Remove the upper and lower fixing nut which is used

to fix the vibration damper; compress the vibration

damper by hand.


Remove the upper end firstly, then the

    lower end; take out the vibration damper .

Installation of vibration damper:

1. Lower tightening force of vibration damper:

1 7 0

5 N

m .

Upper tightening torque :  Compress the rubber block to 2/3 of

total height.

Caution: If the fixing nut of vibration damper is the lock nut, it

should be replaced by the new lock nut after replace the vibra-

tion damper.

Removal of coil spring:

1

. Remove the vibration damper (As previous )

2. Use the special tools to clamp the coil spring.

3. Place the car in the bounce status, take out the

    coilspring

4. Remove the special tools from the coil spring.

Installation of coil spring:

1. Firstly, use the special tools to clamp the coil spring

    to certain height (height when car is in bounce

    status).

2. Cautions for installation: Adjust the rubber gasket on

    the spring to ensure the spring in flat status.

3. Remove the special tools.

special tools

Removal of connecting rod of stabilizer bar:

1.Shown as figure, firstly screw off the nut in the con

   necting place between the connecting rod of stabi

   lizer bar and carriage. (Need the inner hexagon

   spanner ).

2.Screw off the nut connected to stabilizer bar in same

   method; screw off the connecting rod.

Installation of connecting rod of stabilizer bar:

Tighten it to the specified torque during installation:

6 3

5 N

m


Content   ..  67  68  69  70   ..