Dodge Sprinter. Manual - part 91
 

  Index      Dodge     Dodge Sprinter / Mercedes-Benz - service repair manual 2006 year


Search            


Content   ..  89  90  91  92   ..


Dodge Sprinter. Manual - part 91


WIPER RELAY

DESCRIPTION

A wiper relay is standard equipment on all models.

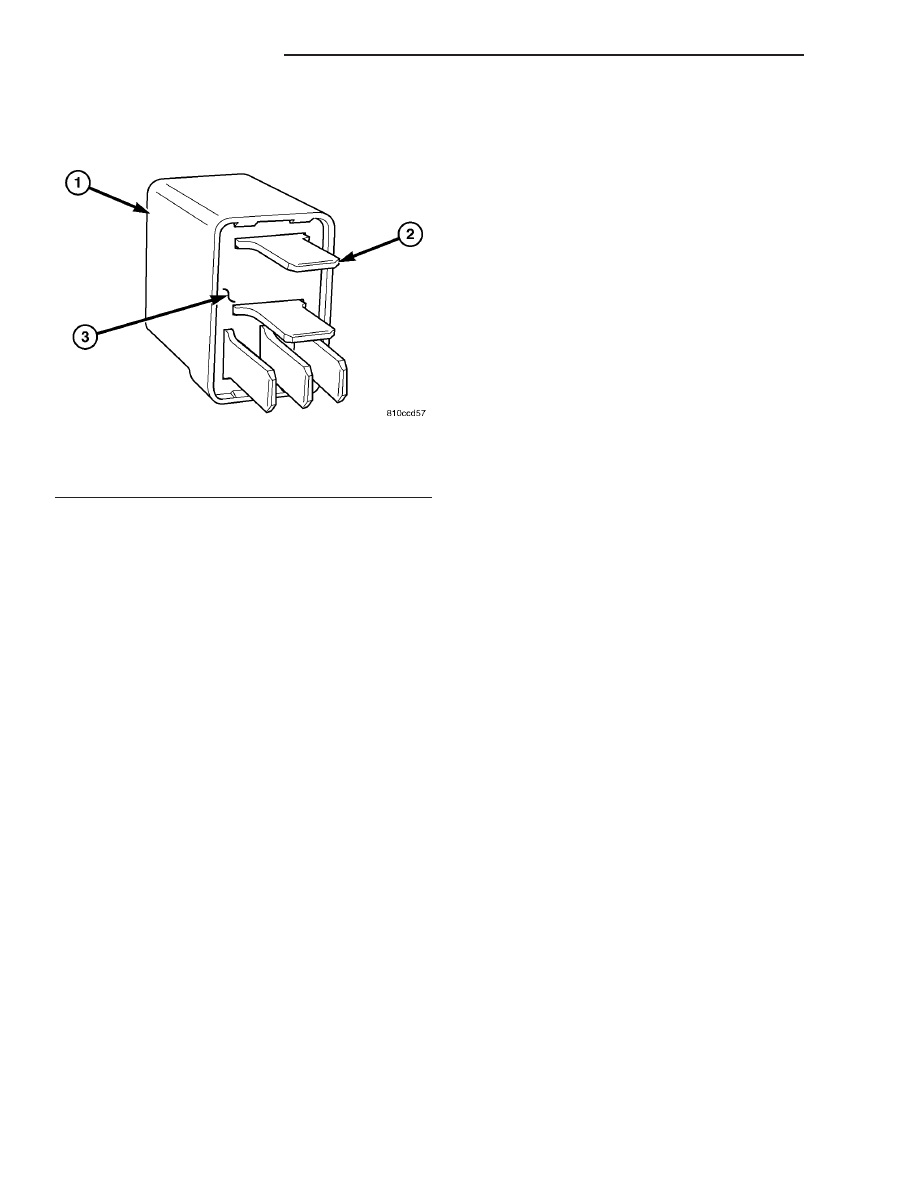
The wiper relay (or intermittent wipe relay) is
located in a dedicated receptacle on the bottom left of
the fuse block on the underside of the steering col-
umn (Fig. 33). The wiper relay is a conventional
International Standards Organization (ISO) micro
relay. Relays conforming to the ISO specifications
have common physical dimensions, current capaci-
ties, terminal patterns, and terminal functions. The
relay is contained within a small, rectangular,
molded plastic housing. The relay is connected to all
of the required inputs and outputs through the
instrument panel wire harness connector by five
male spade-type terminals that extend from the bot-
tom of the relay base. The ISO designation for each
terminal is molded into the base adjacent to the ter-
minal. The ISO terminal designations are as follows:

• 30 (Common Feed) - This terminal is con-

nected to the movable contact point of the relay.

• 85 (Coil Ground) - This terminal is connected

to the ground feed side of the relay control coil.

• 86 (Coil Battery) - This terminal is connected

to the battery feed side of the relay control coil.

• 87 (Normally Open) - This terminal is con-

nected to the normally open fixed contact point of the
relay.

• 87A (Normally Closed) - This terminal is con-

nected to the normally closed fixed contact point of
the relay.

The wiper relay cannot be adjusted or repaired. If

the relay is damaged or faulty, it must be replaced.

OPERATION

The wiper relay (or intermittent wipe relay) is an

electromechanical switch that uses a low current
input from the intermittent wipe logic circuitry
within the fuse block underneath the steering column
to control a high current output to the low speed
brush of the wiper motor. The movable common feed
contact point is held against the fixed normally
closed contact point by spring pressure. When the
relay coil is energized, an electromagnetic field is
produced by the coil windings. This electromagnetic
field draws the movable relay contact point away
from the fixed normally closed contact point, and
holds it against the fixed normally open contact
point. When the relay coil is de-energized, spring
pressure returns the movable contact point back
against the fixed normally closed contact point. A
resistor or diode is connected in parallel with the
relay coil in the relay, and helps to dissipate voltage
spikes and electromagnetic interference that can be
generated as the electromagnetic field of the relay
coil collapses.

The wiper relay terminals are connected to the

vehicle electrical system through a connector recepta-
cle in the fuse block. The inputs and outputs of the
wiper relay include:

• The common feed terminal (30) provides an out-

put to the wiper motor low speed brush through the
wiper control circuitry of the multi-function switch on
the steering column. When the wiper relay is de-en-
ergized, the common feed terminal is connected to
the input of the relay normally closed terminal (87).
When the wiper relay is energized, the common feed
terminal is connected to the input of the relay nor-
mally open terminal (87A).

• The coil ground terminal (85) is connected to

battery current through a fused ignition switch out-
put circuit whenever the ignition switch is in the On
position.

• The coil battery terminal (86) is connected to the

relay control output of the wiper, turn signals and
engine start control module within the fuse block
through the wiper relay control circuit. This elec-
tronic circuitry controls the ground path for this cir-
cuit internally to energize or de-energize the wiper
relay control coil based upon its programming and
inputs from the wiper and washer control circuitry of
the multi-function switch, the wiper motor park
switch, and the ignition switch.

• The normally open terminal (87) is connected to

the output of the wiper motor park switch through
the wiper motor park switch sense circuit. This cir-
cuit can carry either battery current (wipers are not
in park position) or ground (wipers are in park posi-
tion), depending upon the status of the wiper park
switch.

Fig. 33 Wiper Relay

1 - HOUSING
2 - TERMINAL (5)
3 - BASE

8R - 34

WIPERS/WASHERS

VA

• The normally closed terminal (87A) is connected

to battery current through a fused ignition switch
output circuit whenever the ignition switch is in the
On position.

The wiper relay can be diagnosed using conven-

tional diagnostic tools and methods.

REMOVAL

WARNING: To avoid personal injury or death, on
vehicles equipped with airbags, disable the supple-
mental

restraint

system

before

attempting

any

steering wheel, steering column, airbag, seat belt
tensioner, or instrument panel component diagno-
sis or service. Disconnect and isolate the battery
negative (ground) cable, then wait two minutes for
the system capacitor to discharge before perform-
ing further diagnosis or service. This is the only
sure way to disable the supplemental restraint sys-
tem. Failure to take the proper precautions could
result in accidental airbag deployment.

(1) Disconnect and isolate the battery negative

cable.

(2) Remove the fuse access panel from the steering

column opening cover below the steering column on
the instrument panel.

(3) Reach through and below the outboard side of

the fuse access opening to access the wiper relay
(Fig. 34).

(4) Remove the wiper relay by grasping it firmly,

releasing the latches and pulling it straight down
from the receptacle on the bottom of the fuse block.

INSTALLATION

WARNING: To avoid personal injury or death, on
vehicles equipped with airbags, disable the supple-
mental

restraint

system

before

attempting

any

steering wheel, steering column, airbag, seat belt
tensioner, or instrument panel component diagno-
sis or service. Disconnect and isolate the battery
negative (ground) cable, then wait two minutes for
the system capacitor to discharge before perform-
ing further diagnosis or service. This is the only
sure way to disable the supplemental restraint sys-
tem. Failure to take the proper precautions could
result in accidental airbag deployment.

(1) Position the wiper relay to the receptacle on

the bottom of the fuse block (Fig. 34).

(2) Align the wiper relay terminals with the termi-

nal cavities in the fuse block receptacle.

(3) Push firmly and evenly on the top of the wiper

relay until the terminals are fully seated in the ter-
minal cavities in the receptacle of the fuse block and
both latches are fully engaged.

(4) Reinstall the fuse access panel onto the steer-

ing column opening cover below the steering column
on the instrument panel.

(5) Reconnect the battery negative cable.

Fig. 34 Wiper Relay Remove/Install

1 - FUSE BLOCK
2 - LOWER INSTRUMENT PANEL
3 - STEERING COLUMN COVER
4 - LATCH (2)
5 - WIPER RELAY

VA

WIPERS/WASHERS

8R - 35

WIRING

TABLE OF CONTENTS

page

page

WIRING DIAGRAM INFORMATION. . . . . . . 8W-01-1
COMPONENT INDEX . . . . . . . . . . . . . . . . . . 8W-02-1
POWER DISTRIBUTION . . . . . . . . . . . . . . . 8W-10-1
FUSE BLOCK. . . . . . . . . . . . . . . . . . . . . . . . 8W-11-1
GROUND DISTRIBUTION . . . . . . . . . . . . . . 8W-15-1
BUS COMMUNICATIONS . . . . . . . . . . . . . . 8W-18-1
CHARGING SYSTEM . . . . . . . . . . . . . . . . . . 8W-20-1
STARTING SYSTEM . . . . . . . . . . . . . . . . . . 8W-21-1
FUEL/IGNITION SYSTEM . . . . . . . . . . . . . . 8W-30-1
TRANSMISSION CONTROL SYSTEM . . . . . 8W-31-1
VEHICLE SPEED CONTROL . . . . . . . . . . . . 8W-33-1
ANTILOCK BRAKES. . . . . . . . . . . . . . . . . . . 8W-35-1
VEHICLE THEFT SECURITY SYSTEM . . . . . 8W-39-1
INSTRUMENT CLUSTER . . . . . . . . . . . . . . . 8W-40-1
HORN/CIGAR LIGHTER. . . . . . . . . . . . . . . . 8W-41-1
AIR CONDITIONING-HEATER . . . . . . . . . . . 8W-42-1
AIRBAG SYSTEM . . . . . . . . . . . . . . . . . . . . 8W-43-1
INTERIOR LIGHTING. . . . . . . . . . . . . . . . . . 8W-44-1

CENTRAL TIMER MODULE. . . . . . . . . . . . . 8W-45-1
AUDIO SYSTEM . . . . . . . . . . . . . . . . . . . . . 8W-47-1
REAR WINDOW DEFOGGER. . . . . . . . . . . . 8W-48-1
FRONT LIGHTING . . . . . . . . . . . . . . . . . . . . 8W-50-1
REAR LIGHTING . . . . . . . . . . . . . . . . . . . . . 8W-51-1
TURN SIGNALS. . . . . . . . . . . . . . . . . . . . . . 8W-52-1
WIPERS. . . . . . . . . . . . . . . . . . . . . . . . . . . . 8W-53-1
TRAILER TOW. . . . . . . . . . . . . . . . . . . . . . . 8W-54-1
NAVIGATION/TELECOMMUNICATIONS . . . . 8W-55-1
POWER WINDOWS. . . . . . . . . . . . . . . . . . . 8W-60-1
POWER DOOR LOCKS . . . . . . . . . . . . . . . . 8W-61-1
POWER MIRRORS . . . . . . . . . . . . . . . . . . . 8W-62-1
POWER SEATS . . . . . . . . . . . . . . . . . . . . . . 8W-63-1
SPLICE INFORMATION . . . . . . . . . . . . . . . . 8W-70-1
CONNECTOR PIN-OUTS . . . . . . . . . . . . . . . 8W-80-1
CONNECTOR/GROUND/SPLICE

LOCATION . . . . . . . . . . . . . . . . . . . . . . . . 8W-91-1

POWER DISTRIBUTION . . . . . . . . . . . . . . . 8W-97-1

VA

WIRING

8W - 1


Content   ..  89  90  91  92   ..