Dodge Durango (HB). Manual - part 357


  Index      Dodge     Dodge Durango (HB) - service repair manual 2005 year


Search            


Content   ..  355  356  357  358   ..


Dodge Durango (HB). Manual - part 357


LAMP

WARNING: To avoid personal injury or death, on vehicles equipped with airbags, disable the supplemental
restraint system before attempting any steering wheel, steering column, airbag, occupant classification sys-
tem, seat belt tensioner, impact sensor, or instrument panel component diagnosis or service. Disconnect
and isolate the battery negative (ground) cable, then wait two minutes for the system capacitor to discharge
before performing further diagnosis or service. This is the only sure way to disable the supplemental
restraint system. Failure to take the proper precautions could result in accidental airbag deployment.

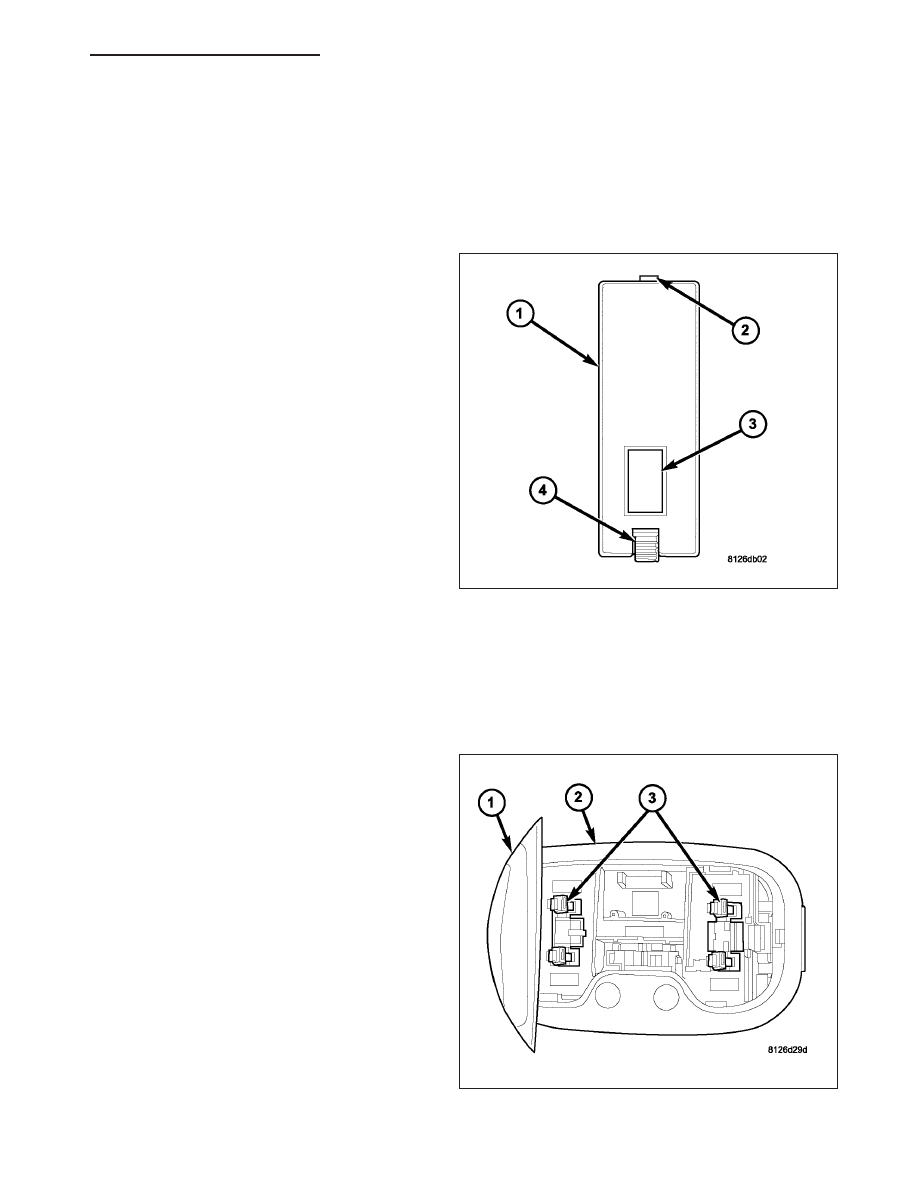
1. Position the center bezel lamp unit (1) into the for-

ward storage bin of the center floor console.

2. Reconnect the wire harness connector to the lamp

connector.

3. Engage the fixed retainer (2) of the lamp with the

forward edge of the mounting hole in the instru-
ment panel support structure.

4. Push the rearward end of the lamp upward until the

retaining latch (4) snaps into the mounting hole.

5. Reconnect the battery negative cable.

DOME LAMP

REMOVAL

BULB - FRONT

1. Disconnect and isolate the battery negative cable.

2. Remove the front dome lamp unit (2) from the

headliner. (Refer to 8 - ELECTRICAL/LAMPS/
LIGHTING

-

INTERIOR/FRONT

DOME

LAMP

UNIT - REMOVAL).

3. With the lamp lens (1) in the open position, care-

fully unsnap the bulb (3) from the two bulb holders
within the front dome lamp housing.

HB

LAMPS/LIGHTING - INTERIOR - SERVICE INFORMATION

8L - 147

LAMP - FRONT

1. Disconnect and isolate the battery negative cable.

2. Insert the tip of a small flat bladed screwdriver into

the notch (3) between the lens (2) and the housing
(1) on one side of the dome lamp unit.

3. Gently pry the end of the lens downward until it

unsnaps from the housing.

4. Swing the lens downward until it is perpendicular to

the housing.

5. Pull the lens hinge/retainer end (4) of the housing

downward slightly from the headliner, then slide the
lowered end of the housing away from the mount-
ing hole far enough to disengage the fixed retainer
on the notched end from the headliner.

6. Pull the lamp away from the headliner mounting

hole far enough to disconnect the wire harness
connector from the back of the lamp.

7. Remove the lamp from the vehicle.

BULB - REAR WITH OVERHEAD CONSOLE

1. Disconnect and isolate the battery negative cable.

2. Remove the rear dome lamp unit (2) from the

headliner. (Refer to 8 - ELECTRICAL/LAMPS/
LIGHTING - INTERIOR/REAR DOME LAMP UNIT
- REMOVAL).

3. With the lamp lens (1) in the open position, care-

fully unsnap the bulb (3) from the two bulb holders
within the rear dome lamp housing.

8L - 148

LAMPS/LIGHTING - INTERIOR - SERVICE INFORMATION

HB

BULB - REAR EXCEPT WITH OVERHEAD CONSOLE

1. Disconnect and isolate the battery negative cable.

2. Insert the tip of a small flat-bladed screwdriver into

the notch on one side of the rear dome lamp
between the lens (4) and the lamp housing (1).

3. Gently pry the notched edge of the lens downward

until it unsnaps from the housing.

4. Swing the notched end of the lens downward far

enough to access the bulb (3).

5. Carefully unsnap the bulb from the two bulb hold-

ers within the rear dome lamp housing.

LAMP - REAR EXCEPT WITH OVERHEAD CONSOLE

1. Disconnect and isolate the battery negative cable.

2. Insert the tip of a small flat bladed screwdriver into

the notch (5) between the lens (2) and the housing
(1) on one side of the dome lamp unit.

3. Gently pry the end of the lens outward until it

unsnaps from the housing.

4. Swing the lens outward until it is perpendicular to

the housing.

5. Pull the lens hinge/retainer end (3) of the housing

outward slightly from the headliner, then slide the
exposed end of the housing away from the mount-
ing hole far enough to disengage the fixed retainer
(4) on the notched end from the headliner.

6. Pull the lamp away from the headliner mounting

hole far enough to access and disconnect the wire
harness connector from the back of the lamp.

7. Remove the lamp from the vehicle.

HB

LAMPS/LIGHTING - INTERIOR - SERVICE INFORMATION

8L - 149

LAMP - REAR WITH OVERHEAD CONSOLE

1. Disconnect and isolate the battery negative cable.

2. Insert the tip of a small flat bladed screwdriver into

the notch (3) between the lens (2) and the housing
(1) on one side of the dome lamp unit.

3. Gently pry the end of the lens downward until it

unsnaps from the housing.

4. Swing the lens downward until it is perpendicular to

the housing.

5. Pull the lens hinge/retainer end (4) of the housing

downward slightly from the headliner, then slide the
lowered end of the housing away from the mount-
ing hole far enough to disengage the fixed retainer
on the notched end from the headliner.

6. Pull the lamp away from the headliner mounting

hole far enough to disconnect the wire harness
connector from the back of the lamp.

7. Remove the lamp from the vehicle.

INSTALLATION

BULB - FRONT

CAUTION: Always use the correct bulb size and type for replacement. An incorrect bulb size or type may
overheat and cause damage to the lamp, the socket and/or the lamp wiring.

1. With the dome lamp lens (1) in the open position,

align the ends of the bulb (3) with the two bulb
holders within the front dome lamp housing (2).

2. Carefully press the bulb firmly and evenly into the

bulb holders until it snaps into place.

3. Reinstall the lamp into the headliner. (Refer to 8 -

ELECTRICAL/LAMPS/LIGHTING

-

INTERIOR/

FRONT DOME LAMP UNIT - INSTALLATION).

4. Reconnect the battery negative cable.

8L - 150

LAMPS/LIGHTING - INTERIOR - SERVICE INFORMATION

HB


Content   ..  355  356  357  358   ..