Dodge Durango (HB). Manual - part 1419


  Index      Dodge     Dodge Durango (HB) - service repair manual 2005 year


Search            


Content   ..  1417  1418  1419  1420   ..


Dodge Durango (HB). Manual - part 1419


3. Clean and dry area of windshield opening to be re-

glued with a suitable glass preparation solvent and
rag.

4. Re-prime any damaged area. If old adhesive has

been exposed for more than 12 hours, entire adhe-
sive area needs to be re-primed.

5. Allow primer to air dry for at least 10 minutes.

Windshield Installation

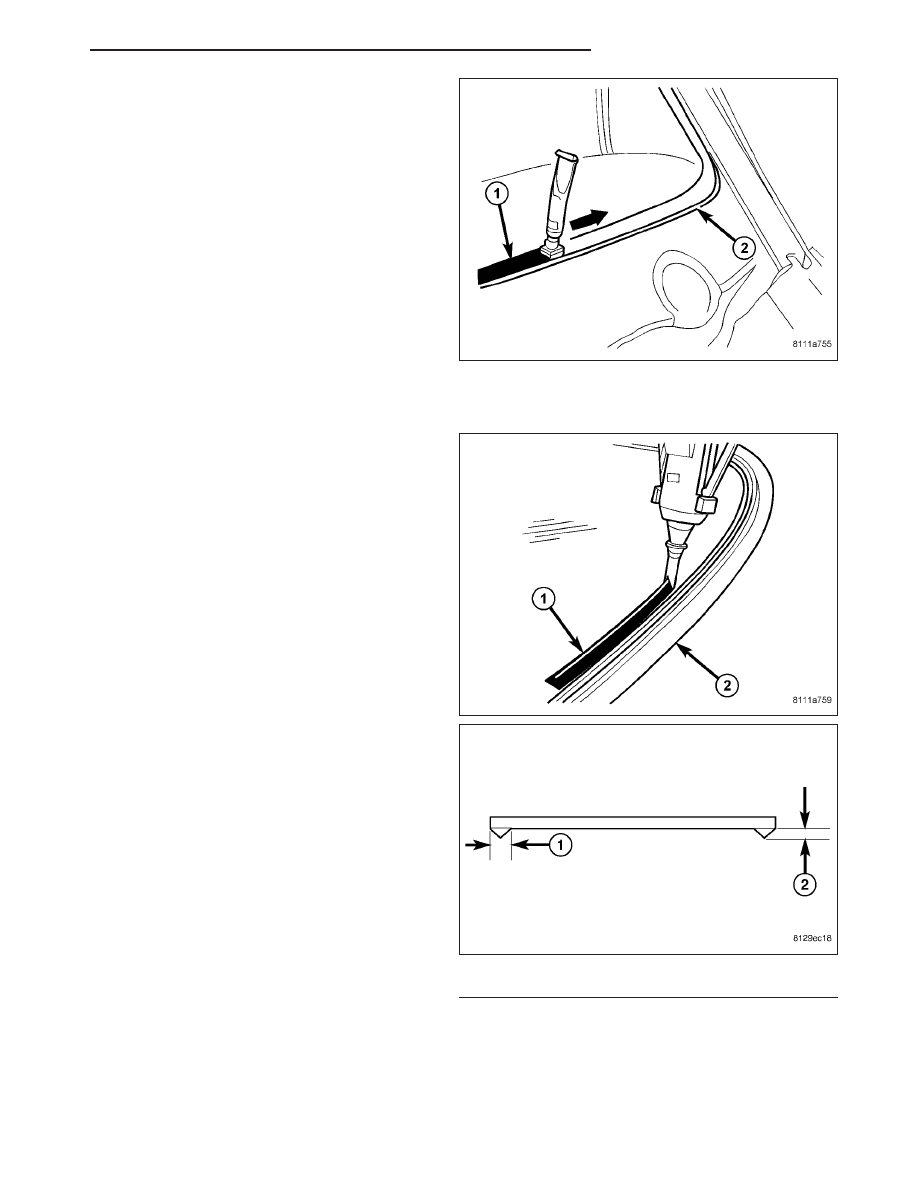
1. Apply bead of adhesive (1) with a triangular nozzle

directly to the windshield seal starting at bottom in
center of windshield.

CAUTION: Always apply bead of adhesive to the
windshield. Always install the windshield within 5
minutes after applying adhesive.

2. Bead dimensions should be approximately 9.5 -

12.0 mm wide (1) by 12.7 - 14.0 mm in height (2).

1 - ADHESIVE WIDTH 9.5 - 12.0 mm (0.375 - 0.470 in)
2 - ADHESIVE HEIGHT 12.7 - 14.0 mm (0.50 - 0.55 in)

HB

STATIONARY GLASS

23 - 189

3. Allow end of adhesive bead to run out parallel to

the start of the bead and smooth ends flush.

4. Lift windshield into place in the center of the wind-

shield opening and use the tape as a guide to aid
installation of the windshield into the center of the
cutout.

5. Carefully lay down windshield and press on.

CAUTION: It is no longer possible to move the
windshield

after

installation.

The

windshield

should never be pressed into place by more than
one person, because the windshield can break if
pressed simultaneously on both sides.

CAUTION: Roll down the left and right front door
glass and open the rear glass slider (if available)
before installing windshield to avoid pressurizing
the passenger compartment if a door is slammed
before urethane is cured. Water leaks can result.

6. Install cowl grille. (Refer to 23 - BODY/EXTERIOR/COWL GRILLE AND SCREEN - INSTALLATION)

7. Install rear view mirror. (Refer to 23 - BODY/INTERIOR/REAR VIEW MIRROR - INSTALLATION)

GLASS-REAR DOOR

DESCRIPTION

The rear door quarter glass is seated within the rear glass run channel and glass run weatherstrip.

1. To remove the quarter glass, remove the rear glass run channel and remove the glass from the channel. (Refer

to 23 - BODY/DOORS - REAR/GLASS RUN CHANNEL - REMOVAL)

23 - 190

STATIONARY GLASS

HB

GLASS-QUARTER

REMOVAL

1. Before proceeding with the following repair proce-

dure, review all warnings and cautions (Refer to 23
- BODY/STATIONARY GLASS - WARNING).

2. Remove quarter panel trim (Refer to 23 - BODY/IN-

TERIOR/QUARTER PANEL TRIM - REMOVAL).

NOTE: Windshield removal shown, quarter glass
similar.

3. Using a windshield cut-out wire (4) or other suitable

tool, separate the adhesive (2).

4. Release the tabs (2) and the tabs on the alignment pin (4) and carefully remove the quarter glass.

INSTALLATION

WARNING: ALLOW THE URETHANE AT LEAST 24 HOURS TO CURE BEFORE RETURNING THE VEHICLE TO
USE.

CAUTION: Roll down the left and right front door glass and open the rear glass slider (if available) before
installing quarter glass to avoid pressurizing the passenger compartment if a door is slammed before ure-
thane is cured. Water leaks can result.

1 - T-HANDLE
2 - WINDSHIELD ADHESIVE
3 - COUNTER SUPPORT
4 - CUTTING WIRE

HB

STATIONARY GLASS

23 - 191

NOTE: The quarter glass fence should be cleaned of most of its old urethane bonding material. A small
amount of old urethane, approximately 1-2 mm in height, should remain on the fence. Do not grind off or
completely remove all old urethane from the fence, the paint finish and bonding strength will be adversely
affected.

Glass Preparation - Installing A Previously Installed Quarter Glass

1. Before proceeding with the following repair proce-

dure, review all warnings and cautions. (Refer to
23 - BODY/STATIONARY GLASS - WARNING)

2. Level old bead of quarter glass adhesive (3) to a

thickness of approximately 1 mm (0.04 in.) and
remove loose adhesive.

NOTE: Typical primer installation shown.

3. Clean and dry area of glass (2) to be re-glued with

a suitable glass preparation solvent and rag.

4. Using a flash light, verify that glass primer is with-

out damage.

5. Re-prime any damaged area. If old adhesive has

been exposed for more than 12 hours, entire adhe-
sive area needs to be re-primed.

23 - 192

STATIONARY GLASS

HB


Content   ..  1417  1418  1419  1420   ..