Dodge Durango (HB). Manual - part 1417


  Index      Dodge     Dodge Durango (HB) - service repair manual 2005 year


Search            


Content   ..  1415  1416  1417  1418   ..


Dodge Durango (HB). Manual - part 1417


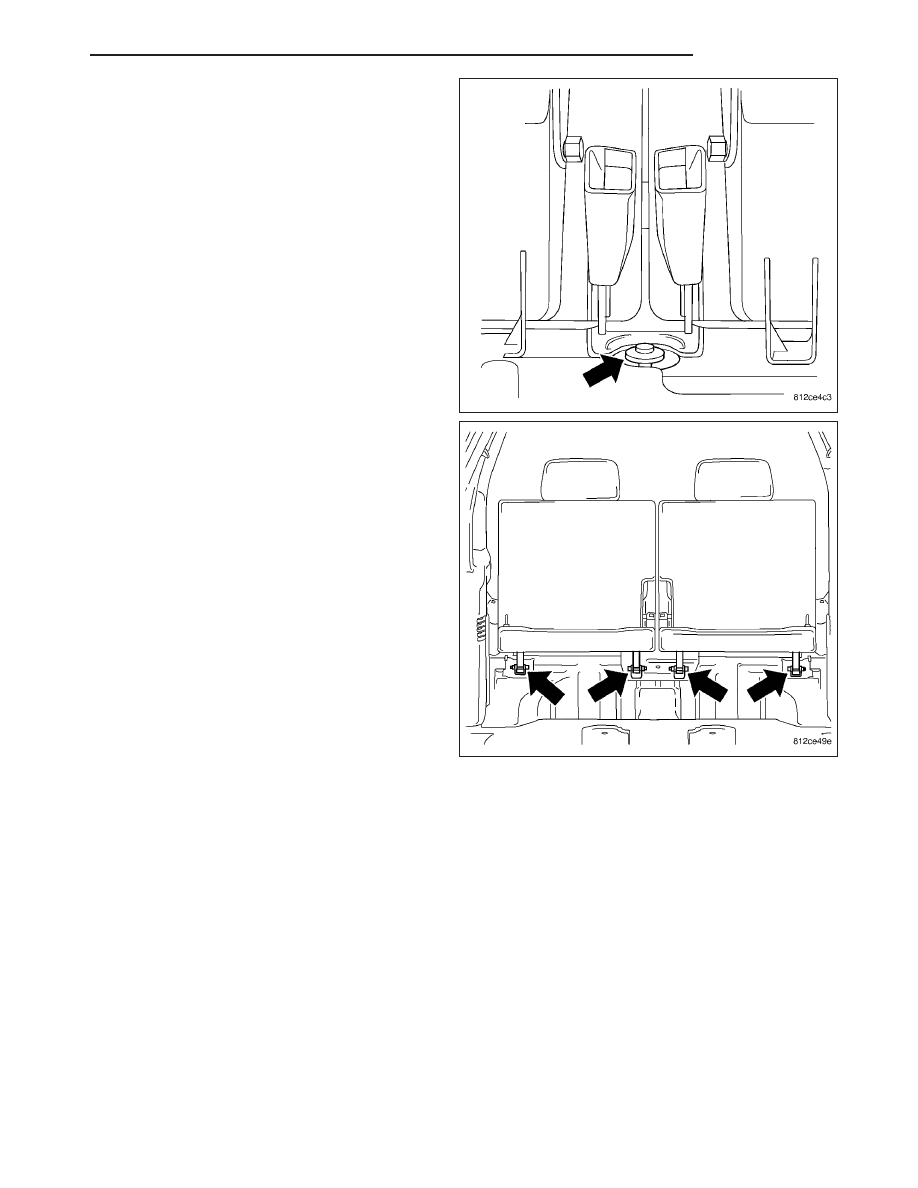
2. Install the bolt between the belt buckles.

3. Tighten the three rear assembly bolts to 47 N·m

(35 ft. lbs.).

4. Tighten the three front assembly bolts to 34 N·m

(25 ft. lbs.).

5. Install the front seat cushion pivot bolts/nuts and

tighten to 34 N·m (25 ft. lbs.).

HB

SEATS

23 - 181

STATIONARY GLASS

TABLE OF CONTENTS

page

page

STATIONARY GLASS

WARNING

WINDSHIELD SAFETY PRECAUTIONS

. . . . 182

WINDSHIELD

REMOVAL

. . . . . . . . . . . . . . . . . . . . . . . . . . . . 183

INSTALLATION

. . . . . . . . . . . . . . . . . . . . . . . . 183

GLASS-REAR DOOR

DESCRIPTION

. . . . . . . . . . . . . . . . . . . . . . . . 190

GLASS-QUARTER

REMOVAL

. . . . . . . . . . . . . . . . . . . . . . . . . . . . 191

INSTALLATION

. . . . . . . . . . . . . . . . . . . . . . . . 191

GLASS-LIFTGATE

REMOVAL

. . . . . . . . . . . . . . . . . . . . . . . . . . . . 196

INSTALLATION

. . . . . . . . . . . . . . . . . . . . . . . . 196

STATIONARY GLASS

WARNING

WINDSHIELD SAFETY PRECAUTIONS

WARNING: Do not operate the vehicle within 24 hours of windshield installation. It takes at least 24 hours
for urethane adhesive to cure. If it is not cured, the windshield may not perform properly in an accident.

Urethane adhesives are applied as a system. Use glass cleaner, glass prep solvent, glass primer, pvc
(vinyl) primer and pinch weld (fence) primer provided by the adhesive manufacturer. If not, structural
integrity could be compromised.

Daimlerchrysler does not recommend glass adhesive by brand. Technicians should review product labels
and technical data sheets, and use only adhesives that their manufactures warrant will restore a vehicle
to the requirements of fmvss 212. Technicians should also insure that primers and cleaners are compat-
ible with the particular adhesive used.

Be sure to refer to the urethane manufacturer’s directions for curing time specifications, and do not use
adhesive after its expiration date.

Vapors that are emitted from the urethane adhesive or primer could cause personal injury. Use them in a
well-ventilated area.

Skin contact with urethane adhesive should be avoided. Personal injury may result.

Always wear eye and hand protection when working with glass.

23 - 182

STATIONARY GLASS

HB

CAUTION: Protect all painted and trimmed surfaces from coming in contact with urethane or primers.
Be careful not to damage painted surfaces when removing moldings or cutting urethane around windshield.

WINDSHIELD

REMOVAL

1. Before proceeding with the following repair proce-

dure, review all warnings and cautions. (Refer to
23 - BODY/STATIONARY GLASS - WARNING)

2. Remove the screws (2) attaching the side wind-

shield molding (1) to the a-pillars and remove the
molding.

3. Remove rear view mirror. (Refer to 23 - BODY/IN-

TERIOR/REAR VIEW MIRROR - REMOVAL)

4. Remove the cowl grille. (Refer to 23 - BODY/EX-

TERIOR/COWL

GRILLE

AND

SCREEN

-

REMOVAL)

5. Using a windshield cut-out wire separate the adhe-

sive.

6. Carefully remove windshield.

INSTALLATION

WARNING: ALLOW THE URETHANE AT LEAST 24 HOURS TO CURE BEFORE RETURNING THE VEHICLE TO
USE.

1 - T-HANDLE
2 - WINDSHIELD ADHESIVE
3 - COUNTER SUPPORT
4 - CUTTING WIRE

HB

STATIONARY GLASS

23 - 183

CAUTION: Roll down the left and right front door glass and open the rear glass slider (if available) before
installing windshield to avoid pressurizing the passenger compartment if a door is slammed before ure-
thane is cured. Water leaks can result.

NOTE: The windshield fence should be cleaned of most of its old urethane bonding material. A small
amount of old urethane, approximately 1-2 mm in height, should remain on the fence. Do not grind off or
completely remove all old urethane from the fence, the paint finish and bonding strength will be adversely
affected. Support spacers located on the cowl at the bottom of the windshield opening should be replaced
with new parts. Replace any missing or damaged spacers around the perimeter of the windshield opening.

Windshield Preparation - Installing A Previously Installed Windshield

1. Before proceeding with the following repair proce-

dure, review all warnings and cautions. (Refer to
23 - BODY/STATIONARY GLASS - WARNING)

2. Level old bead of windshield adhesive (3) to a

thickness of approximately 1 mm (0.04 in.) and
remove loose adhesive.

3. Apply four new spacers (2) to the a-pillars and

place them evenly apart at the top and bottom.

4. Install the lower spacer assemblies (1) into the slot-

ted holes and verify proper installation by pulling to
make sure they are locked on.

NOTE: Lower spacers must be facing with the flat
side upwards when installing into the slotted
holes.

23 - 184

STATIONARY GLASS

HB


Content   ..  1415  1416  1417  1418   ..