Dodge Dakota (R1). Manual - part 187


  Index      Dodge     Dodge Dakota (R1) - service repair manual 2000 year


Search            


Content   ..  185  186  187  188   ..


Dodge Dakota (R1). Manual - part 187


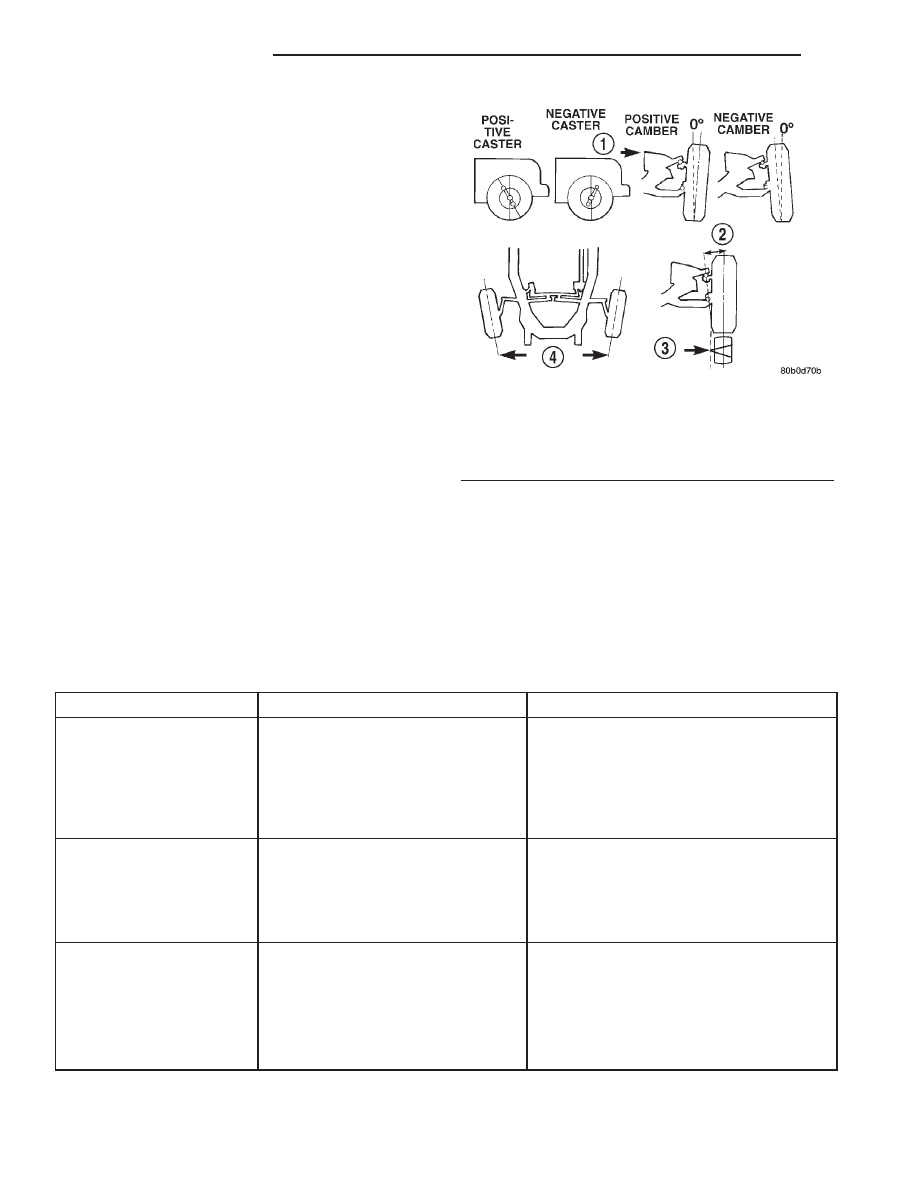
Tilting the top of the wheel outward provides positive
camber. Incorrect camber will cause wear on the
inside or outside edge of the tire (Fig. 2).

• TOE is the difference between the leading inside

edges and trailing inside edges of the front tires.
Wheel toe position out of specification cause’s unsta-
ble steering, uneven tire wear and steering wheel off-
center. The wheel toe position is the final front
wheel alignment adjustment (Fig. 2).

• THRUST ANGLE is the angle of the rear axle

relative to the centerline of the vehicle. Incorrect
thrust angle can cause off-center steering and exces-
sive tire wear. This angle is not adjustable, damaged
component(s) must be replaced to correct the thrust
angle (Fig. 2).

DIAGNOSIS AND TESTING - PRE-ALIGNMENT
INSPECTION

Before starting wheel alignment, the following

inspection and necessary corrections must be com-
pleted. Refer to Suspension and Steering System
Diagnosis Chart for additional information.

(1) Inspect tires for size, air pressure and tread

wear.

(2) Inspect front wheel bearings for wear.
(3) Inspect front wheels for excessive radial or lat-

eral runout and balance.

(4) Inspect ball studs, linkage pivot points and

steering gear for looseness, roughness or binding.

(5) Inspect suspension components for wear and

noise.

(6) On 4x4 vehicles check suspension height.
(7) Road test the vehicle.

SUSPENSION AND STEERING SYSTEM DIAGNOSIS

CONDITION

POSSIBLE CAUSES

CORRECTION

FRONT END NOISE

1. Loose or worn wheel bearing.

1. Replace wheel bearing.

2. Loose or worn steering or
suspension components.

2. Tighten or replace components as
necessary.

3. Lower ball joint (4x4).

3. Gease joint and perform diagnosis and
testing.

EXCESSIVE PLAY IN
STEERING

1. Loose or worn wheel bearing.

1. Replace wheel bearing.

2. Loose or worn steering or
suspension components.

2. Tighten or replace components as
necessary.

3. Loose or worn steering gear.

3. Adjust or replace steering gear.

FRONT WHEELS SHIMMY

1. Loose or worn wheel bearing.

1. Replace wheel bearing.

2. Loose or worn steering or
suspension components.

2. Tighten or replace components as
necessary.

3. Tires worn or out of balance.

3. Replace or balance tires.

4. Alignment.

4. Align vehicle to specifications.

Fig. 2 Wheel Alignment

1 - FRONT OF VEHICLE
2 - STEERING AXIS INCLINATION
3 - PIVOT POINT
4 - TOE-IN

2 - 2

WHEEL ALIGNMENT

AN

WHEEL ALIGNMENT (Continued)

CONDITION

POSSIBLE CAUSES

CORRECTION

VEHICLE INSTABILITY

1. Loose or worn wheel bearing.

1. Replace wheel bearing.

2. Loose or worn steering or
suspension components.

2. Tighten or replace components as
necessary.

3. Tire pressure.

3. Adjust tire pressure.

4. Alignment.

4. Align vehicle to specifications.

EXCESSIVE STEERING
EFFORT

1. Loose or worn steering gear.

1. Adjust or replace steering gear.

2. Column coupler binding.

2. Replace coupler.

3. Tire pressure.

3. Adjust tire pressure.

4. Alignment.

4. Align vehicle to specifications.

VEHICLE PULLS TO ONE
SIDE

1. Tire pressure.

1. Adjust tire pressure.

2. Alignment.

2. Align vehicle to specifications.

3. Loose or worn steering or
suspension components.

3. Tighten or replace components as
necessary.

4. Radial tire lead.

4. Rotate or replace tire as necessary.

5. Brake pull.

5. Repair brake as necessary.

6. Weak or broken spring.

6. Replace spring.

7. Ride height 4WD only.

7. Measure and adjust ride height.

STANDARD PROCEDURE - HEIGHT
MEASUREMENT 4WD

The vehicle suspension height must be measured

and adjusted if necessary before performing wheel
alignment on a 4x4 vehicle. Also when front suspen-
sion components have be replaced. This measure
must be performed with the vehicle supporting it’s
own weight and taken on both sides of the vehicle.

(1) Inspect tires for the correct size and air pres-

sure.

(2) Jounce the front of the vehicle.
(3) Measure and record the distance between the

ground and the center of the lower suspension arm
rear mounting bolt head (Fig. 3).

(4) Measure and record the distance between the

ground and the center of the front wheel (Fig. 3).

(5) Subtract the first measurement from the sec-

ond measurement. The difference between the two
measurement should be 47 mm (1.85 inches)

6 3.25

mm (0.125 inches).

STANDARD PROCEDURE - HEIGHT
ADJUSTMENT 4WD

The vehicle suspension height must be measured

and adjusted if necessary before performing wheel
alignment on a 4x4 vehicle. Also when front suspen-
sion components have be replaced. This measure
must be performed with the vehicle supporting it’s
own weight and taken on both sides of the vehicle.

To adjust the vehicle height turn the torsion bar

adjustment bolt CLOCKWISE to raise the vehicle
and COUNTER CLOCKWISE to lower the vehicle.

Fig. 3 Height

AN

WHEEL ALIGNMENT

2 - 3

WHEEL ALIGNMENT (Continued)

CAUTION: ALWAYS raise the vehicle to the correct
suspension height, NEVER lower the vehicle to
obtain the correct suspension height. If the vehicle
suspension height is too high, lower the vehicle
below the height specification. Then raise the vehi-
cle to the correct suspension height specification.
This will insure the vehicle maintains the proper
suspension height.

NOTE: If a height adjustment has been made, per-
form height measurement again on both sides of
the vehicle.

STANDARD PROCEDURE - CAMBER AND
CASTER ADJUSTMENT

NOTE: 4x4 suspension height measurement must
be performed before alignment.

Camber and caster angle adjustments involve

changing the position of the upper suspension arm
pivot bar (Fig. 4).

NOTE: On 4x2 vehicles use Alignment Tool 8393 for
alignment. The tool attaches to the pivot bar on the
upper control arm.

STANDARD PROCEDURE - CASTER

NOTE: 4x4 suspension height measurement must
be performed before alignment.

Moving the rear position of the pivot bar in or out,

will change the caster angle significantly and camber
angle only slightly. To maintain the camber angle
while adjusting caster, move the rear of the pivot bar
in or out. Then move the front of the pivot bar
slightly in the opposite direction.

For example, to increase a positive caster angle,

move the rear position of the pivot bar inward
(toward the engine). Move the front of pivot bar out-
ward (away from the engine) slightly until the origi-
nal camber angle is obtained.

STANDARD PROCEDURE - CAMBER

NOTE: 4x4 suspension height measurement must
be performed before alignment.

Move the front of the pivot bar in or out. This will

change the camber angle significantly and caster
angle slightly.

After adjustment is made tighten the pivot bar

nuts to proper torque specification.

STANDARD PROCEDURE - TOE ADJUSTMENT

NOTE: 4x4 suspension height measurement must
be performed before alignment.

The wheel toe position adjustment is the final

adjustment.

(1) Start the engine and turn wheels both ways

before straightening the wheels. Secure the steering
wheel with the front wheels in the straight-ahead
position.

(2) Loosen the tie rod jam nuts.

NOTE: Each front wheel should be adjusted for
one-half of the total toe position specification. This
will ensure the steering wheel will be centered
when the wheels are positioned straight-ahead.

Fig. 4 Caster & Camber Adjustment-Typical

1 - PIVOT BAR
2 - + CASTER
3 - + CAMBER
4 - UPPER ARM SUSPENSION

2 - 4

WHEEL ALIGNMENT

AN

WHEEL ALIGNMENT (Continued)

(3) Adjust the wheel toe position by turning the tie

rod as necessary (Fig. 5).

(4) Tighten the tie rod jam nut to 75 N·m (55 ft.

lbs.).

(5) Verify the specifications.
(6) Turn off engine.

SPECIFICATIONS

ALIGNMENT

NOTE: All alignment specifications are in degrees.

DESCRIPTION

SPECIFICATION

VEHICLE

WHEEL BASE

CASTER (

6

0.50°)

CAMBER (

6

0.50°)

TOTAL TOE (

6

0.06°)

4x2

111.9

2.99°

−0.25°

0.10°

130.9

3.13°

−0.25°

0.10°

4x4

111.9

3.16°

−0.25°

0.10°

130.9

3.27°

−0.25°

0.10°

MAXIMUM RT to LT DIFFERENCE

0.50°

0.50°

0.06

DAKOTA RT

DESCRIPTION

SPECIFICATION

VEHICLE

WHEEL BASE

CASTER (

6

0.50°)

CAMBER (

6

0.50°)

TOTAL TOE (

6

0.06°)

4x2

111.9

3.67°

−0.34°

0.10°

130.9

3.81°

−0.34°

0.10°

MAXIMUM RT to LT DIFFERENCE

0.50°

0.50°

0.06

Fig. 5 Toe

1 - JAM NUT
2 - TIE ROD
3 - TIE ROD END

AN

WHEEL ALIGNMENT

2 - 5

WHEEL ALIGNMENT (Continued)


Content   ..  185  186  187  188   ..