Daewoo Matiz (2003 year). Manual - part 275


  Index      Daewoo     Daewoo Matiz - service repair manual 2003 year


Search            


Content   ..  273  274  275  276   ..


Daewoo Matiz (2003 year). Manual - part 275


9P – 16  DOORS

D109C588

CENTRAL DOOR LOCK ACTUATOR

Removal Procedure

1. Disconnect the negative battery cable.

2. Remove the door seal trim. Refer to “Door Seal Trim”

in this section.

3. Remove the door lock assembly. Refer to “Door Lock”

in this section.

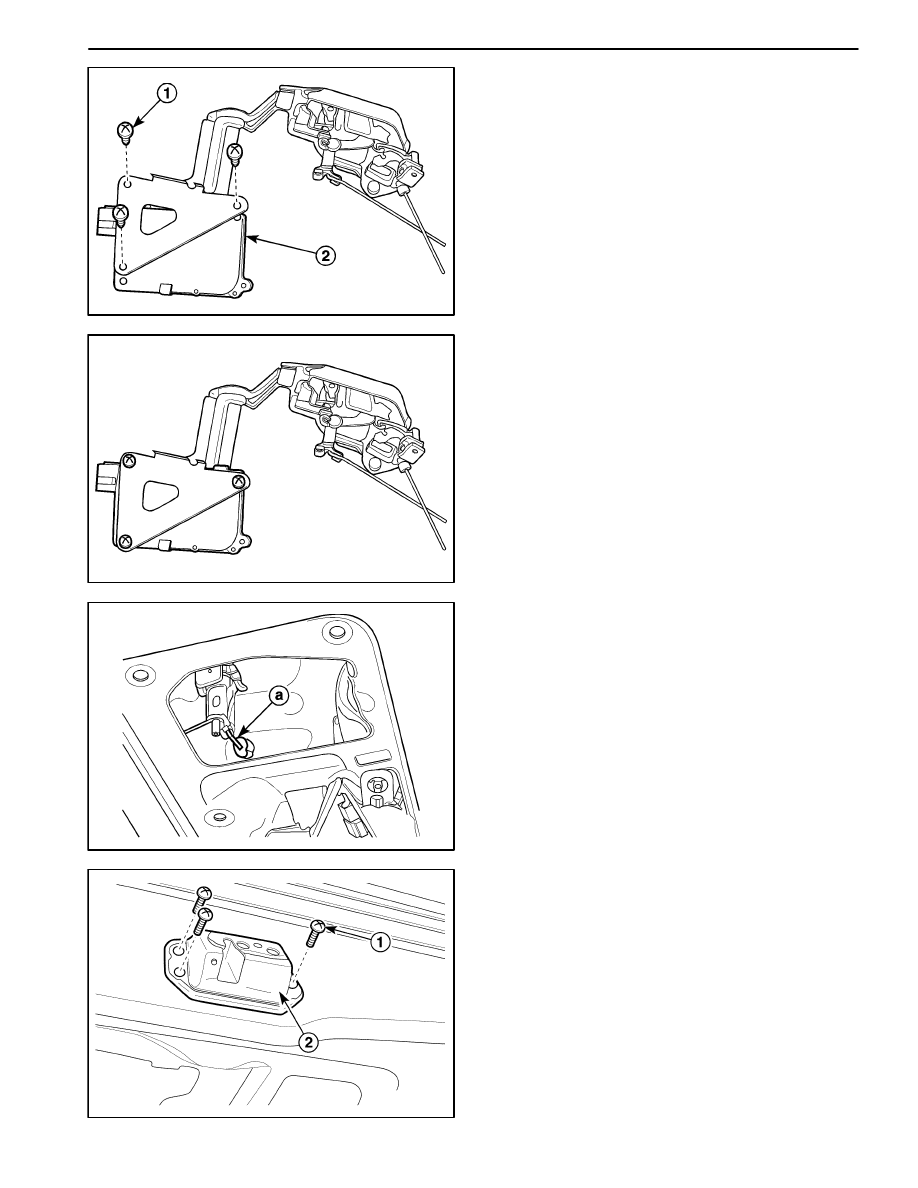
4. Remove the actuator from the door lock assembly.

D

Remove the screws (1).

D

Remove the actuator (2).

D109C589

Installation Procedure

1. Install the door lock actuator to the door lock assem-

bly with the screws.

2. Install the door lock assembly to the vehicle. Refer to

“Door Lock” in this section.

3. Install the door seal trim. Refer to “Door Seal Trim” in

this section.

4. Connect the negative battery cable.

D109C590

TAILGATE LOCK

Removal Procedure

1. Remove the tailgate trim panel. Refer to Section 9G,

Interior Trim.

2. Remove the lock rod from the tailgate lock cylinder.

a. Lock rod.

D109C591

3. Remove the tailgate lock.

D

Remove the screws (1).

D

Remove the tailgate lock (2).

DOORS  9P – 17

D109C592

Installation Procedure

1. Install the tailgate lock with the screws.

2. Install the lock rod to the tailgate lock cylinder.

3. Install the tailgate trim panel. Refer to Section 9G, In-

terior Trim.

D109C593

INSIDE DOOR HANDLE

Removal Procedure

1. Removal the inside door handle.

D

Remove the screw (1).

D

Remove the inside door handle (2).

D109C594

Installation Procedure

1. Install the inside door handle with the screw.

D109C595

OUTSIDE FRONT DOOR HANDLE

Removal Procedure

1. Disconnect the negative battery cable.

2. Remove the front door lock rods.

3. Remove the outside front door handle.

D

Remove the bolts (1).

D

Remove the outside front door handle (2).

9P – 18  DOORS

D109C596

Installation Procedure

1. Install the outside front door lock handle with the

bolts.

2. Install the front door lock rods.

3. Connect the negative battery cable.

D109C597

OUTSIDE REAR DOOR HANDLE

Removal Procedure

1. Disconnect the negative battery cable.

2. Remove the rear door lock. Refer to “Childproof Rear

Door Lock” in this section.

3. Remove the outside rear door handle.

D

Remove the bolts (1).

D

Remove the outside rear door handle (2).

D109C598

Installation Procedure

1. Install the outside rear door handle with the bolts.

2. Install the rear door lock. Refer to “Childproof Rear

door Lock” in this section.

3. Connect the negative battery cable.

D109C599

DOOR LOCK CYLINDER

Removal Procedure

1. Disconnect the negative battery cable.

2. Remove the outside door handle. Refer to “Outside

Front Door Handle” in this section.

3. Remove the door lock cylinder from the outside door

handle.

D

Remove the clip (1).

D

Remove the door lock cylinder (2).

DOORS  9P – 19

D109C600

Installation Procedure

1. Install the door lock cylinder with the clip.

2. Install the outside door handle. Refer to “Outside

Front Door Handle” in this section.

3. Connect the negative battery cable.

D109C601

MANUAL WINDOW REGULATOR

Removal Procedure

1. Remove the glass. Refer to Section 9L, Glass and

Mirrors.

2. Remove the window regulator.

D

Remove the screws (1).

D

Remove the regulator (2).

D109C602

Installation Procedure

1. Install the regulator with the screws.

2. Install the glass. Refer to Section 9L, Glass and Mir-

rors.

D109C603

POWER FRONT WINDOW
REGULATOR

Removal Procedure

1. Disconnect the negative battery cable.

2. Remove the glass. Refer to Section 9L, Glass and

Mirrors.

3. Remove the window regulator assembly.

D

Disconnect the window motor electrical connector
(1).

D

Remove the screws (2).

D

Remove the window regulator assembly (3).


Content   ..  273  274  275  276   ..