Daewoo Matiz (2003 year). Manual - part 264


  Index      Daewoo     Daewoo Matiz - service repair manual 2003 year


Search            


Content   ..  262  263  264  265   ..


Daewoo Matiz (2003 year). Manual - part 264


GLASS AND MIRRORS  9L – 9
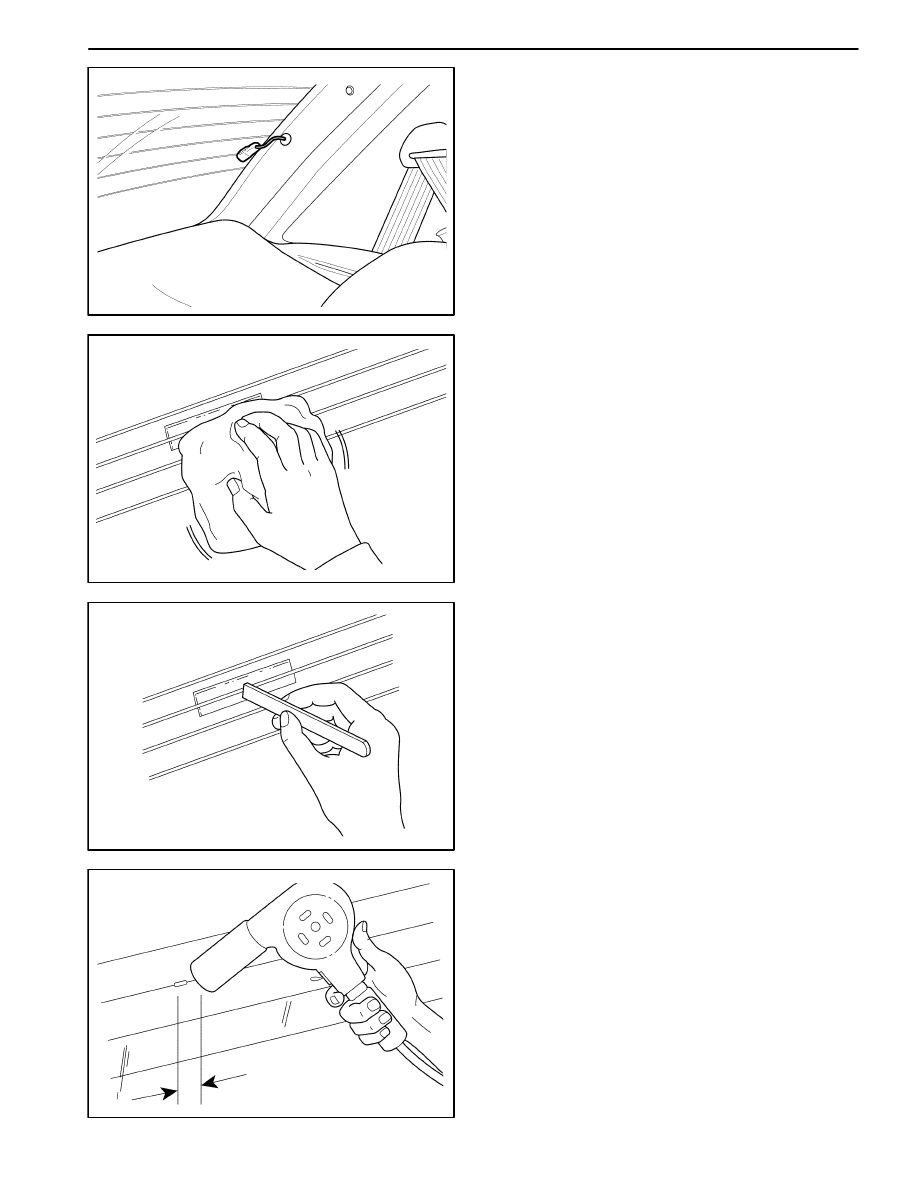
D19E509

REAR WINDOW DEFOGGER GRID
LINE REPAIR

1.

Disconnect the negative battery cable.

2.

Disconnect the rear window defogger electrical con-
nector.

D19E515

3.

Inspect the rear window defogger grid lines.

4.

Use steel wool to buff the grid lines that are to be
repaired. Wipe the lines clean using a cloth damp-
ened with alcohol. Buff and clean about 6 mm (0.25
inch) beyond each side of the break in the grid line.

D19E516

5.

Attach a grid line repair decal or two strips of tape
above and below the repair areas.

D

A repair decal or tape must be used in order to
control the width of the repair areas.

D

If a decal is used, the die–cut metered slot must
be the same width as the grid line.

6.

Apply the grid repair material to the repair area using
a small wooden stick or a spatula. The grid repair
material should be at room temperature.

7.

Carefully remove the decal or the tape.

D19E517

Notice: The grid line repair material must be cured with
heat. In order to avoid heat damage to the interior trim,
protect the trim near the repair area where heat will be
applied.

8.

Heat the repair area for 1 to 2 minutes.

9.

Hold the heat gun nozzle 25 mm (1 inch) from the
surface. A minimum temperature of 149

_

C (300

_

F)

is required.

9L – 10  GLASS AND MIRRORS

D109E518

10. Inspect the grid line repair area. If the repair appears

discolored, apply a coating of tincture of iodine to
the area using a pipe cleaner or a line brush. Allow
the iodine to dry for about 30 seconds. Carefully
wipe off the excess iodine with a lint-free cloth.

11. Test the operation of the rear window defogger in or-

der to verify that the repair was successful.

Important:  At least 24 hours is required for complete
curing of the repair materials. The repair area should not
be physically disturbed until after that time.

D109E519

REAR WINDOW DEFOGGER
BRAIDED LEAD WIRE REPAIR

The rear window defogger bus lead wire or the terminal
can be reattached by resoldering. Use a solder contain-
ing 3 percent silver and a rosin flux paste.

1. Disconnect the negative battery cable.

2. The repair area should be buffed with fine steel wool

before soldering the bus lead wire.

3. Apply the paste–type rosin flux in small quantities to

the wire lead and the bus lead wire repair area using a
brush.

D109E520

4. Coat the soldering iron tip with solder use only

enough solder to ensure a complete repair.

5. Use only enough heat to melt the solder. Do not over-

heat the wire when resoldering to the bus lead wire.

D109E521

FRONT DOOR GLASS

Removal Procedure

1. Remove the front door seal trim. Refer to Section 9P,

Doors.

2. Remove the outside rearview mirror from the front

door. Refer to “Glass and Mirrors” in this section.

3. Remove the division bar.

D

Remove the screw (1).

D

Remove the inside bolt (2).

D

Remove the outside bolt (3).

D

Remove the division bar (4).

GLASS AND MIRRORS  9L – 11

D19E522

4. Remove the glass run from the front door.

D19E523

5. Remove the glass from the front door.

D

Remove the glass retaining bolts (1).

D

Remove the glass (2).

Notice: Make sure not to contact the glass with the body
to prevent the paint damage.

D19E524

Installation Procedure

1. Install the front door glass with the bolts.

D19E522

2. Install the front door glass run.

9L – 12  GLASS AND MIRRORS

D19E521A

3. Install the division bar with the guide rail inside bolt,

the guide rail outside bolt and the guide rail screw.

4. Install the outside rearview mirror. Refer to “Glass

and Mirrors” in this section.

5. Install the front door seal trim. Refer to Section 9P,

Doors.

D109E521

FRONT DOOR QUARTER GLASS

Removal Procedure

1. Remove the front door seal trim. Refer to Section 9P,

Doors.

2. Remove the outside rearview mirror. Refer to “Out-

side Rearview Mirror” in this section.

3. Remove the guide rail.

D

Remove the screw (1).

D

Remove the inside bolt (2).

D

Remove the outside bolt (3).

D

Remove the division bar (4).

D109E525

4. Remove the quarter glass from the front door.

D

Remove the quarter glass assembly (1).

D

Remove the quarter glass run (2).

D19E525A

Installation Procedure

1. Install the quarter glass with the quarter glass run.


Content   ..  262  263  264  265   ..