Daewoo Matiz (2003 year). Manual - part 117


  Index      Daewoo     Daewoo Matiz - service repair manual 2003 year


Search            


Content   ..  115  116  117  118   ..


Daewoo Matiz (2003 year). Manual - part 117


REAR SUSPENSION  2D – 9

D16C515A

Installation Procedure

1. Install the trailing arm.

D

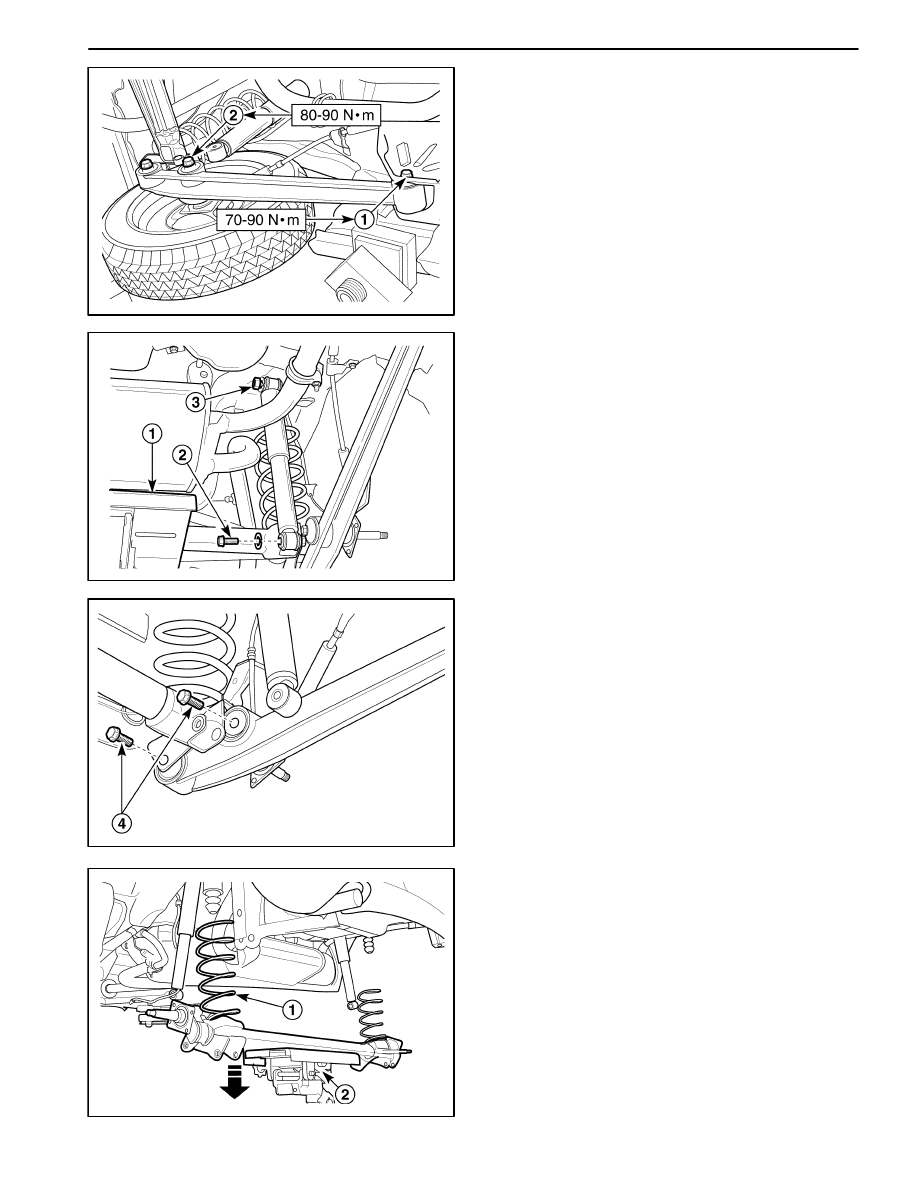
Install the trailing arm–to–body bracket bolt (1).

Tighten

Tighten the trailing arm–to–body bracket bolt to 70–
90 N

S

m (55–66 lb-ft).

D

Install the trailing arm–to–rear axle bolts (2).

Tighten

Tighten the trailing arm–to–rear axle bolts to 80–90
N

S

m (59–66 lb-ft).

2. Install the rear shock absorber. Refer to “Shock Ab-

sorber” in this section.

D106C516

D106C517

REAR AXLE ASSEMBLY 
(INCLUDING COIL SPRING)

Removal Procedure

1. Remove the rear brake drum, shoe and brake plate.

Refer to Section 4E, Rear Drum Brakes.

2. Remove the lateral rod. Refer to “Lateral Rod” in this

section.

3. Disconnect the rear axle and the trailing arm.

D

Support the rear axle with adjustable jack stands
(1).

D

Remove the shock absorber–to–rear axle bolt (2).

D

Loosen the shock absorber–to–body bracket nut
(3).

D

Remove the trailing arm–to–rear axle bolt (4).

Caution: When disconnecting the rear axle and the
trailing arm, coil spring tension may cause the ad-
justable jack stand to slip from the rear axle. This
may result in personal injury. Carry out the opera-
tion with co–worker.

D106C518

4. Remove the rear axle from the vehicle.

D

Remove the coil spring by lowering the jack stand
slowly (1).

D

Lower the support jack and remove the rear axle
(2).

2D – 10  REAR SUSPENSION

D106C519

5. Remove the rear bumper stopper and rear spring up-

per seat.

a. Rear bumper stopper.

b. Rear spring upper seat.

D106C520

Installation Procedure

1. Install in the reverse order of removal.

Important: Make sure the spring diameter prior to
installing the spring. Upper spring diameter is smaller
than lower spring diameter.

Caution: Support the jack stand to the rear axle se-
curely until installing the trailing arm bolts.

D106C519

2. Install the rear bumper stopper and rear spring upper

seat.

REAR SUSPENSION  2D – 11

D16C517C

3. Install the trailing arm and the shock absorber to the

rear axle.

D

Install the trailing arm–to–rear axle bolt (1).

Tighten

Tighten the trailing arm–to–rear axle bolt to 80–90
N

S

m (59–66 lb-ft).

D16C516C

D

Install the shock absorber–to–rear axle bolt (2).

Tighten

Tighten the shock absorber–to–rear axle bolt to 45–70
N

S

m (33–52 lb-ft).

4. Install the lateral rod. Refer to “Lateral Rod” in this

section.

5. Install the rear brake drum, shoe and brake plate. Re-

fer to Section 4E, Rear Drum Brake.

2D – 12  REAR SUSPENSION

UNIT REPAIR

D106C701

HUB AND BEARING ASSEMBLY

Tools Required

DW 340–010 Front Wheel Hub Remover

DW 350–030 Rear Wheel Bearing Race Installer

Disassembly Procedure

1. Remove the rear brake drum. Refer to Section 4E,

Rear Drum Brakes.

2. Remove the rear wheel bearing.

D

Remove the outer tapered roller bearing (1).

D106C702

D

Remove the oil seal (2).

D

Remove the inner tapered roller bearing (3).

D106C703

3. Remove the bearing races from the brake drum.

D

Remove the inner bearing race (1).


Content   ..  115  116  117  118   ..