DAF LF45, LF55 Series. Manual - part 197


  Index      DAF     DAF LF45, LF55 Series - service repair manual


Search            


Content   ..  195  196  197  198   ..


DAF LF45, LF55 Series. Manual - part 197


©

 200505

4-19

Removing and installing

CE ENGINE

ΛΦ45/55 series

2

5

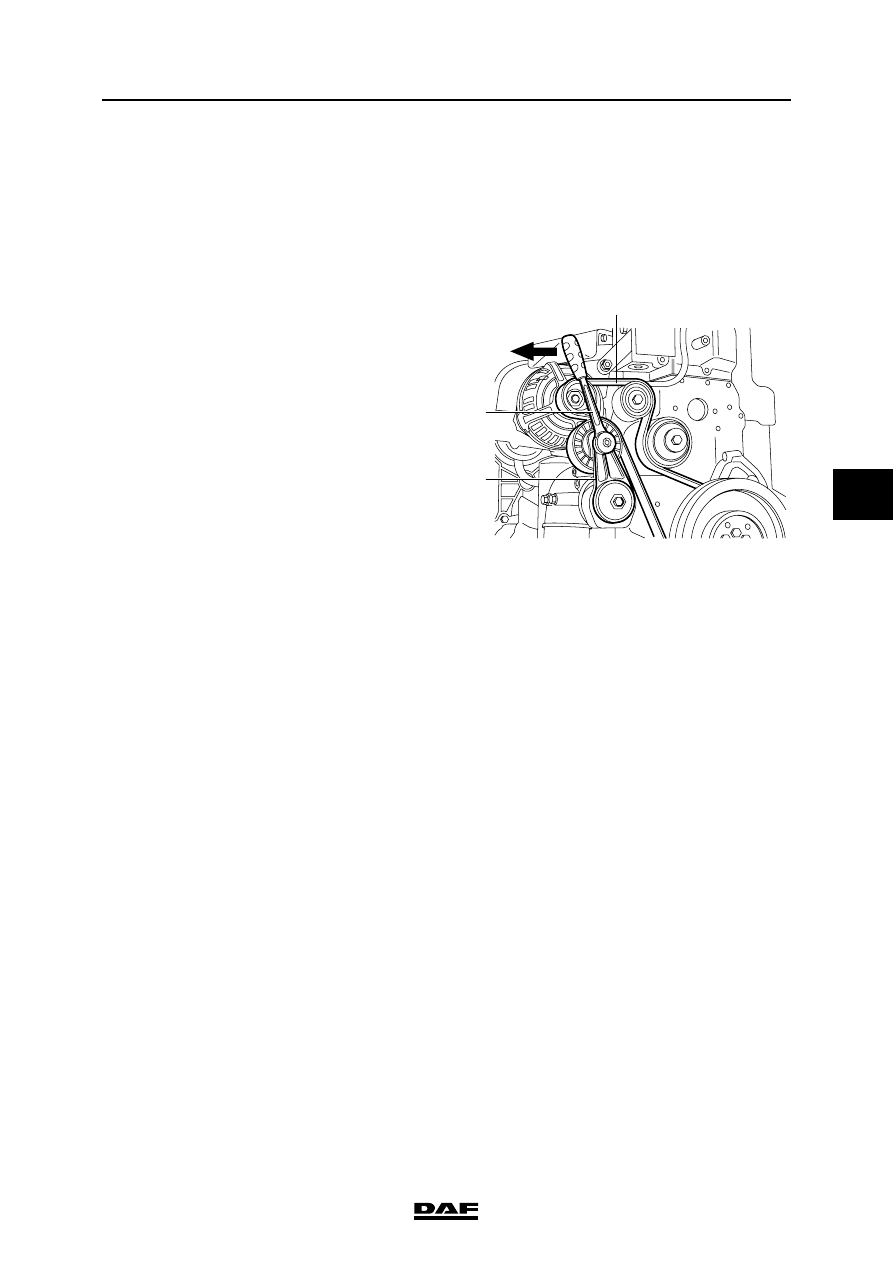
4.12 REMOVAL AND INSTALLATION, POLY-V-BELT

Removing the poly-V-belt
1.

Remove the battery terminal clamp from the 

negative terminal of the starter battery and 

break the contact.

2.

Put a ratchet with a 

3

/

8

" socket (A) in the arm 

(B) of the belt tensioner and slacken the belt 

so that it can be removed from the belt 

pulleys. Carefully let the belt tensioner 

expand to the stop.

3.

Remove the poly-V-belt (C), lifting it over the 

fan.

Installing the poly-V-belt
1.

Inspect the pulleys for damage, rust and 

grease deposits. Clean or replace the belt 

pulleys if necessary.

2.

Fit the poly-V-belt over the fan.

3.

Place a ratchet with a 

3

/

8

" socket in the arm 

of the belt tensioner and push the belt 

against the spring pressure so that it can be 

placed on all belt pulleys. Carefully let the 

belt tensioner spring back until the belt is 

tensioned.

M201430

A

B

C

CE ENGINE

4-20

©

 200505

Removing and installing

5

ΛΦ45/55 series

2

4.13 REMOVAL AND INSTALLATION, ALTERNATOR

Removing the alternator
1.

Remove both battery leads from the battery 

terminals.

2.

Remove the alternator electrical 

connections.

3.

Remove the poly-V-belt.

4.

Remove the attachment bolts from the 

alternator and remove it.

Installing the alternator
1.

Fit the alternator and tighten the attachment 

bolts to the specified torque. See "Technical 

data".

2.

Fit the poly-V-belt.

3.

Fit the alternator electrical connections.

4.

Reconnect both leads to the battery 

terminals.

©

 200505

4-21

Removing and installing

CE ENGINE

ΛΦ45/55 series

2

5

4.14 REMOVAL AND INSTALLATION, FLYWHEEL

Removing the flywheel
1.

Remove the gearbox.

2.

Remove the clutch release assembly and the 

clutch plate.

3.

Remove the attachment bolts from the 

flywheel.

4.

To guide the flywheel during removal, fit two 

threaded ends - each approx. 90 mm - to the 

now-empty bolt holes.

5.

Place two bolts in the circumference of the 

flywheel and carefully pull the flywheel free.

Installing the flywheel
1.

Clean the flywheel housing.

2.

Clean the crankshaft flange and attachment 

bolts.

3.

Clean the rear of the flywheel and inspect it. 

See "Inspection and adjustment".

4.

Fit the flywheel.

5.

Apply a drop of engine oil to the attachment 

bolts and install them. Tighten the 

attachment bolts in a crosswise sequence to 

the specified torque. See "Technical data".

6.

Fit the clutch plate and the clutch release 

assembly.

7.

Fit the gearbox.

CE ENGINE

4-22

©

 200505

Removing and installing

5

ΛΦ45/55 series

2

4.15 REMOVAL AND INSTALLATION, STARTER RING GEAR

Removing the starter ring gear
1.

Remove the flywheel.

2.

Remove the starter ring gear by tapping it off 

the flywheel, using a blunt chisel. If this is not 

possible, cut the starter ring gear between 

two teeth, using a sharp chisel.

Installing the starter ring gear
1.

Clean the flywheel and the starter ring gear. 

Ensure that the contact areas are free of 

grease.

2.

Heat the new starter ring gear evenly in an 

oven. See "Technical data".

3.

Tap the starter ring gear onto the flywheel so 

that the bevelled sides of the teeth point 

towards the starter motor. Ensure that the 

starter ring gear is properly fitted to the 

flywheel.

4.

Fit the flywheel.


Content   ..  195  196  197  198   ..