DAF LF45, LF55 Series. Manual - part 146


  Index      DAF     DAF LF45, LF55 Series - service repair manual


Search            


Content   ..  144  145  146  147   ..


DAF LF45, LF55 Series. Manual - part 146


1

LF45/55 series

Removal and installation

ACCESSORIES

3-3

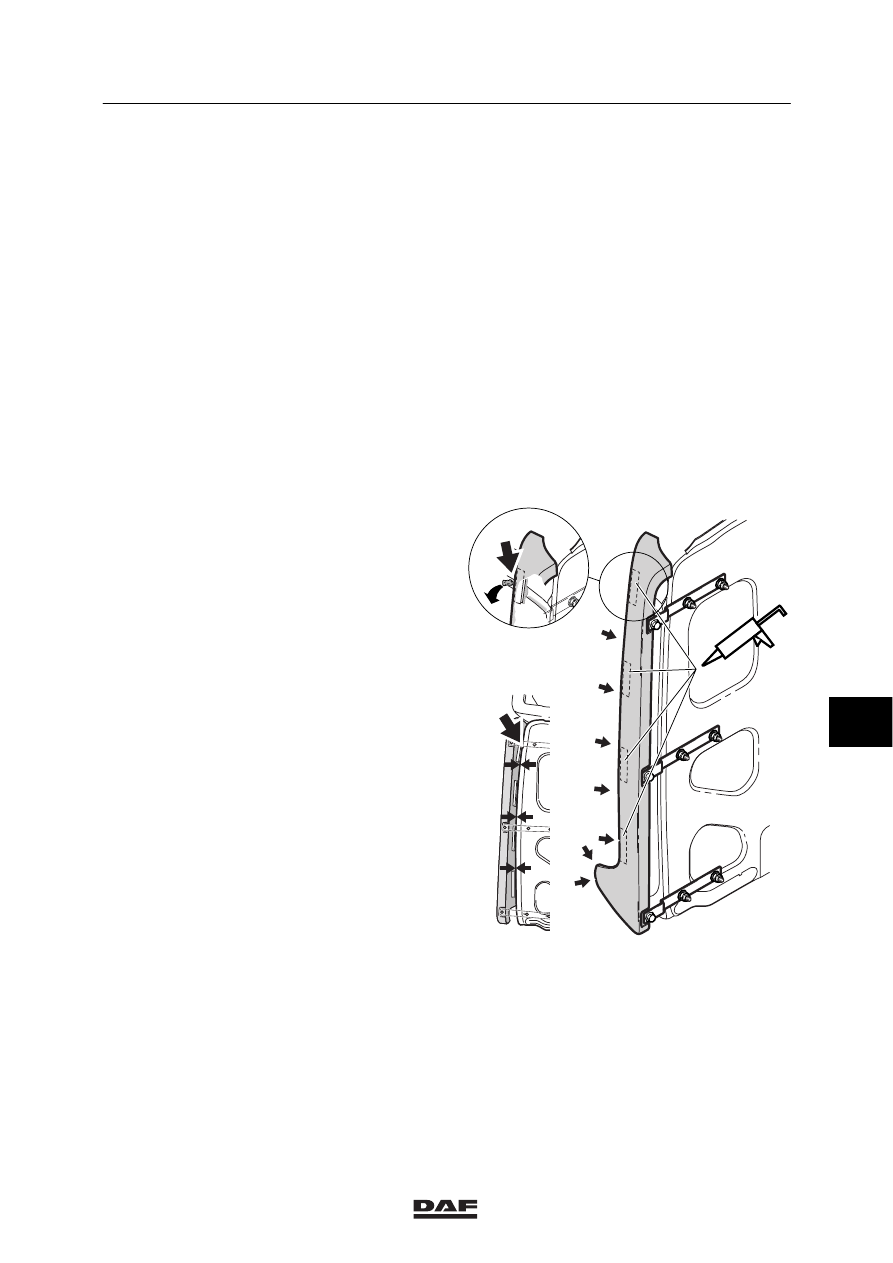
3.3 REMOVAL AND INSTALLATION, REAR AIR FOILS

Removing rear air foils
1.

Remove the attachment nuts of the cab wall
attachment brackets.

2.

Carefully detach the rear air foils from the
cab and carefully cut loose any sealant
between the cab and rear air foil.

3.

Remove the residual sealant from the roof
and rear air foil.

Installing rear air foils
1.

Degrease the rear air foil parts and the cab
at the positions where sealant is to be
applied.

2.

Position the rear air foil against the cab and
check that the rear air foil fits the entire cab
wall.

3.

Put a plug in the drip channel between the
rear air foil and the cab wall (A).

4.

Apply the specified sealant to the
attachment surfaces. See main group
”Technical data”.

5.

Fit the rear air foil to the cab wall using the
attachment nuts and tighten the attachment
nuts to the specified tightening torque. See
main group ”Technical data”.

6.

Wait until the sealant has set and remove
the plug from the drip channel.

K1 01 420

A

A

8

ǹ 0210

1

ACCESSORIES

Removal and installation

LF45/55 series

3-4

3.4 REMOVAL AND INSTALLATION, WINDSCREEN SUN VISOR

Removing windscreen sun visor
1.

Remove the attachment bolts of the
attachment brackets from the threaded
holes in the cab.

2.

Remove the attachment brackets.

Installing windscreen sun visor
1.

Fit the attachment brackets to the cab using
the attachment bolts. Tighten the
attachment bolts to the specified tightening
torque. See main group ”Technical data”.

K1 01 421

3.5 REMOVAL AND INSTALLATION, COMBI-LIGHT

Removing combi-light
1.

Remove the combi-light connector.

2.

Remove the attachment screw (1) and take
the combi-light out of the bumper.

Installing combi-light
1.

Fit the combi-light with attachment screw
(1) into the bumper.

2.

Fit the combi-light connector.

1

K1 01 358

8

ǹ 0210

1

LF45/55 series

Removal and installation

ACCESSORIES

3-5

3.6 REMOVAL AND INSTALLATION, SEAT COVERS

Removing seat covers
1.

If necessary, remove the attachment bolts
of the armrests and, if necessary, remove
the armrests.

2.

Remove the attachment bolts of the cover
on the seat-belt guide.

3.

Remove the cover of the seat-belt guide
from the backrest.

4.

Remove the attachment bolt of the seat-belt
guide.

5.

Remove the seat-belt guide from the
backrest.

6.

Remove the seat squab by pressing the
releasing device of the seat adjusting
mechanism at the front of the seat cushion.

7.

Remove the seat cover from the backrest
by detaching the cover at the bottom and
pulling it upward.

8.

Remove the seat cover from the seat by
detaching the attachment hooks and pulling
the cover from the seat.

Installing the seat covers
1.

Fit the seat cover on the seat.

2.

Tighten the seat cover on the seat, using
the attachment hooks.

3.

Fit the seat cover on the backrest.

4.

Check that the attachment holes for the
seat-belt guide and, if necessary, the
armrests are free.

5.

If applicable, fit the armrests to the backrest
using the attachment bolts.

6.

Fit the seat-belt guide to the backrest using
the attachment bolt.

7.

Fit the cover of the seat-belt guide to the
backrest using the attachment bolts.

8.

Slide the seat into the seat frame until it
snaps into the lock.

K1 01 422

8

ǹ 0210

1

ACCESSORIES

Removal and installation

LF45/55 series

3-6

8

ǹ 0210


Content   ..  144  145  146  147   ..