DAF LF45, LF55 Series. Manual - part 99


  Index      DAF     DAF LF45, LF55 Series - service repair manual


Search            


Content   ..  97  98  99  100   ..


DAF LF45, LF55 Series. Manual - part 99


1

LF45/55 series

Removal and installation

INTERNAL CAB COMPONENTS

4-3

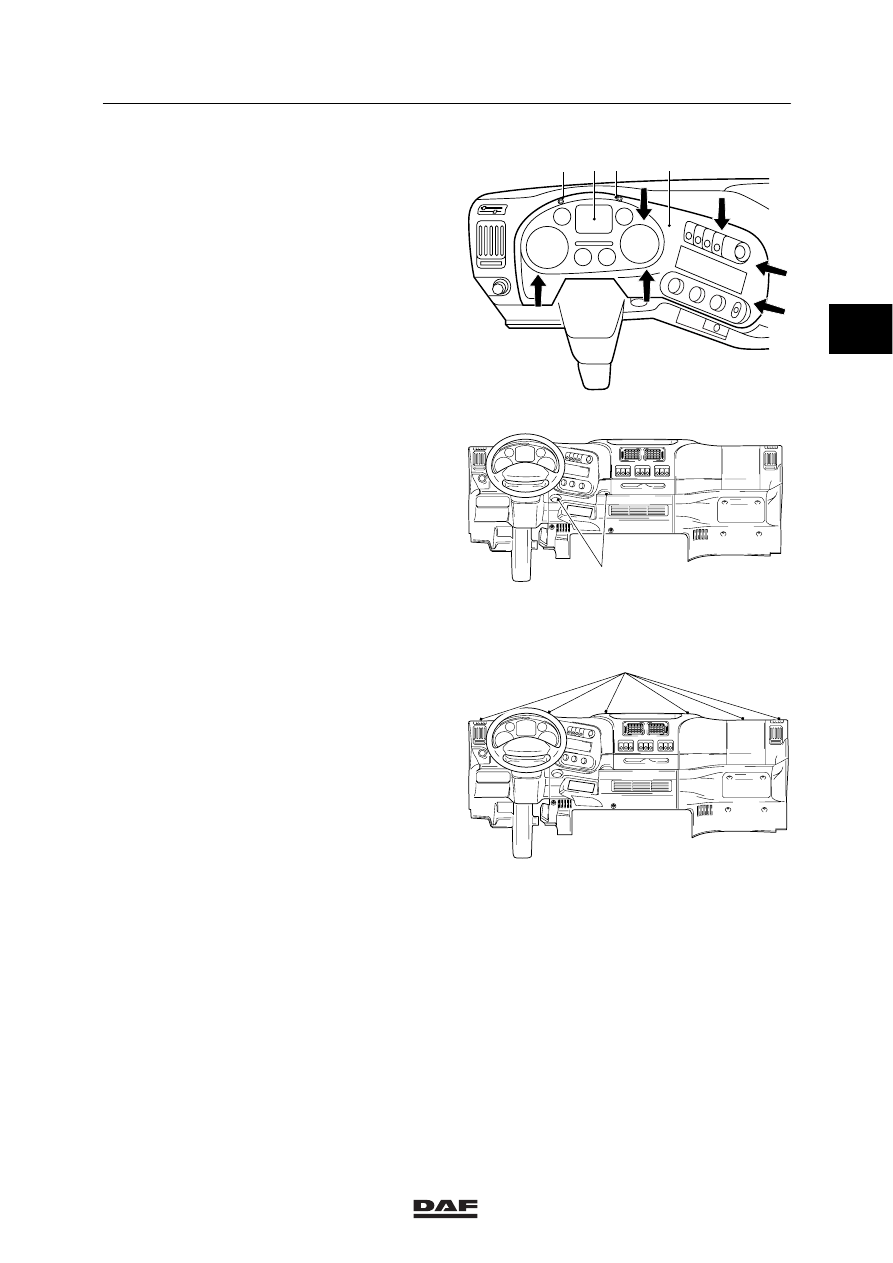
Removing the instrument panel
1.

Remove the attachment bolts (1) of the
garnish moulding (2) around the instrument
panel (3).

2.

Carefully pull the mounting clips (see
arrows) holding down the garnish moulding
(2) from the dashboard panel.

3.

Remove the attachment bolts from the
instrument panel (3).

4.

Remove the instrument panel (3).

5.

Remove the connector from the instrument
panel (3).

K1 01 430

1

1

2

3

Removing the lower dashboard panel on
driver’s side
1.

Remove the attachment bolts (1). Remove
the dashboard panel.

2.

Loosen the headlamp height adjustment
connector at the rear.

3.

Remove the attachment bolts from the
connector block at the rear of the
dashboard panel.

4.

Remove the connector block.

  K1 01 431

1

Removing the window frame cover panel
1.

Remove the attachment bolts (1) from the
window frame.

2.

Take the cover panel out of the window
frame.

K1 01 432

1

2

ǹ 0210

1

INTERNAL CAB COMPONENTS

Removal and installation

LF45/55 series

4-4

Removing the upper cover
1.

Remove the attachment bolts at the bottom
of the cover.

2.

Remove the cover from the upper cover
panel by tilting it upwards.

K1 01 433

Removing the central console control panel
1.

Remove the switches (3) from the control
panel in the central console (5).

2.

Remove the ashtray (2) from the control
panel in the central console (5).

3.

Remove the attachment bolts (1) from
control panel in the central console (5).

4.

Remove the control panel from the central
console (5).

5.

Disconnect the connector of the cigarette
lighter (4).

1

1

K1 01 434

2

3

4

5

Removing the right-side dashboard panel
1.

Remove the dashboard panel attachment
bolts.

2.

Remove the connector from the stepwell
lighting door switch

K1 01 435

2

ǹ 0210

1

LF45/55 series

Removal and installation

INTERNAL CAB COMPONENTS

4-5

Removing the upper dashboard panel on
driver’s side
1.

Remove the attachment bolts (1) from the
radio panel (2).

2.

Remove the attachment bolts (3) from the
dashboard panel.

3.

Cut the cable binders that are used to
attach the wiring harnesses to the
dashboard panel.

4.

Remove the dashboard panel. Unhook the
radio panel (2) from the dashboard panel.

5.

Disconnect the connector of the light switch
(4) and the stepwell lighting door switch.

 K1 01 436

1

3

4

2

Installing the upper dashboard panel on
driver’s side
1.

Fit the connector of the light switch (4) and
the stepwell lighting door switch.

2.

Fit the dashboard panel. Hook the radio
panel (2) to the dashboard panel.

3.

Fix the removed cable harnesses to the
dashboard panel using cable binders.

4.

Fit the dashboard panel attachment
bolts (3).

5.

Fit the attachment bolts (1) of the radio
panel (2) to the dashboard panel.

 K1 01 436

1

3

4

2

Installing the right-side dashboard panel
1.

Fit the connector of the stepwell lighting
door switch to the right-side dashboard
panel

2.

Fit the right-side dashboard panel using the
attachment bolts.

K1 01 435

2

ǹ 0210

1

INTERNAL CAB COMPONENTS

Removal and installation

LF45/55 series

4-6

Installing the central console control panel
1.

Re-fit the connector of the cigarette lighter
(4) to the rear of the control panel of the
central console (5).

2.

Fit the control panel of the central console
(5) to the dashboard.

3.

Hook up the switches (3) from the control
panel in the central console (5) to the
connectors. Re-fit the switches (3) to the
control panel in the central console (5).

4.

Secure the control panel in the central
console (5) using the attachment bolts (1).

5.

Fit the ashtray (2) into the control panel in
the central console (5).

1

1

K1 01 434

2

3

4

5

Fitting the upper cover
1.

Hook the cover into the cover panel. Fit the
cover into the cover panel using the
attachment bolts.

K1 01 433

Fitting the cover panel into the window frame
1.

Fit the cover panel into the window frame
using the attachment bolts (1).

K1 01 432

1

2

ǹ 0210


Content   ..  97  98  99  100   ..