DAF 95XF. Manual - part 550
 

  Index      DAF     DAF 95XF Series - service repair manual


Search            


Content   ..  548  549  550  551   ..


DAF 95XF. Manual - part 550


EXPLANATORY NOTES ON THE MAINTENANCE ACTIVITIES

Removal and installation

4-16

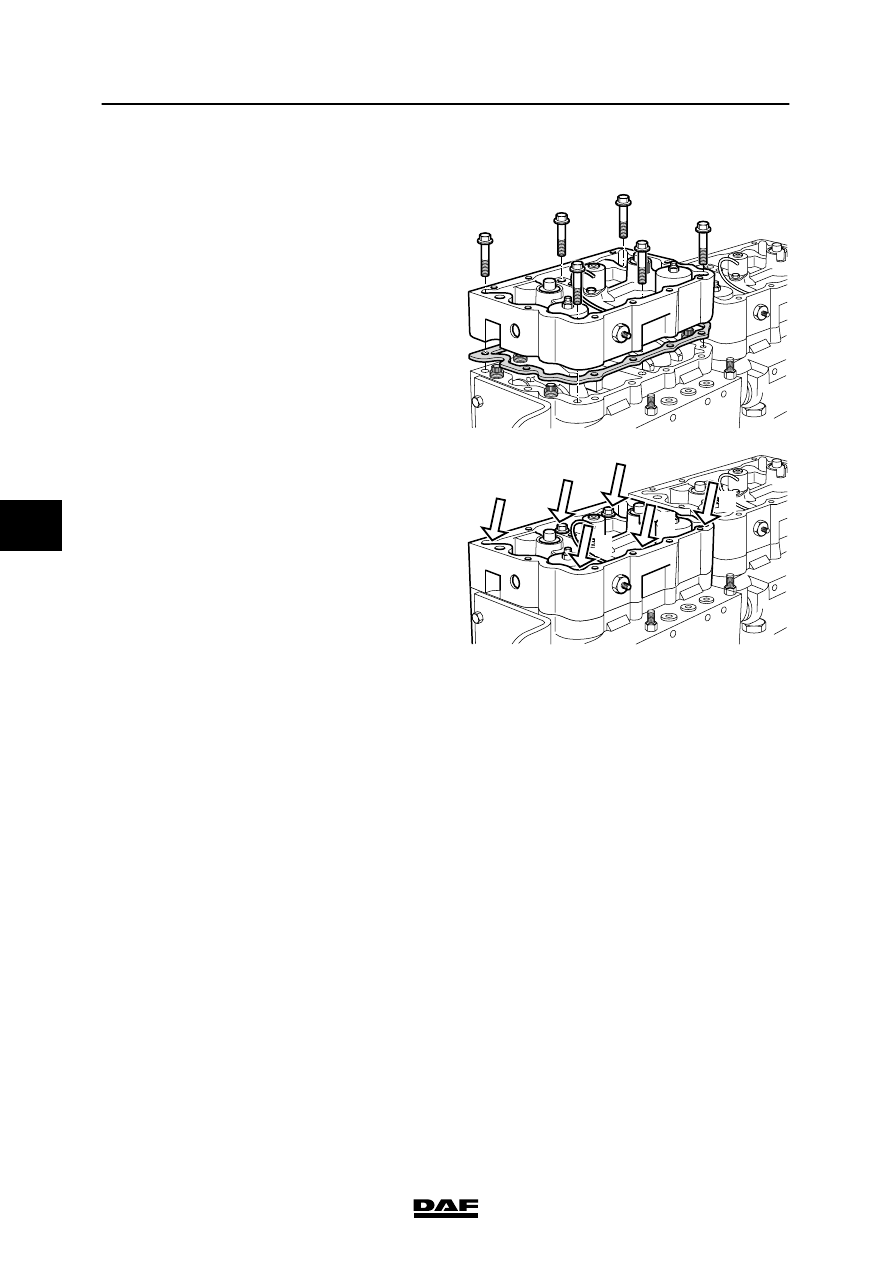
4.10 REMOVAL AND INSTALLATION, C-BRAKE

Removing the C-brake
1.

Remove the C-brake connectors on the
C-brake housing.

2.

Remove the C-brake housing attachment
bolts.

Installing the C-brake
1.

Clean and blow-dry the housing.

2.

Apply a film of oil to the sealing face of the
C-brake housing.

3.

Fit a new gasket.

4.

Fit the C-brake (using two studs as guide
pins).

5.

Fit the attachment bolts and tighten them, in
the order shown in the diagram, to the
specified torque, see “Technical data”.

6.

Fit the C-brake connectors.

7.

Adjust the C-brake play, see “Inspection
and adjustment”.

M2135

M2136

1

2

5

4

6

3

5

 200424

Removal and installation

EXPLANATORY NOTES ON THE MAINTENANCE ACTIVITIES

4-17

4.11 REMOVAL AND INSTALLATION, VALVE COVER

XF/XE engine

When the engine or parts thereof
are opened, it is possible for dirt to
penetrate which can result in
serious damage to the engine. So
clean the engine thoroughly before
opening any parts of it.

Removing the valve cover
1.

Clean the area around the valve cover.

2.

Remove the attachment bolts from the valve
cover.

3.

Remove the valve cover and the valve
cover gasket.

Installing the valve cover
1.

Clean the sealing surface of the valve
sleeve and the valve cover.

2.

Fit the valve cover using a new valve cover
gasket.

3.

Fit the attachment bolts of the valve cover
and tighten them to the specified torque.
See “Technical data”.

5

 200424

EXPLANATORY NOTES ON THE MAINTENANCE ACTIVITIES

Removal and installation

4-18

VF engine

Removing the valve cover
1.

Clean the area around the valve cover.

2.

Remove the attachment bolts from the valve
cover.

3.

Remove the valve cover and the gasket.

Installing the valve cover
1.

Clean the sealing face of the valve cover.

2.

Fit the valve cover using the valve cover
gasket.
The valve cover gasket, if not damaged,
may be reused (do not use solvents for
cleaning the gasket).
The marking “TOP” on the gasket should
point in the direction of the valve cover.

3.

Fit the attachment bolts of the valve cover
and tighten them to the specified torque.
See “Technical data”.

5

 200424

Removal and installation

EXPLANATORY NOTES ON THE MAINTENANCE ACTIVITIES

4-19

4.12 REMOVAL AND INSTALLATION, DEB

Make sure that the spring plate (5)
under the main piston (4) is not
damaged or deformed.

If this spring plate is damaged or
deformed it could break off while
the DEB is engaged, resulting in
serious engine damage.

When the engine or parts thereof
are opened, it is possible for dirt to
penetrate which can result in
serious damage to the engine. So
clean the engine thoroughly before
opening any parts of it.

Removing the DEB
1.

Remove the valve covers.

2.

Disconnect the electrical connection and
remove the cable harness from its housing.

3.

Remove the DEB attachment bolts and the
DEB assembly.

Installing the DEB
1.

Tighten the rocker seat attachment bolts to
the specified torque. See “Technical data”.

Note:
There are two different DEB housings for
cylinders 1 to 3, and cylinders 4 to 6. This is
indicated on the DEB housing.

2.

Place the DEB on the rocker seats.

3.

Insert the DEB attachment bolts and tighten
them to the specified torque. See “Technical
data”.

4.

Connect the electrical connections.

5.

Adjust the valve clearance.

6.

Adjust the DEB clearance. See “Inspection
and adjustment”.

7.

Fit the valve covers.

1

2

4

5

3

6

i 400167

i 400187

5

 200424


Content   ..  548  549  550  551   ..