Chrysler Stratus Convertible. Manual - part 78
 

  Index      Chrysler     Chrysler Stratus Convertible - service repair manual 1995-2000 year


Search            


Content   ..  76  77  78  79   ..


Chrysler Stratus Convertible. Manual - part 78


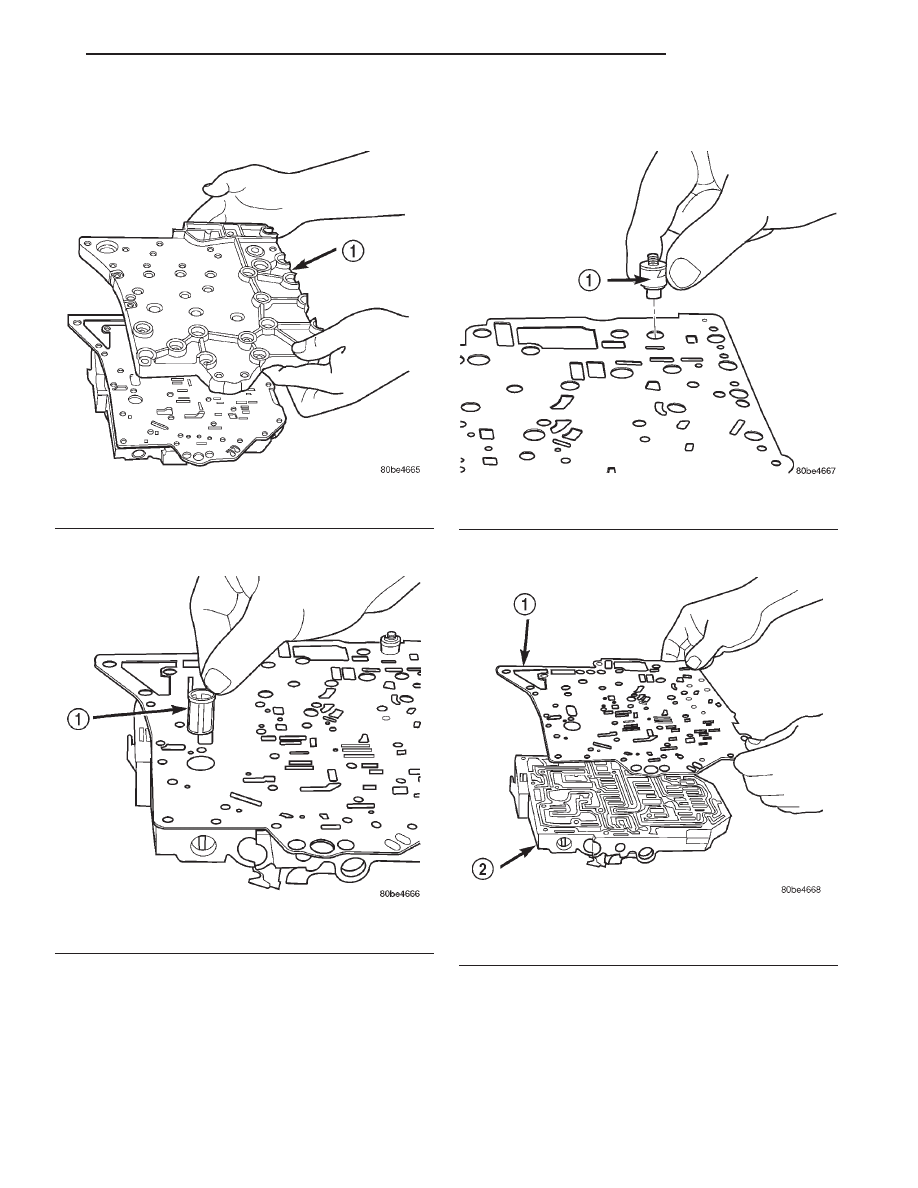
(7) Invert assembly and remove Transfer Plate.

Beware of loose check balls.

(8) Remove oil screen (Fig. 113).

(9) Remove the overdrive clutch (#5) check valve

(Fig. 114)

(10) Remove separator plate (Fig. 115).

Fig. 112 Remove Transfer Plate

1 – TRANSFER PLATE

Fig. 113 Remove Oil Screen

1 – OIL SCREEN

Fig. 114 Remove Overdrive Clutch (#5) Check Valve

1 – OVERDRIVE CLUTCH (#5) CHECK VALVE

Fig. 115 Remove Separator Plate

1 – SEPARATOR PLATE
2 – VALVE BODY

JX

TRANSAXLE

21 - 51

DISASSEMBLY AND ASSEMBLY (Continued)

(11) Remove thermal valve (Fig. 116).

(12) Remove check balls (Fig. 117).

Fig. 117 Ball Check Location

1 – (#4) BALL CHECK LOCATION
2 – (#2) BALL CHECK LOCATION
3 – RETAINER

4 – (#3) BALL CHECK LOCATION
5 – LOW/REVERSE SWITCH VALVE
6 – T/C LIMIT VALVE

Fig. 116 Remove Thermal Valve

1 – THERMAL VALVE

21 - 52

TRANSAXLE

JX

DISASSEMBLY AND ASSEMBLY (Continued)

NOTE: Tag all valve/spring assemblies for reassem-
bly identification.

(13) Remove dual retainer plate using Tool 6301

(Fig. 118).

(14) Remove regulator valve spring retainer (Fig.

119).

(15) Remove

the

vent

reservoir

check

valve

retainer (Fig. 120).

(16) Remove vent reservoir check valve and spring

(Fig. 121).

(17) Remove remaining retainers as shown in (Fig.

122).

Fig. 118 Remove Dual Retainer Plate using Tool

6301

1 – TOOL 6301
2 – RETAINER

Fig. 119 Remove Regulator Valve Spring Retainer

using Tool 6302

1 – TOOL 6302
2 – RETAINER

Fig. 120 Remove Vent Reservoir Check Valve

Retainer

1 – RETAINER

Fig. 121 Vent Reservoir Check Valve and Spring

1 – RETAINER
2 – SPRING
3 – BALL

JX

TRANSAXLE

21 - 53

DISASSEMBLY AND ASSEMBLY (Continued)

(18) Remove valves and springs as shown in (Fig.

123).

NOTE: Refer to Valve Body Cleaning and Inspec-
tion for cleaning procedures.

ASSEMBLY

(1) Install valves and springs as shown in (Fig.

123).

(2) Install regulator valve spring retainer (Fig.

124).

(3) Install dual retainer plate using Tool 6301 (Fig.

125).

(4) Install vent reservoir check valve and spring

(Fig. 126).

(5) Install the vent reservoir check valve retainer

(Fig. 127).

Fig. 123 Springs and Valves Location

1 – VALVE BODY
2 – T/C REGULATOR VALVE
3 – L/R SWITCH VALVE
4 – VENT RESERVOIR CHECK VALVE
5 – CONVERTER CLUTCH CONTROL VALVE

6 – MANUAL VALVE
7 – CONVERTER CLUTCH SWITCH VALVE
8 – SOLENOID SWITCH VALVE
9 – REGULATOR VALVE

Fig. 122 Valve Retainer Location

1 – RETAINER
2 – RETAINER

21 - 54

TRANSAXLE

JX

DISASSEMBLY AND ASSEMBLY (Continued)


Content   ..  76  77  78  79   ..