Chrysler New Yorker. Manual - part 252


  Index      Chrysler     Chrysler New Yorker - service repair manual 1997-1999 year


Search            


Content   ..  250  251  252  253   ..


Chrysler New Yorker. Manual - part 252


FRAMES AND BUMPERS

CONTENTS

page

page

BUMPERS AND FASCIAS . . . . . . . . . . . . . . . . . . . 1

FRAME . . . . . . . . . . . . . . . . . . . . . . . . . . . . . . . . . 5

BUMPERS AND FASCIAS

INDEX

page

page

REMOVAL AND INSTALLATION

FRONT BUMPER FASCIA –

CONCORDE/LHS/300M . . . . . . . . . . . . . . . . . . . 1

FRONT BUMPER FASCIA – INTREPID . . . . . . . . . 2
FRONT BUMPER REINFORCEMENT . . . . . . . . . . 3

REAR BUMPER FASCIA –

CONCORDE/LHS/300M . . . . . . . . . . . . . . . . . . . 3

REAR BUMPER FASCIA – INTREPID . . . . . . . . . . 3
REAR BUMPER REINFORCEMENT . . . . . . . . . . . 4

REMOVAL AND INSTALLATION

FRONT BUMPER FASCIA – CONCORDE/LHS/300M

REMOVE

(1) Release hood latch and open hood.
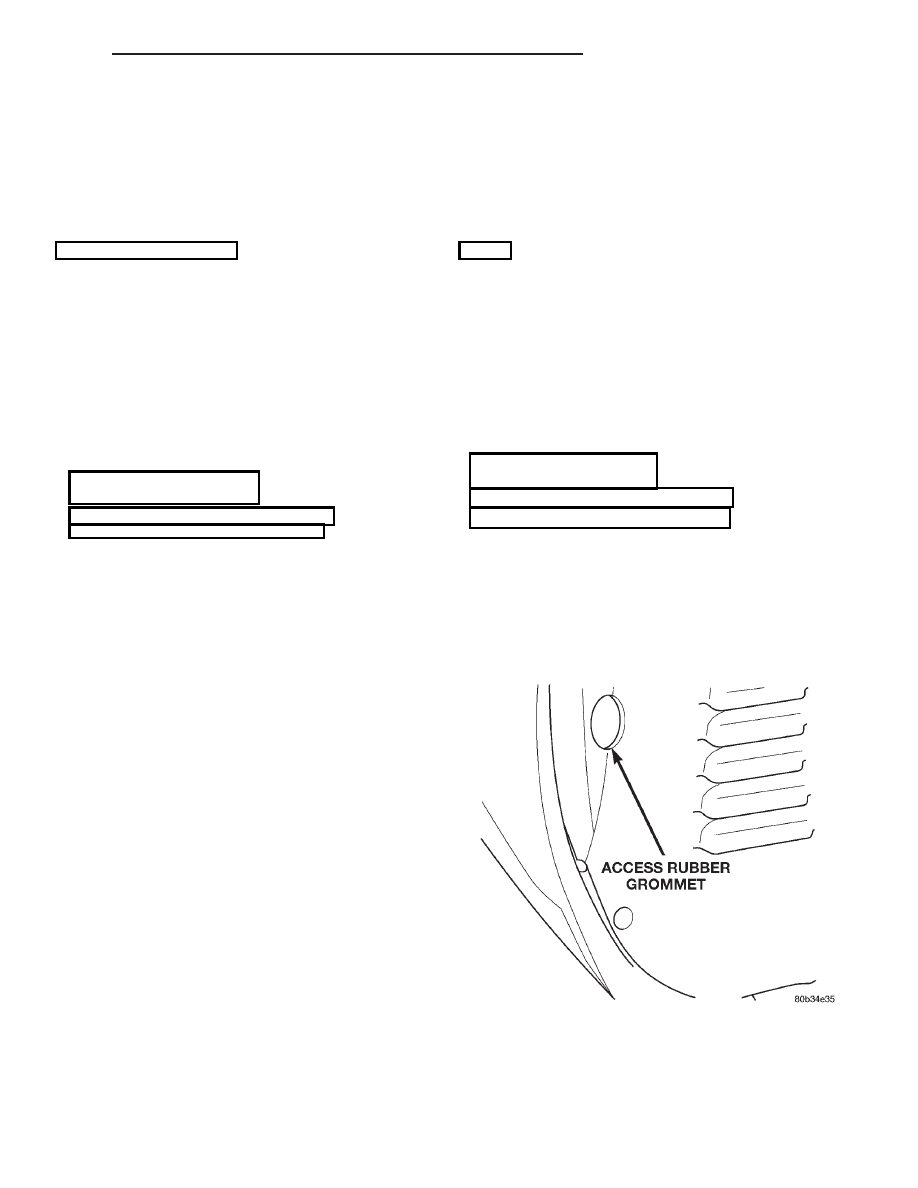
(2) Remove large rubber grommet (70 mm x 168

mm) from splash shield to gain access to fascia fas-
teners (Fig. 1).

(3) Remove fasteners attaching fascia to the front

fender and splash shield, using access hole in splash
shield (Fig. 2).

(4) Remove the fasteners attaching the fascia to

the lower crossmember (Fig. 3).

(5) Remove the fasteners attaching the fascia to

the upper radiator closure panel (Fig. 3).

(6) Disconnect wire connectors (fog lamps, parking/

turn signal, side marker), if equipped (Fig. 4).

(7) Remove fascia from vehicle.

INSTALLATION

(1) Connect wire connectors.
(2) Place fascia in position on vehicle, by fitting

foam to bumper beam. Use care not to scratch fender.
Tape may be put on fender for protection.

(3) Install the top center fasteners, to upper radi-

ator closure panel.

(4) Install fasteners attaching fascia to the front

fender and splash shield, using access hole in splash
shield

(5) Align fascia to bumper reinforcement.

(6) Align the two fascia studs to the fender vertical

attachments, at the same time align the fascia groove
on the horizontal flange with the fender fasteners.
Push fascia rearward to engage the fasteners.

(7) Install nut on fascia stud through the splash

shield access hole, on each side.

Fig. 1 Access Rubber Grommet

300M

FRAMES AND BUMPERS

13 - 1

FRONT BUMPER FASCIA – INTREPID

REMOVAL

(1) Release hood latch and open hood.
(2) Remove push in fasteners attaching bottom of

fascia (air dam) to radiator closure panel (Fig. 5).

(3) Remove fasteners attaching fascia to front

fenders and splash shields (Fig. 6).

(4) Remove push in fasteners attaching the fascia

to upper radiator closure panel.

(5) Pull the sides of the fascia outwards to disen-

gage fascia from drive pins then pull fascia forward.

(6) Disconnect

fog

lamp

wire

connectors,

if

equipped.

(7) Remove fascia from vehicle.

INSTALLATION

(1) Connect fog lamp wire connectors, if equipped.
(2) Place fascia in position on vehicle, by fitting

foam to bumper beam.

(3) Snap sides of fascia over drive pin fasteners on

fenders.

(4) Install fasteners to upper radiator closure.
(5) Install fasteners attaching fascia to front fend-

ers and splash shields.

(6) Install fasteners attaching bottom of fascia to

radiator closure panel.

Fig. 2 Fastener Locations

Fig. 3 Remove Push In Fasteners

Fig. 4 Front Bumper Fascia

Fig. 5 Air Dam

Fig. 6 Front Bumper Fascia

13 - 2

FRAMES AND BUMPERS

300M

REMOVAL AND INSTALLATION (Continued)

FRONT BUMPER REINFORCEMENT

REMOVAL

(1) Remove front fascia.
(2) Remove end plugs in ends of bumper after

removing screws in front of bumper.

(3) Remove attaching bolts from bumper reinforce-

ment to adapter plate through ends of the bumper.
(Fig. 7).

(4) If beam is damaged, the adapter plate to rail

welds will have to be cut off.

INSTALLATION

(1) Place reinforcement in position on front of vehi-

cle.

(2) Install attaching bolts to inside of bumper rein-

forcement to adapter plates.

(3) Install end plugs in ends of bumper, using

screws in front of the bumper.

(4) Install front fascia.

REAR BUMPER FASCIA – CONCORDE/LHS/300M

REMOVAL

(1) Release deck lid latch and open deck lid.
(2) Partially remove trunk carpet to gain access to

fascia attaching nuts and remove nuts.

(3) Remove both tail lamp housings to gain access

to fascia attaching nuts (300M).

(4) Remove nuts from the attaching studs.
(5) Remove fasteners attaching fascia to rear quar-

ter and splash shield.

(6) Remove upper push pins attaching the fascia to

the body.

(7) Pull fascia with 30 pound force to disengage

plastic clip and grommet that attaches the fascia to
the quarter panel vertical flange one side at a time
(Fig. 8).

(8) Disengage main wire connector from the body

harness. The connector is on the left side of vehicle.

(9) Remove fascia from vehicle.

INSTALLATION

(1) Connect main wire connector to the body har-

ness connector.

(2) Place rear fascia in position on bumper rein-

forcement.

(3) Align the two fascia studs to the quarter panel

vertical attachment, at the same time align the fas-
cia key hole slot on the horizontal flange with the
drive pin. Push fascia forward to engage the fasten-
ers.

(4) Install push pins attaching top of fascia to

body.

(5) Install nut on fascia stud. and install tail lamp

housing (300M).

(6) Install trunk carpet back in position.
(7) Install fasteners attaching fascia to rear quar-

ter panel and splash shields.

REAR BUMPER FASCIA – INTREPID

REMOVAL

(1) Open deck lid and remove tail lamps.
(2) Remove fasteners attaching fascia to rear quar-

ter and splash shields.

(3) Remove fasteners attaching fascia to tail lamp

can.

(4) Remove fasteners attaching fascia to lower

trunk panel.

(5) Pull sides of fascia outwards to disengage

snaps to quarter panel attaching bracket (Fig. 9).

(6) Pull fascia rearward to expose license plate

lamp wire connector. Disconnect wire harness connec-
tor. The connector is located on the left side of vehi-
cle.

Fig. 8 Rear Bumper Fascia

Fig. 7 Front Bumper Reinforcement

300M

FRAMES AND BUMPERS

13 - 3

REMOVAL AND INSTALLATION (Continued)

INSTALLATION

(1) Connect the license plate lamp wire connector

to the body harness.

(2) Place rear fascia in position on vehicle, by fit-

ting foam to bumper beam.

(3) Install center fastener to lower trunk panel.
(4) Snap sides of fascia between quarter panel and

bracket.

(5) Install fasteners to tail lamp can.
(6) Install fasteners attaching fascia to rear quar-

ter panel and splash shields.

(7) Install the remaining fasteners to lower trunk

panel.

(8) Install tail lamps.

REAR BUMPER REINFORCEMENT

REMOVAL

(1) Remove rear fascia.
(2) Remove attaching bolts and nuts from attach-

ing bracket to rails (Fig. 10).

INSTALLATION

(1) Place reinforcement in position on rear of vehi-

cle.

(2) Install bracket to rails attaching bolts and

nuts.

Fig. 9 Rear Bumper Fascia

Fig. 10 Rear Bumper Reinforcement

13 - 4

FRAMES AND BUMPERS

300M

REMOVAL AND INSTALLATION (Continued)


Content   ..  250  251  252  253   ..