BMW 3 (E46). Manual - part 211


  Index      BMW     BMW 3 (E46) - service repair manual 2006 year


Search            


Content   ..  209  210  211  212   ..


BMW 3 (E46). Manual - part 211


to release. Pull down on trim.

 -

Installation is reverse of removal.
Replace any broken or missing
fasteners.


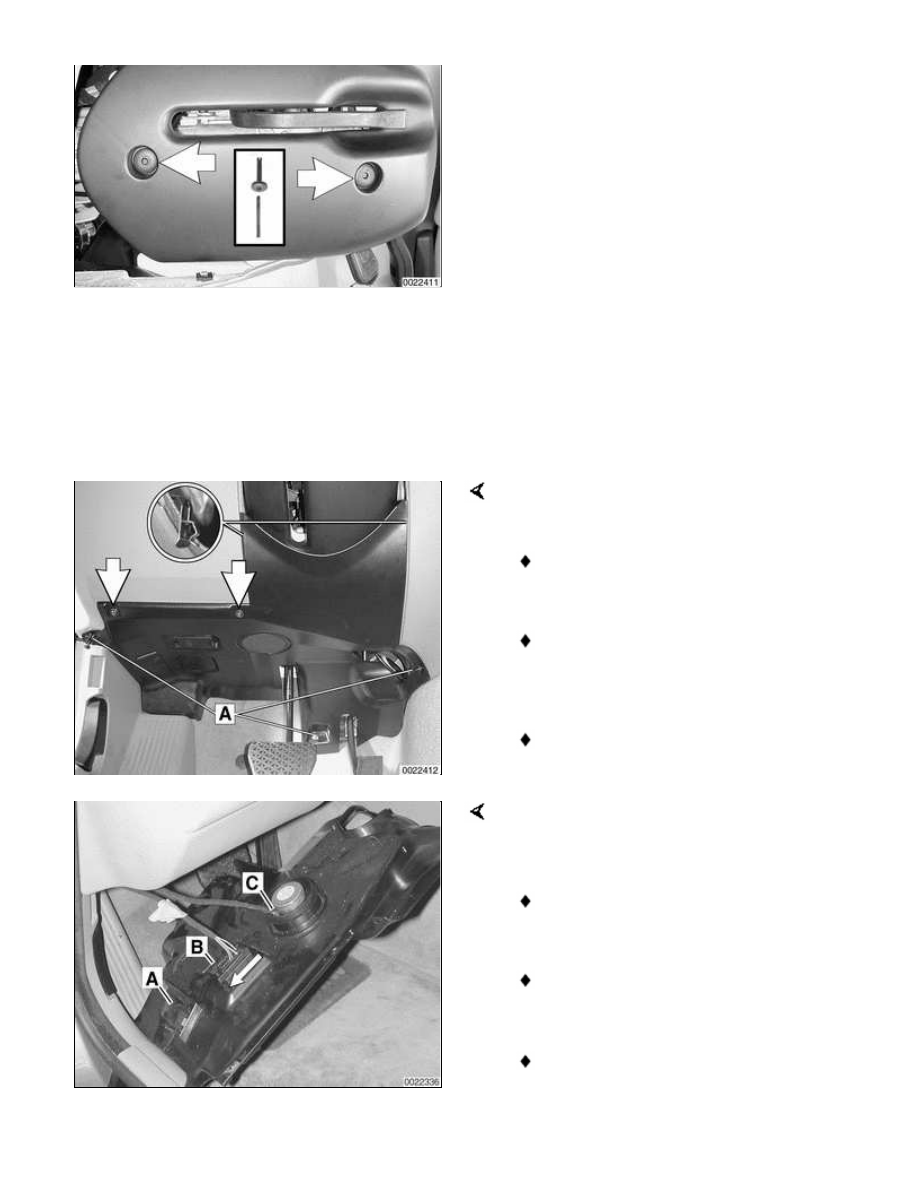
Left footwell (pedal cluster) trim
panel, removing and installing

 -

Move steering column to maximum
extended position.

Working at trim panel, remove screws
(arrows) and expansion rivets (A).

Clips (inset) must be rotated 90° to
remove.

If equipped detach electrical
harness connectors from footwell
light and warning chime.

Release OBD II socket from panel
and pull out.

Disconnect electrical harness connectors
at left footwell trim panel and remove
panel:

Unplug connector at footwell interior
light (A), if equipped.

Slide lock at OBD II connector (B) in
direction of arrow.

Unplug connector at chime (C).


Dashboard/shifter console
assembly, removing and
installing

 -

Disconnect negative (-) cable from
battery and cover terminal with
insulating material.

CAUTION!

Prior to disconnecting the battery,
read the battery disconnection
cautions given at the front of this
manual on page viii.

Using a plastic trim tool pry gently to
remove left, center and right dashboard
trim.

CAUTION!

To avoid marring interior trim, work
with a plastic prying tool.

Note:

Left side shown. Center and right
trim are similar.

To remove center trim, right trim
must be removed first.

 -

Remove steering wheel. See 


320

Steering and Wheel Alignment

.

 -

Remove left footwell trim panel as
described earlier.

 -

Remove upper and lower steering
column trim. Detach steering
column stalk switch electrical
connectors and remove stalk
switch. See 


612 Switches

.

Remove shifter knob by pulling straight
up.

Note:

Apply approx. 90 lb. of force to pull off
knob from shift rod.

 -

Lift up and remove shifter bezel by
prying gently.

 -

Unclip bottom of shifter boot from
center console trim by pushing
forward. Pull boot up around shifter.

 -

Remove center console as
described earlier.

 -

Lift off switch carrier and detach
electrical harness connectors to
window switches.

 -

Remove glove compartment as
described earlier.

To remove storage compartment below
IHKA control panel:

Open compartment door.

Push upward on tabs (arrows),
then pull out.

Remove A-pillar (windshield pillar) trim
on left and right sides by prying out
finishing strip.

CAUTION!

The Head Protection Airbag is behind
the A-pillar. Do not use sharp

instruments to remove trim or finisher
strip

 -

Remove screws beneath finishing
strip.

Carefully pull away A-pillar trim.

 -

Remove headlight switch. See 
 

612 Switches

.

 -

Remove instrument cluster. See 
 

620 Instruments

.

 -

Remove IHKA control panel and
module. See 


640 Heating and Air

Conditioning

.

 -

If applicable: Reach through IHKA
control panel opening and
disconnect solar sensor harness
connector.

 -

Remove radio. See 


650 Radio

.

 -

Remove front passenger airbag.
See 


721 Airbag System (SRS)

.

 -

Remove glove compartment as
described earlier.

Remove right footwell trim panel (arrow)
by pulling backward to detach from
mounting points.

Note:

Detach electrical harness connector(s)
from panel while removing.

Remove dashboard mounting screw or
expansion rivet (arrow) in lower right


Content   ..  209  210  211  212   ..