BMW 3 (E46). Manual - part 187


  Index      BMW     BMW 3 (E46) - service repair manual 2006 year


Search            


Content   ..  185  186  187  188   ..


BMW 3 (E46). Manual - part 187


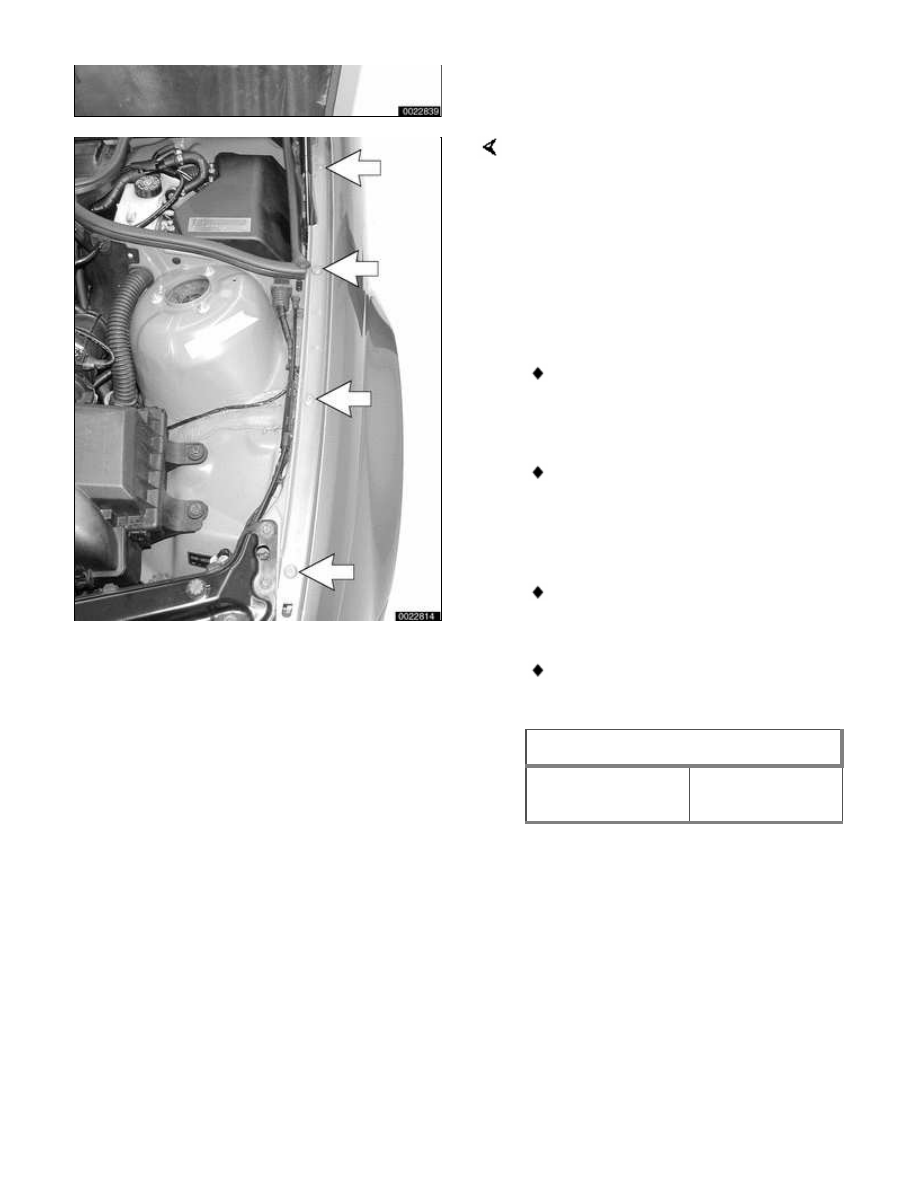
Remove bolts (arrows) along top edge
of fender.

 -

Carefully remove fender from
body.

 -

Installation is reverse of removal,
noting the following:

Before installing new fender, clean
old sealant and protective coating
from mounting surfaces.

Position new fender and loosely
install all mounting bolts. Align
fender with door pillar and inner
fender, then tighten bolts.

Repair any paint damage and
paint any exposed metal.

Reseal and apply protective
coating to mounting surfaces.

Clearance specification

Fender to front
hood or to door

4.25 ± 0.75 mm

(0.167 ± 0.03 in.)

410-3


Engine Hood


Hood, raising to service
position

CAUTION!

Do not switch on the windshield
wipers with the engine hood
raised. As a precaution, remove
the wiper motor fuse. See 


610

Electrical Component Locations

.

The hood is heavy. Before
removing the hood supports, be
sure to have an assistant help
support the hood.

Open hood fully. With the help of a
partner, support hood and remove
retaining clips (arrow) on upper end of
pressurized lifting struts. Pull struts off
hood.

 -

Raise hood higher and install
BMW special tool 51 2 160 in
between hood lift struts and hood
brackets to hold hood in service
position.


Hood, removing and installing

Raise hood:

Disconnect washer fluid hose (A)
from washer nozzles.

Where applicable, disconnect

electrical harness connector (B)
from heated nozzles.

 -

Detach gas-charged hood
supports from hood.

CAUTION!

The hood is heavy. Before removing
the hood supports or hood retaining
bolts, be sure to have an assistant
help support the hood.

Loosen upper hood hinge bolts (A).
Remove ground strap (B) and remove
lower hinge bolts (C). Lift hood off
carefully.

 -

Installation is reverse of removal.

Repair any paint damage and
paint any exposed metal.

Check hood alignment as
described next.

Note:

The hood was fitted and attached to an
unfinished body at the factory.
Unfinished surfaces exposed by this
procedure must be touched up with
paint.


Hood, aligning

When installing the hood, align the
hinges as close to the original painted
surface as possible. Movement of the
hood on its attaching hardware may
require touch-up paint.

The hood should be aligned so that
gap (arrows) to fender is as even as
possible.

Clearance specification

Hood edges to
adjoining body
panel (gap)

5.5 mm (0.216

in.)

If height adjustment at rear of hood
cannot be completed using upper
hinge, loosen lower hinge bolts
(arrows) and reposition as necessary.

Plastic coating on top of hinge stop
screw must not be damaged or
missing.

Stop disk for front of hood (arrow) is
eccentric, and is marked 0-10. Initial
setting is with the 0 setting forward, for


Content   ..  185  186  187  188   ..