BMW 3 (E46). Manual - part 106


  Index      BMW     BMW 3 (E46) - service repair manual 2006 year


Search            


Content   ..  104  105  106  107   ..


BMW 3 (E46). Manual - part 106


Remove housing for interior ventilation
microfilter.

Remove upper cover and
microfilter.

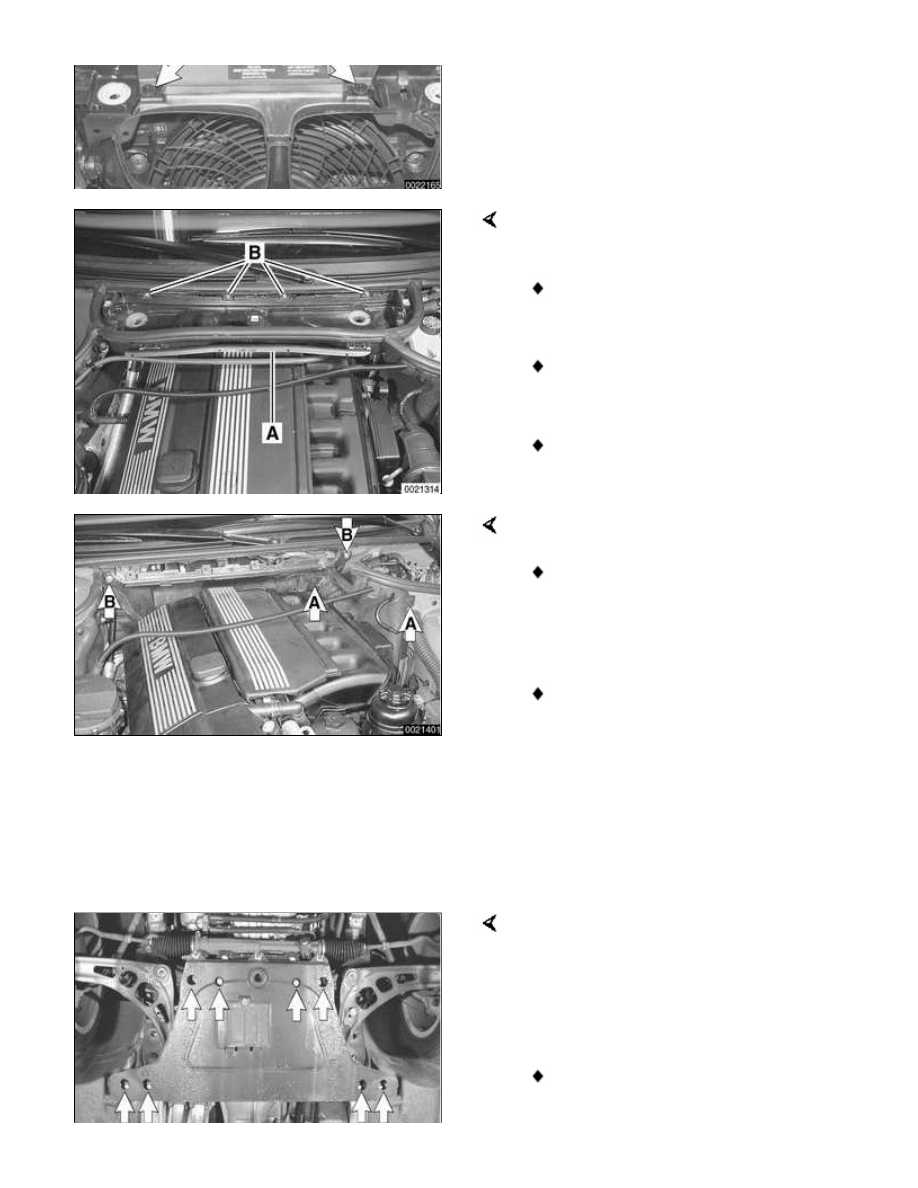
Open wiring harness loom cover
(A) and remove wires.

Unfasten screws (B) and remove
lower microfilter housing.

Remove heater bulkhead cover.

Remove engine compartment side
trim panel. Turn locking knobs (A)
and slide trim panel from
mounting lip.

Remove heater bulkhead cover
mounting screws (B) and lift cover
up and out from firewall.

 -

Raise and safely support vehicle.

 -

Remove engine splashguard from
underside of vehicle.

Remove front suspension
reinforcement bolts (arrows). Remove
reinforcement (coupe shown) and
front axle subframe.

Note:

Tubular style front end
reinforcements are used in rear

wheel drive 3 Series sedans and
wagons built up to 11/00 and
coupes built up to 10/99.

Pan style front end reinforcements
are used on rear wheel drive
sedans and wagons built after
12/00, coupes built after 11/99 and
all convertibles.

All wheel drive models require no
reinforcement due to the
construction of the front subframe.

Attach BMW special tool 11 8 022 to
left and right lower control arms.
Tighten knurled screws until tool
makes contact with engine oil pan.

 -

Support transmission with
transmission jack. Remove
reinforcing cross brace from below
engine/transmission.

 -

Disconnect harness connector
from back-up light switch on
transmission.

 -

Remove exhaust system and heat
shield. See 


180 Exhaust

System

 -

Remove driveshaft. See 


260

Driveshaft

.

 -

On all wheel drive vehicles:
Remove transfer case. See 


270

Transfer Case

.

Disconnect shift rod from selector shaft
coupling.

 -

Disconnect shift console from top

of transmission. See 


250

Gearshift Linkage

.

 -

Unbolt clutch slave cylinder from
side of transmission. Do not
disconnect fluid hose. Suspend
slave cylinder from chassis using
stiff wire.

CAUTION!

Do not operate clutch pedal with
slave cylinder removed from
transmission.

 -

Loosen knurled screws of BMW
special tool 11 8 022 until
transmission/engine assembly is
just above, but not in contact with
fire wall and heater connections.

CAUTION!

Tilting the engine to lower the
transmission can lead to damage to
various components due to lack of
clearance at rear of engine -Remove
brake fluid reservoir if necessary.

Remove transmission mounting
Torx-head bolts (arrows). Note length
and location of bolts.

 -

Remove transmission by pulling
backward until the transmission
input shaft clears the clutch disc
splines, then pull downwards.
Lower jack and remove
transmission.

Installation is reverse of removal,
keeping in mind the following:

When installing a new
transmission, be sure to transfer
parts from old transmission if
applicable.

Thoroughly clean input shaft and
clutch disc splines. Lightly
lubricate transmission input shaft
before installing.

Be sure bellhousing dowels
(arrows) are correctly located.

Center rear of transmission in
driveshaft tunnel before tightening
transmission support bracket.

Always replace front end
reinforcement mounting fasteners
on vehicles equipped with the
plate style reinforcement.

Note:

Torx-head mounting bolts should
always be used with washers to prevent
difficult removal in the future.

 -

Install driveshaft and preload
center bearing bracket. Use new
nuts when mounting driveshaft to
transmission/flex disc and final
drive. See 


260 Driveshaft

.

 -

Refill transmission with
appropriate lubricant before
starting or towing the car. See 

Transmission Fluid Service

 earlier

in this repair group.

Tightening torques

Front end reinforcement to chassis
and subframe (M10)


Content   ..  104  105  106  107   ..