BMW 3 (E46). Manual - part 79


  Index      BMW     BMW 3 (E46) - service repair manual 2006 year


Search            


Content   ..  77  78  79  80   ..


BMW 3 (E46). Manual - part 79


 -

Raise car and support in a safe
manner.

WARNING!

Make sure the car is stable and well
supported at all times. Use a
professional automotive lift or jack
stands designed for the purpose. A
floor jack is not adequate support.

 -

Remove under-engine splash
guards.

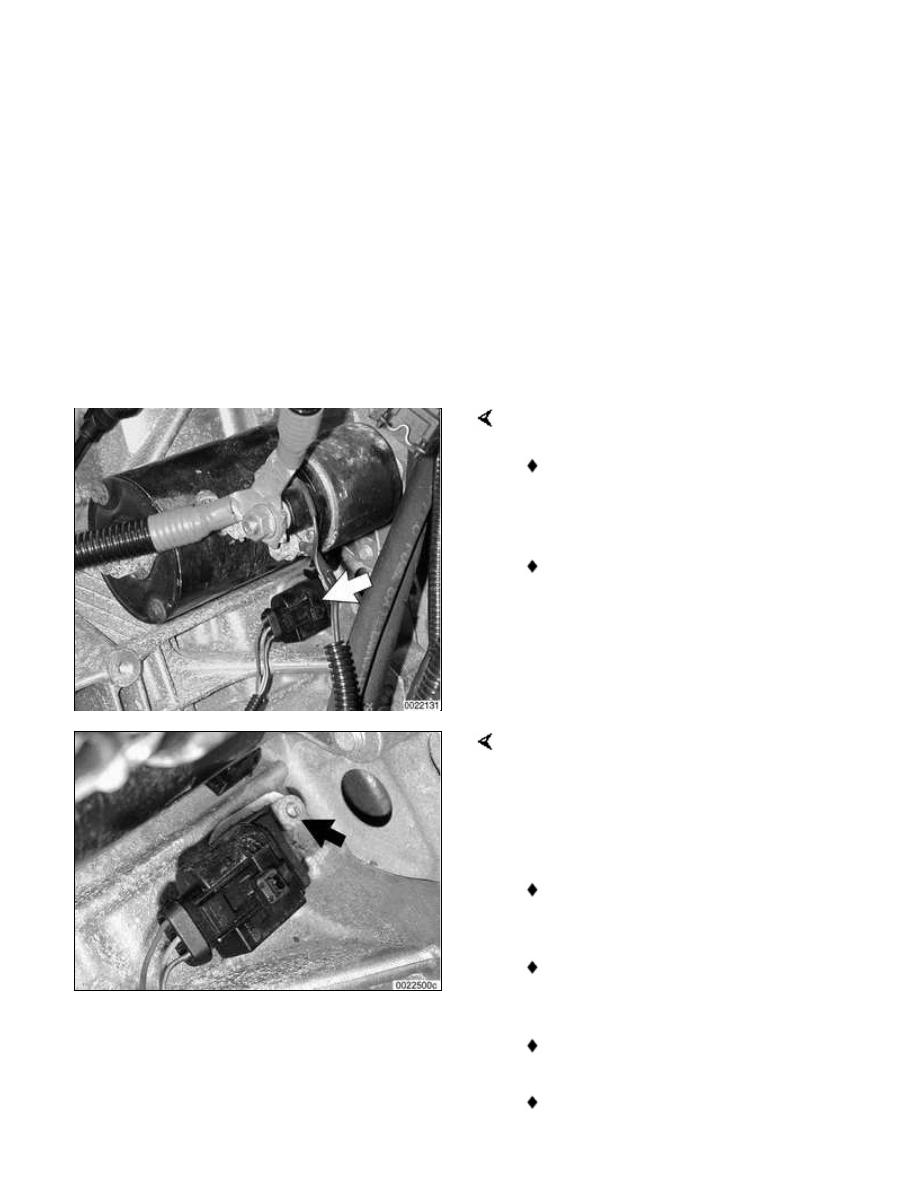
Working just underneath starter:

Cut off wire tie securing crankshaft
speed sensor harness connector
(arrow) to sensor.

Disconnect harness connector.

Remove sensor mounting screw (arrow)
and remove sensor from cylinder block.

 -

Installation is reverse of removal,
noting the following:

Use a new O-ring when installing
sensor.

Be sure wiring is rerouted in same
orientation.

Secure sensor using new wire ties.

Use scan tool to read out and clear

ECM fault memory.


Camshaft position sensors

The camshaft position sensors are used
by the engine management system for
VANOS control, sequential fuel injection
and knock control.


Intake camshaft position
sensor, replacing

 -

Make certain ignition has been
turned off.

 -

Remove housing for the microfilter
for interior ventilation as shown
earlier.

 -

Remove plastic cover from above
fuel injectors by prying off bolt
covers and removing cover
mounting bolts.

Remove complete air filter housing:

Disconnect electrical harness
connector on mass air flow sensor
(B).

Detach vacuum line at intake boot
(A).

Remove filter housing mounting
screws (D).

Loosen hose clamp at intake boot
and detach air duct connections
(C).

Disconnect cold air duct tube (E).

 -

Disconnect harness connector
from VANOS solenoid and unscrew
solenoid from VANOS control unit.
Be prepared with shop rags to
catch oil released from VANOS
unit.

Remove camshaft sensor (arrow) from
left front of cylinder head, next to top of
oil filter housing.

 -

Disconnect camshaft sensor
harness from under intake
manifold. Prior to removal, attach a
stiff piece of wire to the harness
connector end to preserve proper
routing of harness for
reinstallation.

 -

Installation is reverse of removal.

Use new O-rings when installing
sensor and solenoid.

Be sure wiring is rerouted in same
orientation.

Use scan tool to read out and clear
ECM fault memory.

Tightening torques

Intake camshaft
sensor to cylinder
head

5 Nm (3.5 ft-lb)

VANOS solenoid to
VANOS control unit

30 Nm (22 ft-lb)


Exhaust camshaft position

sensor, replacing

 -

Make certain ignition has been
turned off.

Working at front of engine on exhaust
(right) side, detach exhaust camshaft
position sensor electrical harness
connector (arrow).

 -

Remove camshaft sensor from
right front of cylinder head.

 -

Installation is reverse of removal.

Use a new O-ring when installing
sensor.

Be sure wiring is rerouted in same
orientation.

Use scan tool to read out and clear
ECM fault memory.

Tightening torque

Exhaust camshaft
sensor to cylinder
head

5 Nm (3.5 ft-lb)


Knock sensors, replacing

The knock sensors are bolted to the left
side of the cylinder block under the
intake manifold.

 -

Remove intake manifold as
described in 

113 Cylinder Head

Removal and Installation

.

Disconnect knock sensor electrical
harness connector (arrow) on left side
of engine cylinder block.


Content   ..  77  78  79  80   ..