Acura CSX. Manual - part 217


  Index      Acura     Acura CSX - P/NO. 61SNR03 - service repair manual 2006-2009 year


Search            


Content   ..  215  216  217  218   ..


Acura CSX. Manual - part 217


21

22

23

24

13-96

Manual Transmission

12 x 1.25 mm
64 N·m (6.5 kgf·m, 47 lbf·ft)

A

6 x 1.0 mm
12 N·m
(1.2 kgf·m, 9 lbf·ft)

6 x 1.0 mm
12 N·m
(1.2 kgf·m,
9 lbf·ft)

A

B

C

A

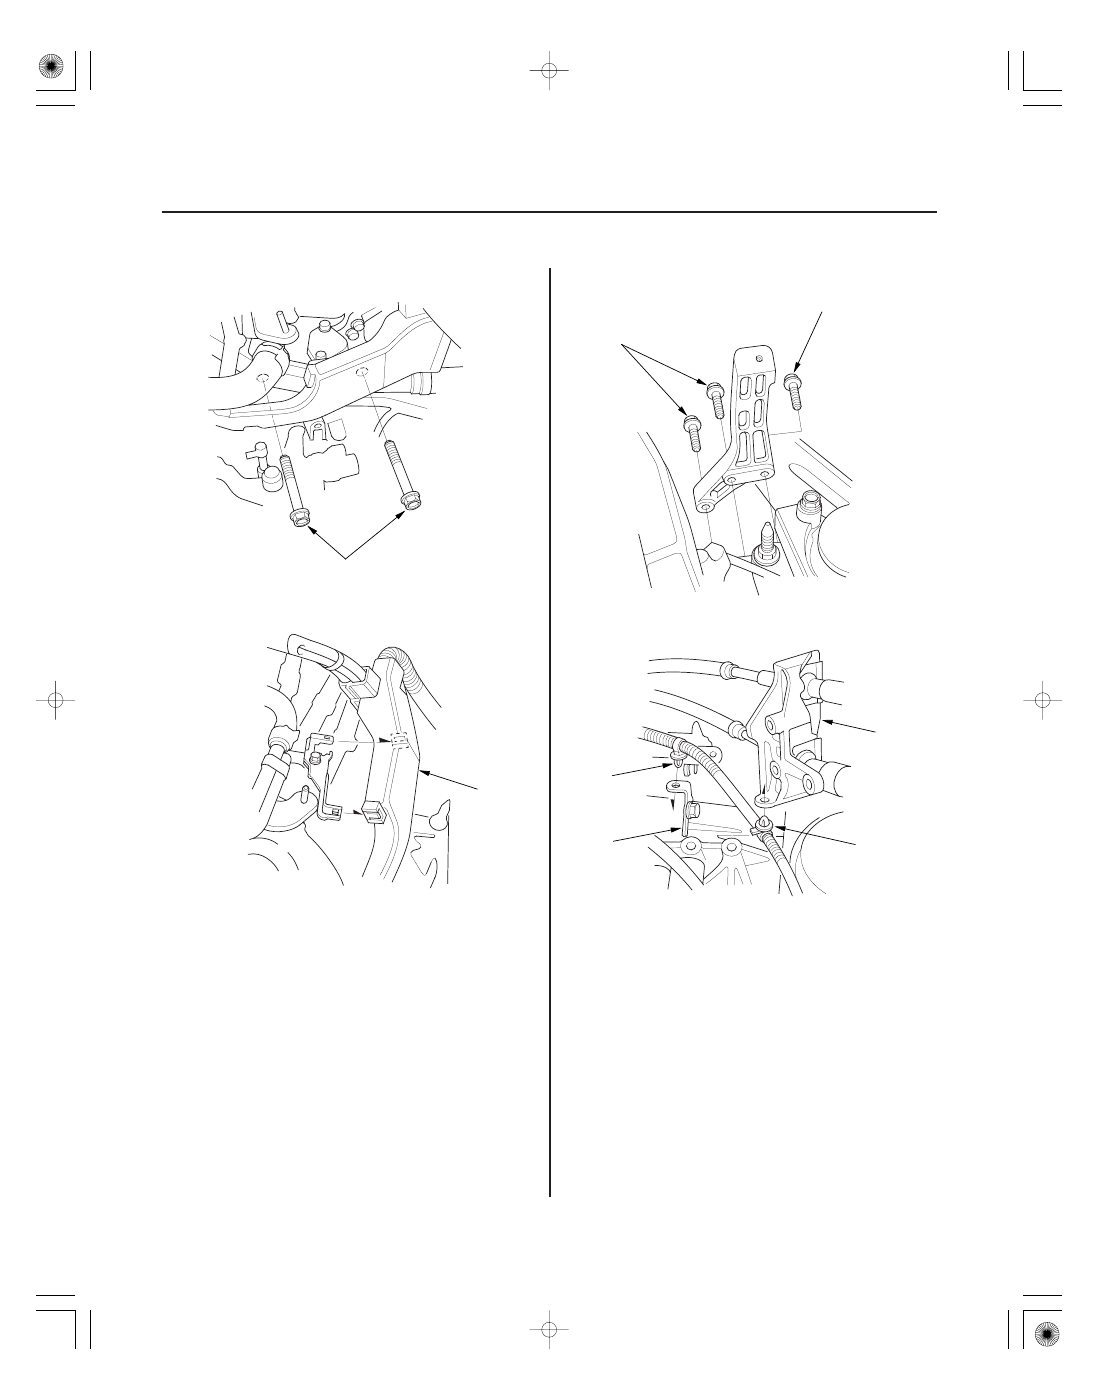
33. Install the two upper transmission mounting bolts.

34. Install the engine harness cover (A).

35. Install the air cleaner housing mounting bracket.

36. Install the harness clips (A) on the shift cable

bracket (B) and the harness bracket (C).

08/08/21 14:47:29 61SNR030_130_0098

*07

*08

26

’06 model

’07-09 models

13-97

8 x 1.25 mm
27 N·m (2.8 kgf·m, 20 lbf·ft)

C

B

C

A

(P/N 08C30-B0234M)

E

D

C

B

C

A

(P/N 08C30-B0234M)

8 x 1.25 mm
27 N·m (2.8 kgf·m, 20 lbf·ft)

A

D

B

C

37. Apply a light coat of silicone grease (P/N 08C30-

B0234M) to the shift cable ends (A).

NOTE: Make sure not to get any silicone grease on
the terminal part of the connectors and switches,
especially if you have silicone grease on your
hands or gloves

38. Install the shift cable bracket (B) and the shift cables

(C), then install new cotter pins (D) or lock pins (E).

39. Connect the back-up light switch connector (A), the

output shaft (countershaft) speed sensor connector
(B), and the reverse lockout solenoid connector (C).
Install the harness clips (D).

Replace.

08/08/21 14:47:30 61SNR030_130_0099

27

28

13-98

Manual Transmission

6 x 1.0 mm
9.8 N·m
(1.0 kgf·m,
7.2 lbf·ft)

8 x 1.25 mm
22 N·m (2.2 kgf·m, 16 lbf·ft)

(P/N 08798-9002)

B

A

6 x 1.0 mm
9.8 N·m
(1.0 kgf·m, 7.2 lbf·ft)

6 x 1.0 mm
9.8 N·m (1.0 kgf·m, 7.2 lbf·ft)

6 x 1.0 mm
9.8 N·m (1.0 kgf·m, 7.2 lbf·ft)

B

A

C

C

D

40. Apply super high temp urea grease (P/N 08798-

9002) to the end of the slave cylinder pushrod.
Install the slave cylinder (A), then install the clutch
line bracket (B). Be careful not to bend the clutch
line.

41. Install the battery base (A) with the coolant

reservoir (B).

42. Install the harness clips (C) and the intake air duct

(D).

43. Install the air cleaner assembly (see page 11-345).

44. Do the battery installation procedure (see page

22-69).

45. Install the under-cowl panel and the cowl cover

(see page 20-163).

46. Check the shift lever and the clutch operation.

47. Check the wheel alignment (see page 18-5).

48. Test-drive the vehicle.

08/08/21 14:47:31 61SNR030_130_0100

*01

SNR9AA9E34150100000LCAT00

Exploded View - Clutch Housing

13-99

Transmission Disassembly

MAINSHAFT ASSEMBLY

COUNTERSHAFT ASSEMBLY

REVERSE IDLER GEAR

BALL BEARING

REVERSE IDLER GEAR SHAFT

14 x 20 mm DOWEL PIN
MAGNET

DIFFERENTIAL ASSEMBLY

OIL GUIDE PLATE C

BEARING SET PLATE

NEEDLE BEARING

28 mm WASHER

28 mm SPRING WASHER

6 mm SPECIAL BOLT

REVERSE SHIFT FORK

SHIFT FORK ASSEMBLY

15 N·m (1.5 kgf·m, 11 lbf·ft)

72 mm SNAP RING

6 mm FLANGE BOLT
12 N·m (1.2 kgf·m, 9 lbf·ft)

35 x 58 x 8 mm OIL SEAL

28 x 43 x 7 mm OIL SEAL

20 mm WASHER

BACK-UP LIGHT SWITCH
29 N·m (3.0 kgf·m, 22 lbf·ft)

20 mm BOLT
44 N·m (4.5 kgf·m, 33 lbf·ft)

CLUTCH HOUSING

Replace.

Replace.

Replace.

08/08/21 14:47:53 61SNR030_130_0101


Content   ..  215  216  217  218   ..