Acura CSX. Manual - part 204


  Index      Acura     Acura CSX - P/NO. 61SNR03 - service repair manual 2006-2009 year


Search            


Content   ..  202  203  204  205   ..


Acura CSX. Manual - part 204


*03

*04

*05

13-38

Manual Transmission

B

A

A

D

E

B

C

B

C

A

D

E

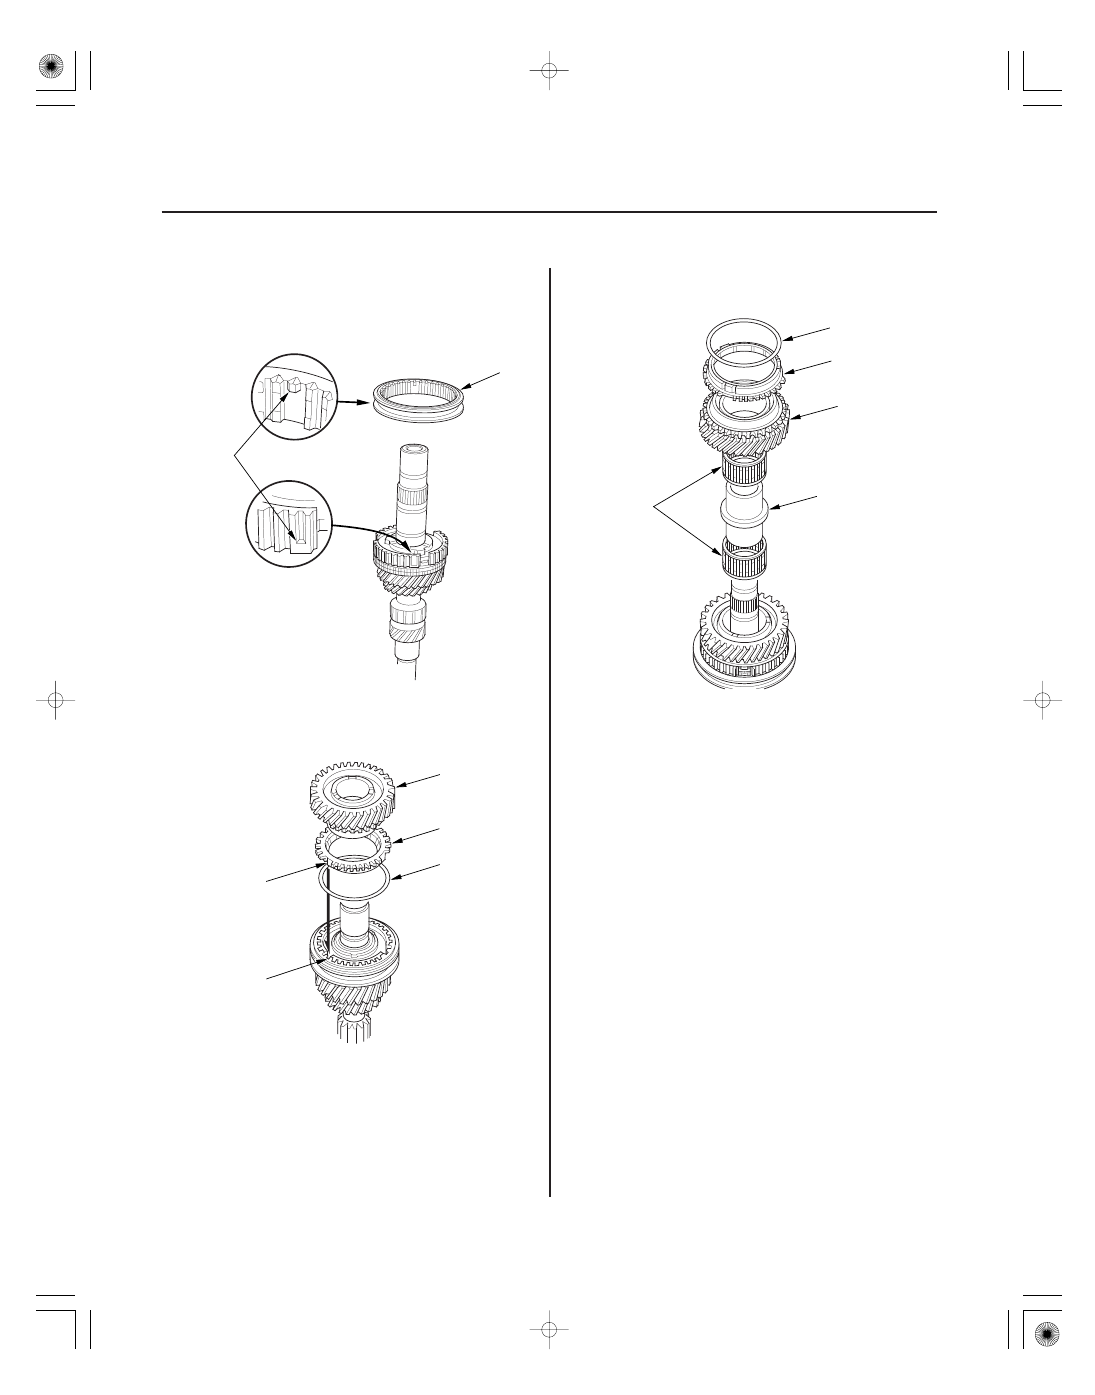
6. Install the 3rd/4th synchro sleeve (A) by aligning

the stops (B) of the 3rd/4th synchro sleeve and the
3rd/4th synchro hub. After installing, check the
operation of the 3rd/4th synchro hub set.

7. Install the synchro ring (A) with the synchro spring

(B) by aligning the synchro ring fingers (C) with the
grooves (D) in the 3rd/4th synchro hub.

8. Install 4th gear (E) on to the synchro ring.

9. Install the 4th/5th gear distance collar (A) with the

needle bearings (B), then install 5th gear (C).

10. Install the synchro ring (D) with the synchro spring

(E) onto 5th gear.

08/08/21 14:45:06 61SNR030_130_0040

*06

*07

*08

13-39

B

C

A

B
07746-0030100

A

C
07746-0030300

B

A

11. Install the 5th synchro hub (A) by aligning the

synchro ring fingers (B) with the grooves (C) in the
5th synchro hub.

12. Press on the 5th synchro hub (A) using the 40 mm

inner driver handle (B), the 30 mm inner bearing
driver attachment (C), and a press.

13. Install the 5th synchro sleeve (A) by aligning the

slots of the 5th synchro sleeve and the 5th synchro
hub (B). After installing, check the operation of the
5th synchro hub set.

NOTE: Make sure to align the slots in the 5th
synchro hub as shown.

08/08/21 14:45:40 61SNR030_130_0041

*09

*10

13-40

Manual Transmission

A

D

E

B

C

F

B
07746-0030100

C
07746-0030300

A

D

14. Install the synchro ring (A) with the synchro spring

(B) by aligning the synchro ring fingers (C) with the
grooves (D) in the 5th synchro hub.

15. Install the MBS distance collar (E) and the tapered

cone ring (F).

16. Press on new angular ball bearing (A) using the

40 mm inner driver handle (B), 30 mm inner
bearing driver attachment (C), and a press (D).

08/08/21 14:45:41 61SNR030_130_0042

01

*01

03

04

SNR9AA8E34150200000MAAT10

Standard:

0.06

0.16 mm (0.002

0.006 in.)

Service Limit: 0.25 mm (0.010 in.)

Standard: 23.03

23.08 mm (0.907

0.909 in.)

Standard:

22.92

22.97 mm (0.902

0.904 in.)

Service Limit: 22.87 mm (0.900 in.)

Standard:

0.06

0.16 mm (0.002

0.006 in.)

Service Limit: 0.25 mm (0.010 in.)

13-41

Countershaft Assembly Clearance Inspection

C

B

A

B

A

C

1. Measure the clearance between 1st gear (A) and

the 1st gear distance collar (B) with a feeler gauge
(C).

• If the clearance exceeds the service limit, go to

step 2.

• If the clearance is within the service limit, go to

step 4.

2. Measure the length of the 1st gear distance collar

as shown.

• If the length is not within the standard, replace

the 1st gear distance collar.

• If the length is within the standard, go to step 3.

3. Measure the thickness of 1st gear.

• If the thickness is less than the service limit,

replace 1st gear.

• If the thickness is within the service limit, replace

the 1st/2nd synchro hub and the reverse gear as
a set.

4. Measure the clearance between 2nd gear (A) and

3rd gear (B) with a feeler gauge (C). If the clearance
exceeds the service limit, go to step 5.

08/08/21 14:45:41 61SNR030_130_0043


Content   ..  202  203  204  205   ..