Snowmobile Ski Doo REV SERIES (2004 year). Manual - part 87


  Index      Snowmobiles / ATV     Snowmobile Ski Doo REV SERIES - service manual 2004 year


Search            


Content   ..  85  86  87  88   ..


Snowmobile Ski Doo REV SERIES (2004 year). Manual - part 87


Section 10 BODY/FRAME

Subsection 01 (BODY)

BODY

INSTALLATION AND
ADJUSTMENT

HEADLAMP BEAM AIMING

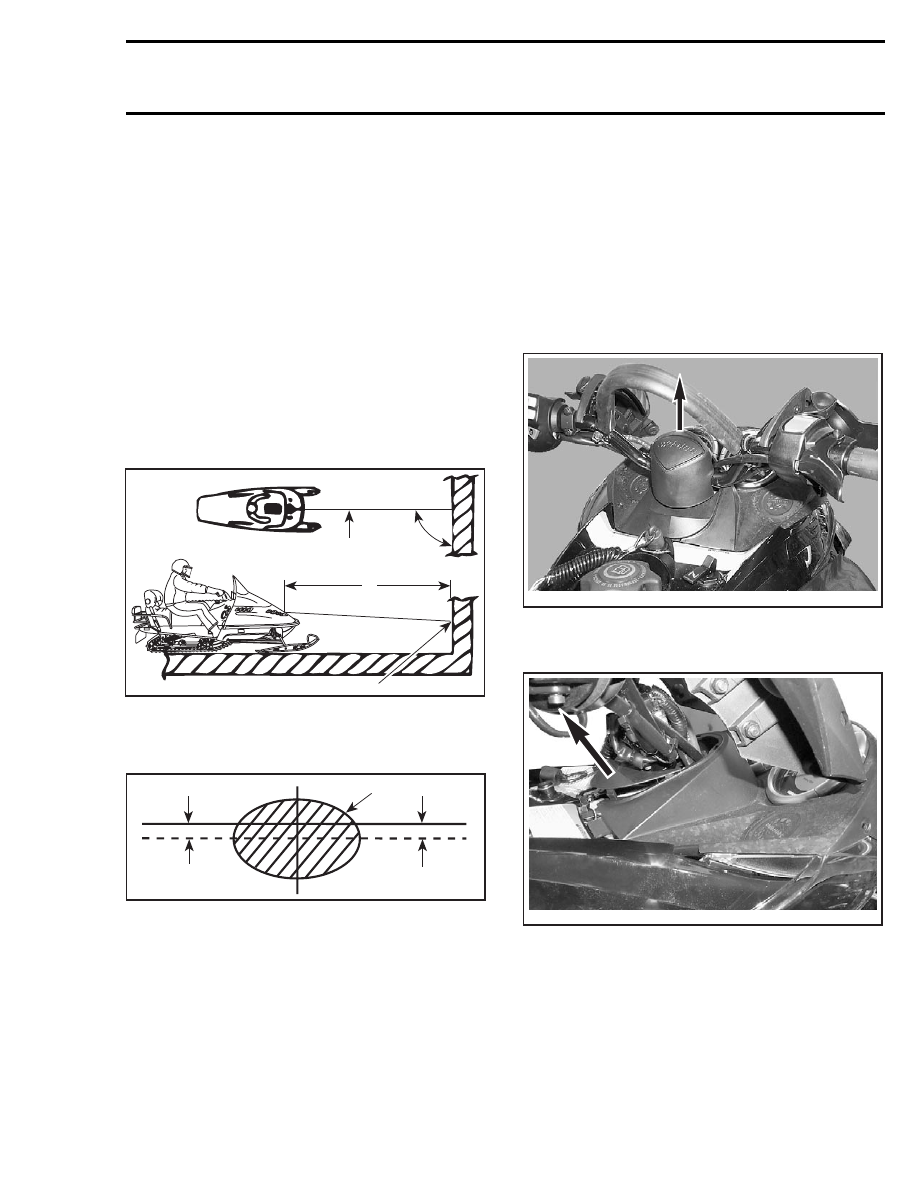
Beam aiming is correct when center of high beam
is 25 mm (1 in) below the headlamp horizontal cen-
ter line, scribed on a test surface, 381 cm (12 ft
6 in) away.

Measure headlamp center distance from ground.
Scribe a line at this height on test surface (wall
or screen). Light beam center should be 25 mm
(1 in) below scribed line.

A02E0AA

1

B

90°

A

TYPICAL
1. Headlamp center line

A. 381 cm (12 ft 6 in)
B. 25 mm (1 in) below center line

A02E07A

2

A

1

3

1. Headlamp horizontal
2. Light beam (high beam) (projected on the wall)
3. Light beam center

A. 25 mm (1 in)

Required Conditions

Place the vehicle on a flat surface perpendicular to
test surface (wall or screen) and 381 cm (12 ft 6 in)
away from it.

Rider or equivalent weight must be on the vehicle.

Select high beam.

BULB REPLACEMENT

Headlamp

If any headlight bulb is burnt, proceed as follows.

Remove windshield. See below.

Pull out steering support cap.

A32H45A

Lift hood.

Pull up front console end cap.

A32H47A

Remove retaining screws and slightly lift front con-
sole.

mmr2004-Rev

343

Section 10 BODY/FRAME
Subsection 01 (BODY)

1

A32H46A

1

1. Remove screws

Unplug gauge connector(s).

Pull front console out.

Unplug burnt bulb connector. Remove the rubber
boot.

Turn bulb retainer ring counterclockwise to unlock.
Detach the bulb and replace.

A32H44A

CAUTION: Never touch glass portion of an
halogen bulb with bare fingers, as it short-
ens its operating life. If by mistake glass is
touched, clean it with isopropyl alcohol which
will not leave a film on the bulb. After lock-
ing ring installation, ensure bulb is properly
secured in place.

Properly reinstall removed parts.

Taillight

If the taillight bulb is burnt, expose the bulb by re-
moving red plastic lens. To remove, unscrew the
2 retaining screws. Verify all lights after replace-
ment.

DECAL

To remove a decal; heat old decal with a heat gun
and peel off slowly.

Using isopropyl alcohol, clean the surface and dry
thoroughly.

Apply liquid soap to new decal and carefully po-
sition the decal. Using a sponge or a squeegee,
remove the air bubbles and surplus water work-
ing from the center toward the edges. Allow to
air dry.

CAUTION: Do not apply isopropyl alcohol or
solvent directly on decals. Use only in a well
ventilated area.

WINDSHIELD

Pull windshield one side at a time as shown to
remove it.

A32H48A

Remove protective film when installing a new
windshield.

Apply liquid soap on grommets prior to installing
windshield to ease pin insertion.

344

mmr2004-Rev

Section 10 BODY/FRAME

Subsection 01 (BODY)

1

A32H49A

1. Grommets

Position the windshield on the windshield sup-
ports then push it down until the pins are fully in-
serted into the grommets.

GUARD

Disassembly and Assembly

NOTE: For additional information (ex.: exploded
view) refer to the correspondent Parts Catalog.

WARNING

Engine should be running only with guard
well secured in place.

Inspection

Check guard mounting bosses, clips and retainers
for wear.

WIRING HARNESS

WARNING

Ensure all terminals are properly crimped on
the wires and that all connector housings are
properly fastened. Keep wires away from
any rotating, moving, heating and vibrating
parts. Use proper fastening devices as re-
quired.

CABLES

WARNING

Before installation, ensure that all cables are
in perfect condition. Properly install the cable
ends and secure them in place. Pay attention
to route them properly, away from any rotat-
ing, moving, heating or vibrating parts.

TUBING

WARNING

Always ensure that the fuel, vent, primer, im-
pulse, injection oil and rotary valve oil lines
are properly fixed to their connectors, that
they are not perforated or kinked and that
they are properly routed away from any rotat-
ing, moving, heating or vibrating parts. Also
check for leaks. Replace if required.

NOTE: Refer to proper Parts Catalog to find suit-
able clip part numbers.

PLASTIC MAINTENANCE
AND REPAIR

MAINTENANCE

Clean the vehicle thoroughly, removing all dirt and
grease accumulation.

To clean use a soft clean cloth and either soapy
water or isopropyl alcohol.

To remove grease, oil or glue use isopropyl alco-
hol.

CAUTION: Do not apply isopropyl alcohol or
acetone directly on decals.

CAUTION: The following products must not be
used to clean or wax any of the plastic compo-
nents used on the vehicles:

– gasoline
– brake fluid
– kerosene
– diesel fuel
– lighter fluid
– varsol
– naphtha
– acetone

mmr2004-Rev

345

Section 10 BODY/FRAME
Subsection 01 (BODY)

– strong detergents
– abrasive cleaners
– waxes containing an abrasive or a cleaning

agent in their formula.

Apply wax on glossy finish only. Protect the ve-
hicle with a cover to prevent dust accumulation
during storage.

CAUTION: If for some reason the snowmobile
has to be stored outside, it is preferable to
cover it with an opaque tarpaulin. This will
prevent the sun rays from affecting the plastic
components and the vehicle finish.

REPAIR

The very first step before repairing plastic materi-
als is to find out exactly which type of material is
involved.

CAUTION: Some repair products are not com-
patible with certain plastics.

WARNING

Polycarbonate windshields must never be re-
paired by welding or otherwise.

For hood repair, refer to a specialized shop.

The following company provides a complete line
of products to repair plastic materials:

CREST
INDUSTRIES,
INC.Trenton, MI
48183

Phone: 734-479-4141
Toll Free: 1-800-822-4100
Fax: 1-800-344-4461
Fax: 734-479-4040
E-Mail:
info@crestauto.com
www.crestauto.com

346

mmr2004-Rev


Content   ..  85  86  87  88   ..