Snowmobile Ski Doo REV SERIES (2004 year). Manual - part 13


  Index      Snowmobiles / ATV     Snowmobile Ski Doo REV SERIES - service manual 2004 year


Search            


Content   ..  11  12  13  14   ..


Snowmobile Ski Doo REV SERIES (2004 year). Manual - part 13


Section 02 MAINTENANCE

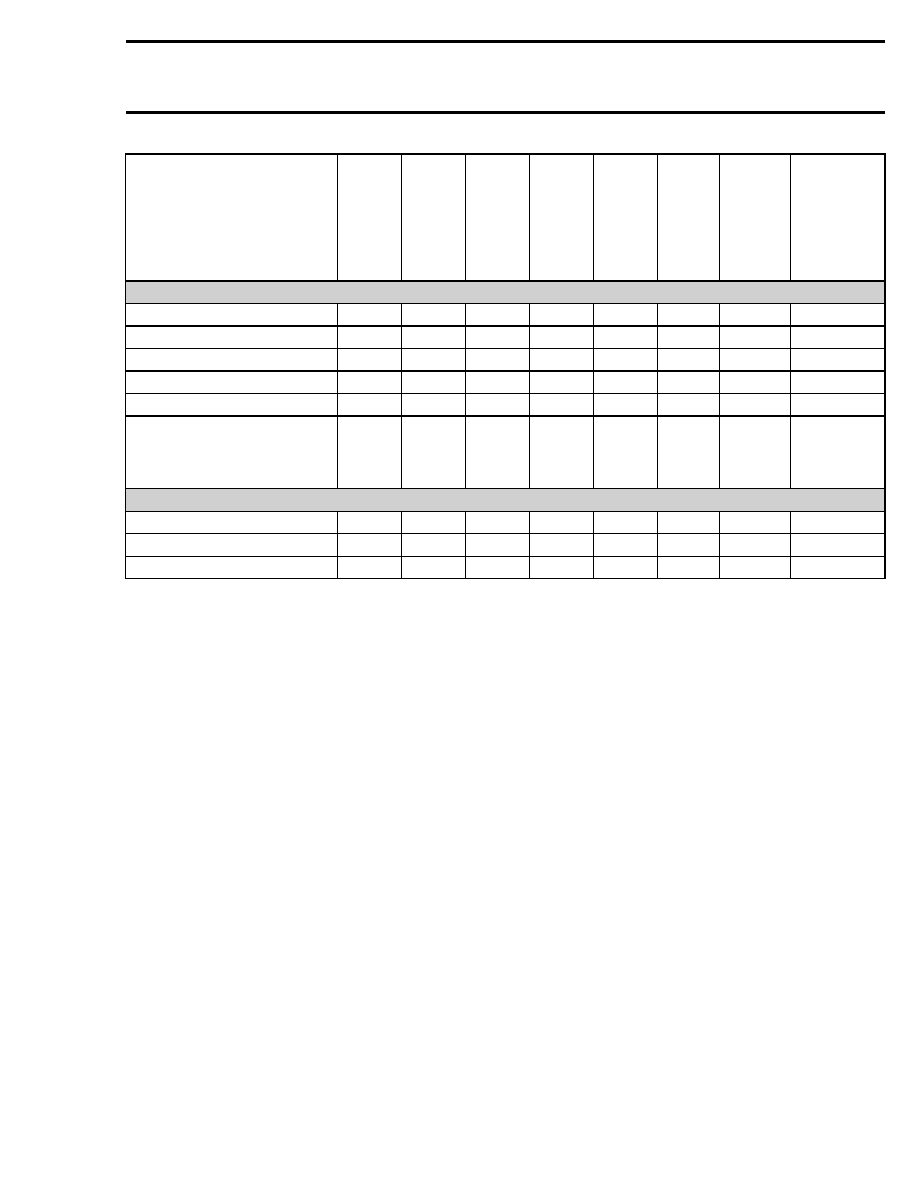
Subsection 01 (MAINTENANCE CHART)

I:

Inspect, verify, clean, adjust,
lubricate or replace if necessary

C:

Clean

L:

Lubricate

R:

Replace

A:

Adjust

10 h

or

500 km

(300 m.)

(1)

Weekly

or

240 km

(150 m.)

Monthly

or

800 km

(500 m.)

Once

a year

or

3200 km

(2000 m.)

6000 km

(3700 m.)

Storage

(1)

Preseason

preparation

(1)

Refer to the

following

subsection(s)

ELECTRICAL

EMS Fault Codes

(4)

I

I

05-03

Spark Plugs

(3) (4)

I

I

R

05-02 and 07-02

Battery (if so equipped)

I

I

I

I

05-02 and 07-03

Headlamp Beam Aiming

A

A

10-01

Wiring Harnesses, Cables and Lines

(4)

I

I

I

10-01

Operation of Lighting System (HI/LO
beam, brake light, etc.) Test Operation
of Engine Cut-Out Switch and Tether
Cut-Out Switch

I

I

I

Operator’s Guide

VEHICLE

Rags in Air Intake and Exhaust System

R

C

02-02 and 02-03

Engine Compartment

C

C

C

02-02

Vehicle Cleaning and Protection

C

C

C

02-02

(1) To be performed by an authorized Ski-Doo dealer.

(2) Lubricate whenever the vehicle is used in wet conditions (wet snow, rain, puddles).

(3) Before installing new spark plugs at preseason preparation, it is suggested to burn excess storage oil by starting the engine

with the old spark plugs. Only perform this operation in a well-ventilated area.

(4) Emission-related

mmr2004-Rev

31

Section 02 MAINTENANCE

Subsection 02 (STORAGE)

STORAGE

GENERAL

Proper snowmobile storage is a necessity during
the summer months or when a vehicle is not being
used for more than one month.

Refer to storage column from MAINTENANCE
CHART jointly with the present storage proce-
dure in order to cover each and every aspect of
the snowmobile storage procedure. Any worn,
broken or damaged parts should be replaced.

WARNING

Unless otherwise specified, engine should be
turned off for storage procedure.

FUEL STABILIZER

With the new fuel additives, it is critical to use
the fuel stabilizer (P/N 413 408 600) (250 mL) to
prevent fuel deterioration, gum formation and fuel
system components corrosion. Follow manufac-
turer’s instructions for proper use.

Pour fuel stabilizer in fuel tank prior to starting en-
gine for internal parts lubrication so that stabilizer
flows everywhere in fuel system. Fill up fuel tank
completely. Ensure there is no water inside fuel
tank.

CAUTION: Should any water be trapped inside
fuel tank, severe internal damage will occur to
the fuel injection system (if so equipped).

After engine starting, use primer several times so
that stabilizer flows inside it.

Do not drain fuel system.

CAUTION: Fuel stabilizer should be added prior
to engine lubrication to ensure carburetor pro-
tection against varnish deposit.

WARNING

Fuel is inflammable and explosive under
certain conditions. Always work in a well
ventilated area. Do not smoke or allow open
flames or sparks in the vicinity. Fuel tank
may be pressurized, slowly turn cap when
opening. Never use an open flame to check
fuel level. When fueling, keep vehicle level.
Do not overfill or top off the fuel tank and
leave vehicle in the sun.

As temperature

increases, fuel expands and might overflow.
Always wipe off any fuel spillage from the
vehicle. Periodically inspect fuel system.

ENGINE LUBRICATION

NOTE: Be sure to add fuel stabilizer before start-
ing the engine.

Engine internal parts must be lubricated to protect
them from possible rust formation during the stor-
age period.

Proceed as follows:

Start the engine and allow it to run at idle speed
until the engine reaches its operating tempera-
ture.

WARNING

Ensure the track is free of particles which
could be thrown out while it is rotating.
Keep hands, tools, feet and clothing clear
of track. Ensure no one is standing in close
proximity to the vehicle.

Stop the engine.

Remove air silencers to spray storage oil into each
carburetor/throttle body bore.

Restart engine and run at idle speed.

Inject storage oil until the engine stalls or until a
sufficient quantity of oil has entered the engine
(approximately half a can).

With the engine stopped, remove the spark plug
and spray storage oil (P/N 413 711 600) for Canada
and (P/N 413 711 900) for USA into each cylinder.

Crank slowly 2 or 3 revolutions to lubricate cylin-
ders.

mmr2004-Rev

33

Section 02 MAINTENANCE
Subsection 02 (STORAGE)

Reinstall the spark plugs and the outlet primer
hose or air silencers.

WARNING

This procedure must only be performed in a
well-ventilated area. Do not run engine dur-
ing storage period.

ENGINE COMPARTMENT

Keep clean of grass, twigs, cloth, etc. These are
combustible under certain conditions.

PULLEY PROTECTION

After inspection and interior cleaning of pulleys,
spray BOMBARDIER LUBE (P/N 293 600 016) on
sheaves. Do not reinstall drive belt.

COUNTERSHAFT LUBRICATION

Driven pulley and brake disc must be floating on
the countershaft for efficient operation. Lubricate
with anti-seize lubricant (P/N 293 800 070).

CAUTION: Do not lubricate excessively as
lubricant could contact and soil brake pads
and/or drive belt.

BATTERY

Remove battery, clean its tray and its exterior sur-
face. Charge battery as explained in BATTERY
section.

VEHICLE CLEANING

To facilitate the inspection and ensure adequate
lubrication of components, it is recommended to
clean the entire vehicle.

Remove any dirt or rust.

To clean the entire vehicle, use only flannel cloths
or equivalent.

CAUTION: It is necessary to use flannel cloths
or equivalent on windshield and hood to avoid
further damaging surfaces to clean.

To clean the entire vehicle, including bottom pan
and metallic parts use Heavy duty cleaner (P/N 293
110 001 (spray can 400 g) and P/N 293 110 002
(4 L)).

CAUTION: Do not use Heavy duty cleaner on
decals or vinyl.

For vinyl and plastic parts use Vinyl & Plastic
Cleaner (P/N 413 711 200 (6 x 1 L)).

To remove scratches on windshield or hood use
BOMBARDIER Scratch Remover Kit (P/N 861 774
800).

CAUTION: Never clean plastic parts or hood
with strong detergent, degreasing agent, paint
thinner, acetone, products containing chlorine,
etc.

Inspect the hood and repair any damage.

Touch up all metal spots with touch-up paint
where paint has been scratched off.

Spray all bare metal parts including shock chromed
rods with BOMBARDIER LUBE (P/N 293 600 016).

Wax the hood and the painted portion of the
frame for better protection. Use a non-abrasive
wax such as silicone wax.

NOTE: Apply non-abrasive wax on glossy finish
only.

RAGS IN AIR INTAKE AND
EXHAUST SYSTEM

Block air intake hole and exhaust system hole us-
ing clean rags.

VEHICLE PROTECTION

Protect the vehicle with a cover to prevent dust
accumulation during storage.

CAUTION: The snowmobile has to be stored
in a cool and dry place and covered with an
opaque but ventilated tarpaulin. This will pre-
vent sun rays and grime from affecting plastic
components and vehicle finish.

Lift rear of vehicle until track is clear of the ground.
Install on a snowmobile mechanical stand.

NOTE: Do not release track tension.

34

mmr2004-Rev

Section 02 MAINTENANCE

Subsection 03 (PRESEASON PREPARATION)

PRESEASON PREPARATION

Proper vehicle preparation is necessary after the
summer months or when a vehicle has not been
used for more than one month.

Refer to preseason preparation column from
MAINTENANCE CHART jointly with the present
preseason preparation procedure in order to cover
each and every aspect of the snowmobile presea-
son preparation procedure.

Any worn, broken or damaged parts found during
the storage procedure should have been replaced.
If not, proceed with the replacement.

WARNING

Unless otherwise specified, engine should be
turned off for preparation procedure.

FUEL FILTER REPLACEMENT

All Models except 593 SDI Equipped Models

Drain fuel tank.

Install a hose pincher (P/N 295 000 076) on supply
hose then, unplug support hose.

Pull out male connector from grommet.

295 000 076

A33I02A

2

1

1. Male connector
2. Grommet

Pull out grommet from fuel tank then, pull out
pickup hose and fuel filter.

1

A33I01A

2

1. Fuel filter
2. Pickup hose

Replace fuel filter and grommet. To facilitate the
installation, grommet should be on smaller diam-
eter of male connector. Install grommet on fuel
tank and push male connector through grommet.

593 SDI Equipped Models

Fuel filter, inlet and outlet hoses come as an as-
sembly.

The fuel filter is located beside the steering col-
umn, next to coolant tank.

Using B.U.D.S. release the fuel pressure. Refer to
COMPONENT INSPECTION AND ADJUSTMENT.

Remove console to gain access to top of fuel
pump module.

Disconnect both ends of fuel filter line.

Unfasten clip retaining fuel line to fuse box sup-
port.

Unscrew the fuel filter support nut then remove
the filter.

The installation is the reverse of removal proce-
dure.

mmr2004-Rev

35


Content   ..  11  12  13  14   ..