Snowmobile Arctic Cat (2008 year). Manual - part 143


  Index      Snowmobiles / ATV     Snowmobile Arctic Cat - service manual 2008 year


Search            


Content   ..  141  142  143  144   ..


Snowmobile Arctic Cat (2008 year). Manual - part 143


7-132

TZ053A

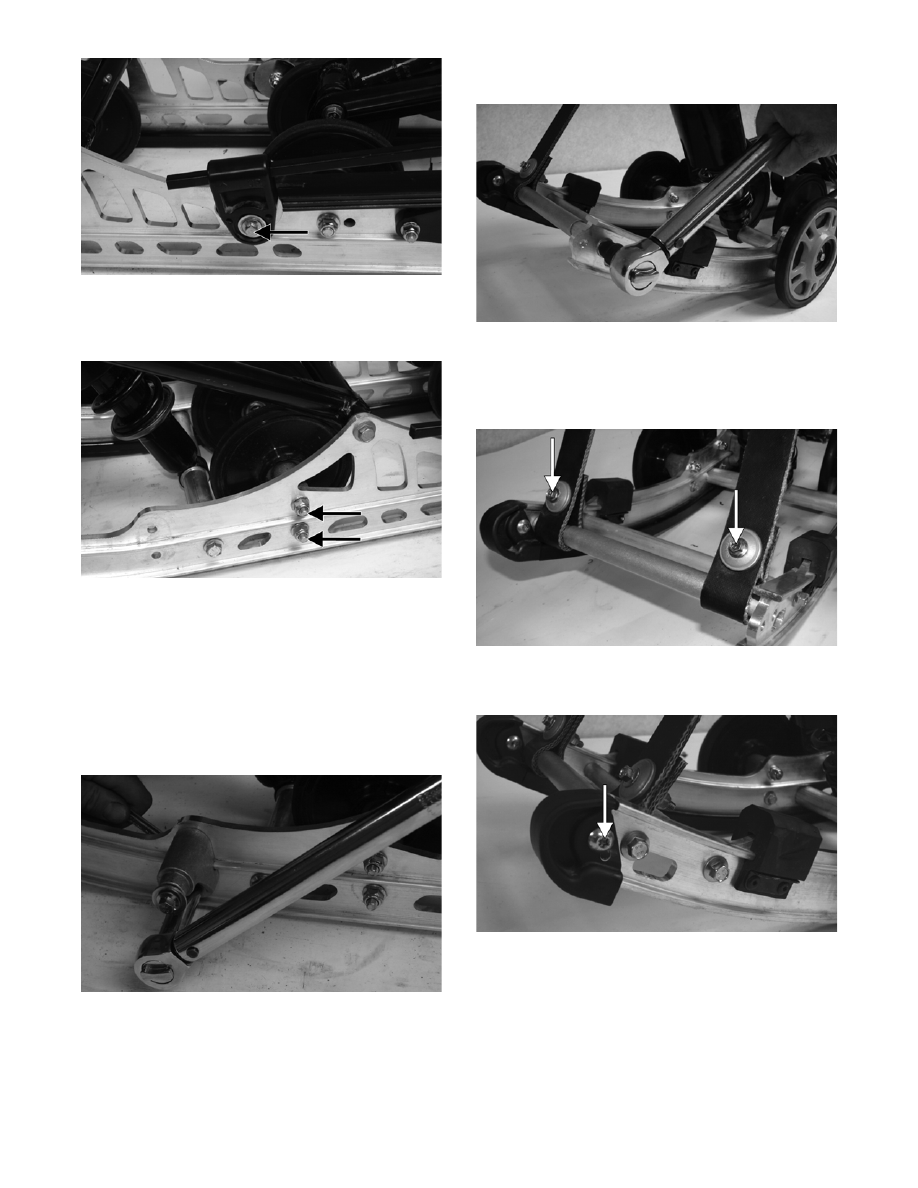
10. Install the inner idler wheel mounting block and

secure with cap screws and lock nuts. Tighten to

20 ft-lb.

TZ035B

„NOTE: To obtain proper alignment for the idler
wheel cap screw, place the cap screw in the top
hole through the rail and mounting block prior to
tightening.

11. Secure the outer idler wheel mounting block with

the cap screw and lock nut. Tighten to 20 ft-lb;

then secure the idler wheel to the mounting blocks

with existing hardware. Tighten to 20 ft-lb.

TZ055

„NOTE: To obtain proper alignment for the idler
wheel cap screw, place the cap screw in the top
hole through the rail and mounting block prior to
tightening.

12. Secure the rail supports with cap screws. Tighten

to 20 ft-lb.

FZ077

13. With the spacer on the front rail support centered

between the limiter straps, secure the straps to the

rail support with the cap screw, washers, and lock

nut. Tighten to 10 ft-lb.

FZ078A

14. Secure the end cap onto the slide rail using a cap

screw and a lock nut. Tighten to 7 ft-lb.

FZ079A

„NOTE: Apply a light coat of grease to the slide
rail surface to aid in installing a new wear strip. If
there are any sharp edges on the lower portion of
the rail, use a file to remove them.

7-133

7

TZ056

15. From the back, start the wear strip onto the rail;

then using a soft hammer, drive the wear strip for-

ward into position. Secure with a torx-head screw

and lock nut. Tighten to 50 in.-lb.

TZ057

FZ026B

16. Install the skid frame (see Installing Skid Frame in

this sub-section).

„NOTE: It is advisable to install the rear arm
springs onto the adjuster blocks after the skid
frame has been installed.

17. Adjust track tension deflection (see Track Tension

in this sub-section) and track alignment (see Track

Alignment in this sub-section).

Installing Skid Frame

1. Place a piece of cardboard on the floor to protect

against scratching and tip the snowmobile onto

one side.

2. Pull the track away from the tunnel and spread

open; then place the skid frame into the track.

3. Position the front of the skid frame into the tunnel

and engage the front arm with the slider axle in the

tunnel.

0742-187

„NOTE: To aid in centering the front arm with the
hole in the tunnel, position the skid frame and
track at a 45° angle to the bottom of the tunnel.

4. Push the rear of the skid frame and the track into

the tunnel.

5. Align the pivot arm assembly with the appropriate

hole in the tunnel. Secure the pivot arm assembly

with a cap screw, lock washer, and flat washer. AT

THIS TIME, TIGHTEN ONLY UNTIL SNUG.

6. Tip the snowmobile onto the other side; then align

the pivot arm assembly with the appropriate hole

in the tunnel. Secure the pivot arm assembly with

a cap screw, lock washer, and flat washer. AT

THIS TIME, TIGHTEN ONLY UNTIL SNUG.

„NOTE: Do not install the short legs of the rear
springs onto the adjusting cams at this time.

! CAUTION

After proper track tension and alignment have been
attained, make certain that the rear axle assembly is
tightened to specifications or component damage
will occur.

7-134

7. At this time, place the snowmobile to the upright

position; then tighten both pivot arm mounting cap

screws securely.

8. Using the Rear Suspension Spring Tool, install the

short legs of the rear springs onto the adjusting

cams making sure the cams are in the same adjust-

ment positions.

9. Tighten the two track tension adjusting bolt evenly

until track deflection is within specifications; then

lock the jam nuts to secure the adjustment.

10. Check track tension deflection and alignment;

adjust if necessary (see Track Tension and Track

Alignment in this sub-section).

Track Tension

CHECKING DEFLECTION

1. Tip the snowmobile on its side.

2. Hook a spring scale around a track clip at mid-

span; then pull the track down with the scale to 9

kg (20 lb) and measure the distance between the

bottom of the wear strip and the inside surface of

the track clip. Track deflection must be within

specifications.

729-429A

„NOTE: If the track is new, it will stretch slightly
and take a “set” within the first 300 to 500 miles of
operation.

ADJUSTING DEFLECTION

1. Place the snowmobile up on a shielded safety

stand. Check to make sure the track is 2-3 in. off

the floor.

2. If the measurement is not as specified, loosen the

jam nuts of the adjusting bolts.

0742-921

3. If the measurement obtained in step 2 is more than

specified, tighten the adjusting bolts. If the mea-

surement obtained is less than specified, loosen

the adjusting bolts. When the measurement is

within specification range, lock the adjustment by

bottoming the jam nuts against the axle housings.

„NOTE: If the track tension must be loosened, it
may be necessary to loosen the rear axle assem-
bly slightly.

„NOTE: Vigorously push the underside of the
track up and down. Track must not hit the top of
the tunnel or slap the skid frame.

4. After correct track tension is obtained, check track

alignment (see Track Alignment in this sub-sec-

tion).

„NOTE: Track tension and track alignment are
interrelated; always check both even if only one
adjustment seems necessary. Always establish
correct track tension before checking and/or
adjusting alignment.

! WARNING

Deactivate all switches.

Rear Suspension Style

Setup

Tension

After Break-In

Tension

FasTrack w/Torque Sensing 
Link (128 in. Track) @ 20 lb

44-51 mm

(1 3/4-2 in.)

51-57 mm

(2-2 1/4 in.)

! CAUTION

After proper track tension and alignment have been
attained, make certain that the rear axle assembly is
tightened to specifications or component damage
will occur.

7-135

7

Track Alignment

„NOTE: Proper track alignment is when the rear
idler wheels are equidistant from the inner drive
lugs on the inside surface of the track.

CHECKING/ADJUSTING

1. Using a shielded safety stand, raise the rear of the

snowmobile off the floor making sure the track is

free to rotate.

2. Start the engine and accelerate slightly. Use only

enough throttle to rotate the track several revolu-

tions. SHUT THE ENGINE OFF.

„NOTE: Allow the track to coast to a stop. Do not
apply the brake because it could produce inaccu-
rate alignment conditions.

3. When the track stops rotating, check the relation-

ship of the rear idler wheels and the inner track

drive lugs. If the distance from the idler wheels to

the inner drive lugs is the same on both sides, no

adjustment is necessary.

0739-637

4. On the side of the track which has the inner drive

lugs closer to the rear idler wheel, loosen the

adjusting bolt jam nut; then rotate the adjusting

bolt clockwise 1-1 1/2 turns.

„NOTE: If the track tension must be loosened, it
may be necessary to loosen the rear axle assem-
bly slightly.

5. Continue to check the track alignment and make

the necessary adjustments until proper alignment

is obtained.

6. After proper track alignment is obtained, lock the

jam nut against the axle housing.

„NOTE: Make sure correct track tension is main-
tained after adjusting track alignment.

„NOTE: Field test the track under actual condi-
tions and, after the field test, check track align-
ment and track tension; adjust as necessary.

! WARNING

The tips of the skis must be positioned against a
wall or similar object for safety. Keep hands, feet,
and clothing away from moving components.

! CAUTION

After proper track tension and alignment have been
attained, make certain that the rear axle assembly is
tightened to specifications or component damage
will occur.


Content   ..  141  142  143  144   ..