Snowmobile Polaris Rush (2010 year). Manual - part 9


  Index      Snowmobiles / ATV     Snowmobile Polaris Rush - service manual 2010 year


Search            


Content   ..  7  8  9  10   ..


Snowmobile Polaris Rush (2010 year). Manual - part 9


37

FEATURES

Instrument Cluster

Rider Information Center

Diagnostic Display Code Definitions
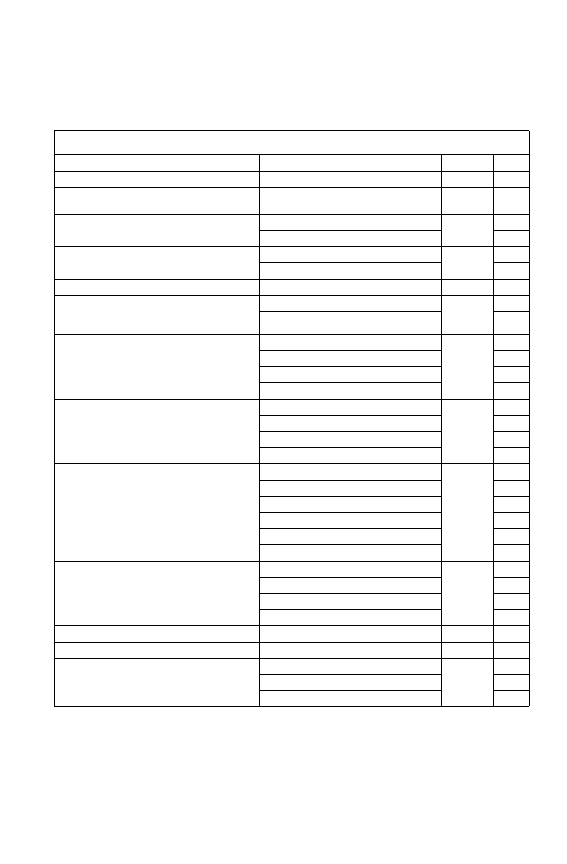
Diagnostic Codes

Component

Condition

SPN

FMI

Ignition Coil Primary Driver 1 (MAG)

Driver Circuit Open/Grounded

1268

5

Fuel Pump Driver Circuit


Driver Circuit Open/Grounded

1347

5

Chassis Relay

Driver Circuit Open/Grounded

520208

5

Driver Circuit Short to B+

3

Exhaust Valve Solenoid

Driver Circuit Grounded

520215

5

Driver Circuit Short to B+

3

ECU Memory

Checksum/CRC Error

628

13

Alternator Power Supply Potential 

(DC-SDI DC Chassis Voltage) (Fuel 

Pump Power)

Voltage Too High

167

3

Voltage Too Low

4

Sensor Supply Voltage 1 (DC-SDI 

TPS/TMAP PWR)

Voltage Too High

3509

3

Voltage Too Low

4

Voltage Above Critical Level

0

Voltage Below Critical Level

1

Sensor Supply Voltage 2 (DC-SDI 

Ground Speed Sensor PWR)

Voltage Too High

3510

3

Voltage Too Low

4

Voltage Above Critical Level

0

Voltage Below Critical Level

1

ECU Output Supply Voltage 2 (DC-

SDI Injection Supply PWR)

Voltage Too High

3598

3

Voltage Too Low

4

Voltage Above Critical Level

0

Voltage Above Warning Level

16

Voltage Below Critical Level

1

Voltage Below Warning Level

18

Throttle Release Signal

Voltage Too High

520194

3

Voltage Too Low

4

Signal Out Of Range

2

Throttle Stuck

7

Knock Level Cylinder 1 (MAG)

Knock Above Critical Level

1352

0

Knock Level Cylinder 2 (PTO)

Knock Above Critical Level

1353

0

Fuel Type Selected

Voltage Too High

524007

3

Voltage Too Low

4

Signal Out Of Range

2

38

THE PERFECT FIT

Suspension Quick Set-Up Guide

The suspension on your RUSH is incredibly easy to adjust to your 

weight and riding style. Just remember three simple steps:
1. Set up rear shock spring preload for rider weight.
2. Adjust the rear spring to tune vehicle balance (ski pressure and 

weight transfer).

3. Adjust shock clickers to tune ride quality (stiffer or softer ride).
The following Quick Set-Up Guide walks you through what you need to 

know to get started, and additional detail is available on the pages 

immediately following the guide. See pages 40-41 for factory and initial 

suspension charts for the standard spring as well as for accessory 

springs that are available for heavier or lighter riders.
Step 1: Set up rear shock spring preload for rider weight.
Before riding for the first time, use the gauge supplied with your snow-

mobile to adjust rear spring preload to the appropriate setting for the 

rider’s weight.
Position the narrow end of 

the gauge flush with the 

spring retainer. Turn the 

spring until the rider’s 

weight setting aligns with 

the silver/red junction on 

the shock body. 
Make no other suspension 

adjustments at this time. 

Test ride the snowmobile 

in various terrain to fully 

experience the existing 

suspension settings before 

making adjustments.

TIP: Initially, heavier riders may want to set the shock clickers 2-4 clicks higher 

than lighter riders.

Spring Retainer

Silver/Red Junction

39

THE PERFECT FIT

Suspension Quick Set-Up Guide

Step 2: Adjust the rear spring to tune vehicle balance.
After the initial test ride, make adjustments to the rear shock spring to 

improve vehicle balance. Increasing preload will increase ski pressure 

and result in less weight transfer for flatter cornering and more precise 

steering response. Decreasing preload will decrease ski pressure and 

result in more weight transfer, or less weight on the skis when accelerat-

ing. 

Step 3: Adjust shock clickers for ride quality.
After making spring adjustments, adjust shock clickers to control bot-

toming. Turning a clicker clockwise increases damping for a stiffer ride 

and less bottoming. Turning a clicker counter-clockwise decreases 

damping for a softer ride.
Test ride the snowmobile and continue making spring and clicker 

adjustments until you achieve the perfect ride.

Ride Experience

Adjustment

See 

Page

Too much weight transfer
•Ski pressure is too light
•Skis push

Turn rear shock 

spring retainer 

clockwise

47

Too little weight transfer
•Ski pressure is too heavy
•Steering is heavy

Turn rear shock 

spring retainer 

counter-clockwise

47

Ride Experience

Clicker

to Adjust

Adjustment

See 

Page

Bottoming in the IFS

IFS shock - after 

150 mi. (240 km) 

break-in

Clockwise

44

Bottoming in the center

Front track shock

Clockwise

46

Bottoming in the rear

Rear shock

Clockwise

47

No bottoming, but ride is 

harsh in front or rear

Rear shock

Counter-clockwise

47

Harsh in chatter/bumps

Rear shock

Counter-clockwise

47

40

THE PERFECT FIT

Suspension Quick Set-Up Guide

Accessory rear shock springs are available for riders of different 

weights. A corresponding gauge is available for each spring type. 
The gauge provided with your snowmobile is calibrated for the stock 

190 spring, which should be used by most riders. Do not change springs 

unless your weight is at the very high or very low end of the 190 stock 

spring rider weight range and adjustments to the factory-installed spring 

have not perfected your ride.
In the following spring guide, the dimension is as measured from the 

spring retainer to the silver/red junction on the shock body. See page 38.

Spring Guide

Stock

190


Spring

Accessory

120 Spring

Accessory

260 Spring

See your Polaris dealer to order an accessory 

spring and the gauge calibrated for that spring.

Rider 

Weight

Dimension

Rider 

Weight

Dimension

Rider 

Weight

Dimension

lbs.

kg

in.

cm

lbs.

kg

in.

cm

lbs.

kg

in.

cm

120

54

2 5/8 

Min

6.7

90

41

2 5/8  6.7

240

109 2 3/8

6.0

130

59

2 3/4

7.0

95

43

2 3/4  7.0

255

116 2 1/2

6.3

140

64

2 7/8

7.3

100

45

2 7/8  7.3

270

122 2 5/8

6.7

150

68

 3

7.6

105

48

7.6

280

127 2 3/4

7.0

160

73

3 1/8

7.9

110

50

3 1/8  7.9

295

134 2 7/8

7.3

170

77

3 1/4

8.3

115

52

3 1/4  8.3

310

141

 3

7.6

180

82

3 3/8

8.6

120

54

3 3/8  8.6

320

145 3 1/8

7.9

190

86

3 1/2

8.9

125

57

3 1/2  8.9

335

152 3 1/4 

Max

8.3

200

91

3 5/8

9.2

130

59

3 5/8  9.2

-

-

-

-

210

95

3 3/4

9.5

135

61

3 3/4  9.5

-

-

-

-

220

100 3 7/8

9.8

140

64

3 7/8  9.8

-

-

-

-

230

104

 4

10.1

150

68

10.1

-

-

-

-

240

109 4 1/8 10.5

155

70

4 1/8 

Max

10.5

-

-

-

-

250

113 4 1/4 

Max

10.8

-

-

-

-

-

-

-

-


Content   ..  7  8  9  10   ..