Snowmobile Polaris High Performance (2001 year). Manual - part 55


  Index      Snowmobiles / ATV     Snowmobile Polaris High Performance - service manual 2001 year


Search            


Content   ..  53  54  55  56   ..


Snowmobile Polaris High Performance (2001 year). Manual - part 55


CLUTCHING

4.48

P-85 Driven Clutch Movable Sheave Large Bushing Installation

NOTE: The P-85 driven moveable has a split bushing.
The bushing is held in place after installation by screws.

11. Insert bushing (PN 3569803) into clutch and tap

lightly with a soft face hammer.

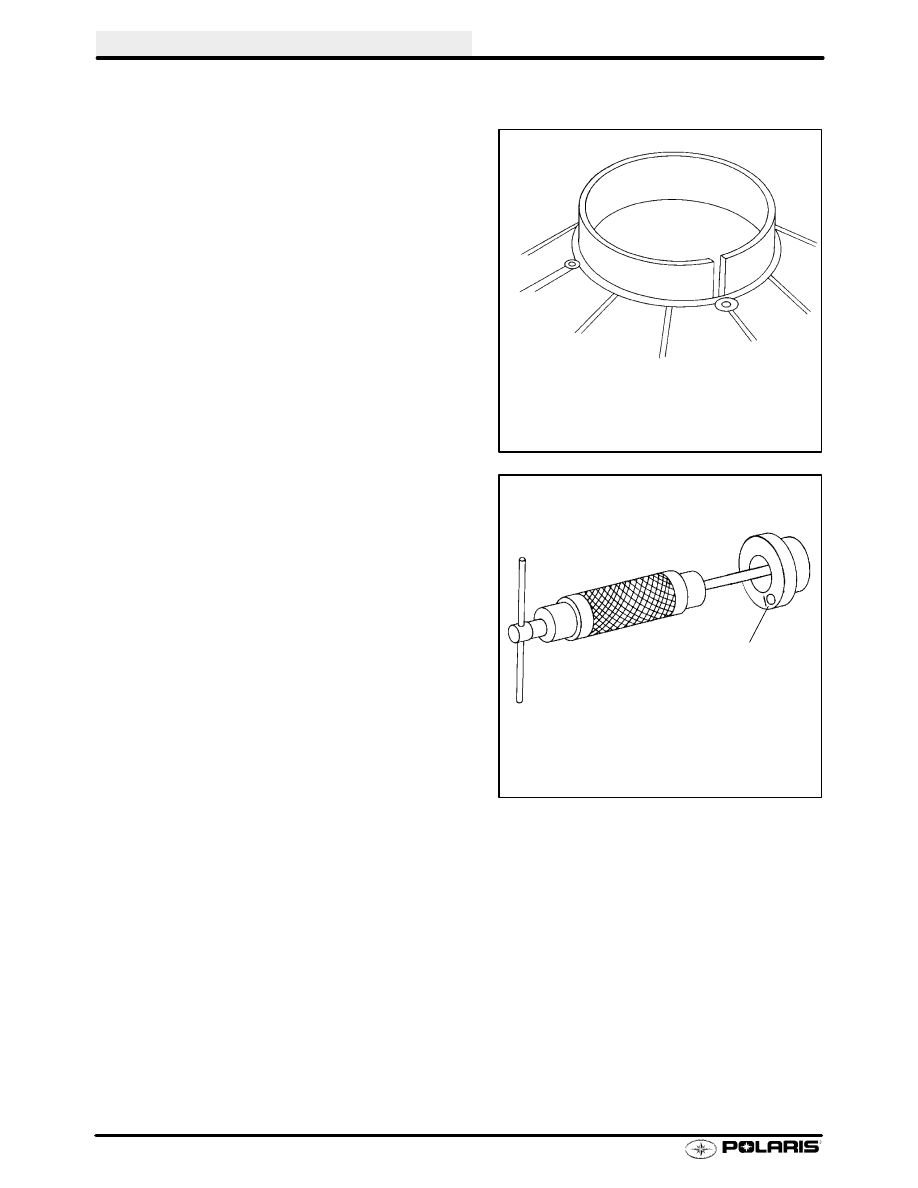
12. Install adapter number two (Item 10) onto puller. See

Ill. 5.

13. Slide clutch sheave onto puller with back side away

from vise.

14. Turn puller barrel until rod extends past back side of

sheave.

15. Insert large installation tool for DU bushing (Item 4)

onto rod.

16. Install nut onto puller rod and hand tighten. Turn

puller barrel to increase tension as needed.

17. Turn clutch sheave counterclockwise until bushing is

seated.

18. Remove nut from puller rod and set aside.

19. Remove installation tool and slide clutch sheave

from puller.

NOTE: The screws hold the bushing in place.

Ill. 4

Ill. 5

Adapter
Number Two

CLUTCHING

4.49

SYMPTOMS

PROBABLE CAUSE

REMEDY

Harsh drive clutch engage-
ment

-Drive belt worn too narrow

-Excessive belt to sheave clearance with
new belt (high performance version with-
out detent shift weight)

-Replace

-Perform belt to sheave clear-
ance adjustment with shim
washers beneath spider

Drive belt turn over

-Wrong belt for application

-Clutch alignment out of spec

-Engine mount broken or loose

-Driven clutch sheaves have excessive
runout, are bent or damaged

-Replace

-Adjust alignment offset

-Inspect, adjust or replace

-Measurement should be tak-
en .25

in from outer circum-

ference on sheave face. Max-
imum allowable tolerance is
.015

(.6 mm).

Noise in drive system

-Broken drive clutch components

-Excessive drive clutch button - tower
clearance

-Bearing failure/ chaincase, jackshaft or
front drive shaft

-Drive chain loose or worn, sprocket teeth
broken

-Driven clutch bushing worn excessively or
spring broken

-Drive chain adjustment too tight/too loose

-Drive belt surface flat spots

-Inspect/replace

-Install new buttons or shim
out existing buttons

-Inspect/replace

-Inspect/adjust or replace

-Inspect/replace

-Inspect/replace

Inspect/adjust

Inspect/replace

Over rev during initial accel-
eration or during heavy pulling
at low ground speeds.

Engine bogs after engage-
ment.

-Spider roller position remaining in detent

-Improper driven clutch setup

-Worn belt

-Excessive belt deflection

-Improper offset/alignment

-Broken or misadjusted torque stop

-Broken motor mount

-Jackshaft bearing seizure

-Add spider shim washers

-Add driven washers

-Reduce gear ratio (chaincase
models)

-Replace

-Subtract driven clutch wash-
ers

-Inspect/adjust

-Inspect/adjust/replace

-Inspect/replace

-Replace

CLUTCHING

4.50

SYMPTOMS

PROBABLE CAUSE

REMEDY

Engine RPM below specified
operating range, although en-
gine is properly tuned

a) Wrong or broken drive clutch spring
b) Drive clutch shift weight too heavy
c) Driven clutch spring broken or installed

in wrong helix location

d) Drive belt too long
e) Improper driven clutch setup

a) Replace with recommended spring

b) Install correct shift weight kit to

match engine application

c) Replace spring; refer to proper

installation location

d) Install new belt and/or adjust belt

tension

e) Install correct parts and/or ad just to

match engine application and ma

chine use

Erratic engine operating RPM
during acceleration or load
variations

Drive clutch binding or driven clutch
malfunction

Converter sheaves greasy; belt slippage

-

Disassemble drive clutch; inspect shift

weights for wear and free operation

Clean clutches; install new belt

-Clean and polish stationary shaft hub;

reassemble clutch without spring to

determine problem area

-Replace ramp buttons

-Inspect moveable sheave for excessive

bushing clearance/replace

Engine RPM above specified
operating range

a) Incorrect drive clutch spring (too high

spring rate)

b) Drive clutch shift weights incorrect for

application (too light)

c) Drive clutch binding
d) Driven clutch binding
e)Converter sheaves greasy; belt slippage
f)Improper driven clutch setup

a) Install proper spring

b) Install proper shift weights

c) Disassemble and clean clutch,

inspecting shift weights and buttons.

Reassemble without the spring to

determine probable cause.

d)-Disassemble, clean and inspect

driven clutch, noting worn sheave

bushing and ramp buttons and helix

spring location

e) Clean clutches; install new belt

f) Install correct parts and/or ad just t o

match engine application and ma

chine use

Burnt Belts / Premature Wear

Also see Belt Wear / Burning
Diagnosis Chart on page 4.37

a) Wrong or broken drive clutch spring
b) Drive clutch shift weight too heavy
c) Driven clutch spring broken or installed

in wrong helix location

d) Drive belt too long
e) Converter sheaves greasy; belt slip-
page.
f) Improper driven clutch setup

a) Replace with recommended spring

b) Install correct shift weight kit to match

engine application

c) Replace spring; refer to proper

installation location

d) Install new belt and/or adjust belt

tension

e) Clean clutches; install new belt

f) Install correct parts and/or adjust to

match engine application and ma

chine use

5

CHAPTER 5
CHASSIS / BRAKES / FINAL DRIVE

2001 Chassis Changes

5.9

. . . . . . . . . . . . . . . . . . . . . . . .

Jackshaft Speed vs MPH Charts

5.1-5.3

. . . . . . . . . . . . . . .

Sprocket / Chain Combinations

5.1--5.3

. . . . . . . . . . . . . . . . .

Hyvo Sprocket Part Numbers

5.4

. . . . . . . . . . . . . . . . . .

Optional Tracks

5.5

. . . . . . . . . . . . . . . . . . . . . . . . . . . . . .

Edge Tunnel (Dual Angle Tunnel)

5.9

. . . . . . . . . . . . . . .

Hydraulic Brake System Overview

5.7

. . . . . . . . . . . . . .

Brake Bleeding / Fluid Change

5.8--5.9

. . . . . . . . . . . . . . . . .

Wilwood

t

Master Cylinder

5.10

. . . . . . . . . . . . . . . . . . . . .

Hayes

t

Master Cylinder Removal

5.11

. . . . . . . . . . . . . .

Master Cylinder Service

5.12-5.19

. . . . . . . . . . . . . . . . . . . . . . .

Brake Pad Replacement

5.20--5.21

. . . . . . . . . . . . . . . . . . . . . . .

Brake Caliper Service

5.22--5.24

. . . . . . . . . . . . . . . . . . . . . . . . .

Drive System Service

5.25

. . . . . . . . . . . . . . . . . . . . . . . . .

Rear Suspension Removal

5.26

. . . . . . . . . . . . . . . . . . . .

Chaincase Removal

5.26--5.27

. . . . . . . . . . . . . . . . . . . . . . . . . .

Jackshaft Removal

5.27--5.28

. . . . . . . . . . . . . . . . . . . . . . . . . . .

Chaincase Assembly

5.29

. . . . . . . . . . . . . . . . . . . . . . . . . .

Jackshaft Assembly

5.29--5.30

. . . . . . . . . . . . . . . . . . . . . . . . . . .

Driveshaft Installation

5.30--5.31

. . . . . . . . . . . . . . . . . . . . . . . . .

Track Intallation

5.32

. . . . . . . . . . . . . . . . . . . . . . . . . . . . . .

Final Assembly

5.36

. . . . . . . . . . . . . . . . . . . . . . . . . . . . . . .


Content   ..  53  54  55  56   ..